
Back in the day when I was writing television scripts (bear with me, this will turn out to be relevant) I learnt about cliffhangers. At the end of an episode you leave the audience wanting to come back for the next helping. A cliffhanger can’t just be a narrative trick—through some freak our hero escapes and all is well again. The “in one bound he was free” solution leaves the punters feeling cheated.
So for me, the cliffhanger was always an opportunity for a narrative hinge-point. The resolution to a cliffhanger should be a turn in the story that shows the main character—or, better still, the whole world of the story—in a surprising new light.
My adventure with the Toshiba FlashAir has been very like that. My starting point, several years ago, was with the EyeFi cards that were typical plug-and-go prosumer products. They were highly proprietary: a special activation code to get it started, and interoperable only with the Californian company’s own software.
I assumed the FlashAir would be much the same sort of thing. But the Japanese are full of surprises. Like a good TV script.
Openness
 THE OPENNESS OF THE FLASHAIR manifested itself within a few minutes of prising the card out of the pack. The storage-WiFi-Web server open standards basics we talked about in part one was encouraging when it came to getting pictures off the camera into any device capable of running a Web browser. But you still seemed to need Toshiba’s own FlashAir Tool to set it up.
And, apart from the undoubtedly useful function of being able to send multimedia over the ether, the scope of the cards seemed limited. The problem I encountered trying to implement Internet passthrough mode, and the shortcomings of FlashAir Drive, left me with the feeling the product was still bounded by the limited vision of a small department in a very large company going through something of a rough time.
But as it turned out I was wrong about this (the limited vision thing, not the rough time—see the House of Cards box below). The first clue I had of this was the discovery that third party developers like Yokin of FlashAirSync fame were pitching in with their own improvements on the software Toshiba and Keenai were providing. They seemed to have no problem finding their way around inside the FlashAir.
A Breath of FlashAir
The discovery of Yokin’s FlashAirSync lead me to an Internet site called the FlashAir Developers’ Forum. It’s not the liveliest technical discussion group I’ve ever encountered, but when I asked there about my Internet pass through problem I got a response within hours.
 I said in part 1 that to fix this “I’d need to change the address of the FlashAir card. But there’s no provision to do this.” However, it turns out this is a trivial task for the FlashAir Developers’ Forum.
I won’t get into the hairier aspects of messing about inside the FlashAir card here. But the information is all there on the forum if you feel inclined to pursue this. To give you a flavour of what’s involved, this is how you change your FlashAir’s IP address.
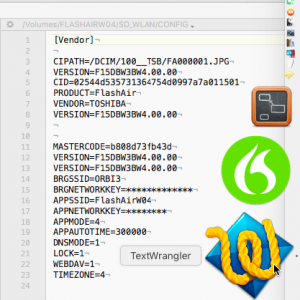
The card keeps much of its setup information in a file called CONFIG. This is the file where the parameters you change with the FlashAirTool app are stored. In keeping with the best practices of well-thought out operating systems, CONFIG is a plain text file, easily editable.
You don’t normally see this file because the SD_WLAN directory it sits in has been given a “hidden” attribute. To get to CONFIG you’ll have to find a way to unhide the directory. There are various techniques for this: on the Mac, the simplest is probably to use the free (and excellent) text editor called TextWrangler (or its newer commercial incarnation BBedit). TextWrangler’s File Open dialogue has a tick box to unhide hidden items, which makes it very easy to fish CONFIG out of the FlashAir card plugged into the MacBook Air’s SD slot.
CONFIG doesn’t explicitly list the default address of 192.168.0.1, but you can override it by writing in a line like this:
IP_Address=192.168.0.80I need to make this change, you’ll remember from part 1, because the default address of the FlashAir is the same as the address of my Virgin Media router. A preferred way would be to allow the FlashAir to fetch this address from the DHCP reservation table of my LAN’s DHCP server. That’s entirely doable but this fixed IP is enough for now.
But out in the field isn’t where I mostly find the need to transfer my files. Back at base with your wireless network, STA mode means:
- The FlashAir is immediately accessible, without having to fiddle with your wireless connection.
- Yokin’s FlashAirSync still works.
- You don’t lose your Internet connection.
Details of the shape of the CONFIG file are in the forum here. A great deal more information about changing the characteristics of the FlashAir card can be gleaned from the forum. Including the solution to that use-case I mentioned at the end of part 1, where you want to transfer photos from your phone to a non-wireless computer.
How?
Getting Ideas Above Its Station
Simple. By default, the FlashAir acts as a wireless access point with its own subnet that can’t connect to your LAN. But once you’ve got your hands directly on that CONFIG file, it doesn’t have to.
Wireless access point (AP) mode is the default as delivered to consumers, and this is the mode it will probably stay in while in the hands of the regular punter because the FlashAirTool app offers only one mode to change it to: that unsatisfactory Internet passthrough mode. But now we have our sticky fingers on the CONFIG file, changing the card from AP mode to STA mode (it becomes a STAtion on your LAN) is a breeze.
I’ll leave the nitty-gritty of this to those of you who care to visit the forum, starting here with details of the CONFIG file. You can explore further with the FlashAir Developers’ Forum tutorials. Here you can learn, for example, how to upload files to the FlashAir.
You may not immediately see the value of that. In fact, it opens up a world of possibilities. One adventurous photographer has used it to create a wireless shutter trigger. The FlashAir card is set to look for a file of a particular name, and when the file appears (transferred wirelessly into the FlashAir card from a remote phone which is running an app for this specific purpose) the FlashAir card triggers the shutter.
The ability to upload also provides a way for owners of devices like non-wireless 3D printers to load and control them remotely.
One More Twist to the Tale
My mention of the adventurous photographer above might have had you wondering how the FlashAir polls for the arrival of a new file, and how, once it’s detected, the card manages to trigger the shutter.
![]() If you suspected there might be something going on in the FlashAir card other than memory, WiFi and the Web server you’ll have guessed right. Hidden away from regular consumers, underneath all this is a fourth element—a small, fast, interpreted scripting language called Lua.
If you suspected there might be something going on in the FlashAir card other than memory, WiFi and the Web server you’ll have guessed right. Hidden away from regular consumers, underneath all this is a fourth element—a small, fast, interpreted scripting language called Lua.
Lua (the name means “moon” in Portuguese) is open source and runs on a huge variety of platforms. In fact, the Lua team says “When we talk about portability, we’re talking about running Lua on all platforms we have ever heard about”.
You won’t need Lua if you’re just sticking to transferring multimedia data from your camera. But if you’re curious about the language, the FlashAir Developers’ Forum has this covered. And there are plenty of other sources available on the Web. For those who know something about programming, this YouTube video might be a good start. For the complete beginner, there’s a painless video introduction to the rudiments here.
Once you get serious, you’ll want to reference the full Lua manual here. Or buy the official hardback (and help out the Lua community) from Amazon.
This easy access to the Lua engine transforms the FlashAir card from a mere replacement for those pioneering but tightly proprietary EyeFi cards into a whole new ball-game. This is what I meant in the intro above when I talked about unveiling the world of the story in a surprising new light. Originally marketed as a small step up from the EyeFi offering, the FlashAir now takes a giant stride into the domain of the Internet of Things.
I won’t be expanding further on Lua here (this review of the FlashAir could easily become a series), but it’s definitely something I intend to catch up on.
A Footnote on Ricoh’s Keenai
You’ll remember that in part 1 I emailed Ricoh’s help desk to clarify whether the Keenai app would continue to work after I’d closed my free 30-day account. When the response came back negative I didn’t wait for the free enrollment to expire. I closed the account on the spot.
And was very surprised to discover that the app still worked. Still lifted images out of my camera, popping up those neat little thumbnails down in the right-hand corner of my MacBook Air’s screen, and slipping them effortlessly into their designated directory.
I wrote back to Garry. Here’s the response:

Thanks, Garry. But now I’ve discovered the total convenience of putting the FlashAir into STA mode, the Keenai Mac app has lost its appeal. The chief problem: it’s hardwired to find the FlashAir at 192.168.0.1. The Keenai app’s Preferences doesn’t offer a way to change this.
And the same applies to the phone apps that Toshiba supplies for Android and iOS. Like Keenai, they assume AP mode and that 192.168.0.1 address. A very short-sighted way to write apps around a product as flexible as the FlashAir.
On my Mate 9 Android phone (the one Chrome use case where Yokin doesn’t work) I get round this by saving a 192.168.0.80 bookmark on my phone’s desktop. With the camera switched on, I just launch the bookmark like an app and get to those pictures straight away.
On my MacBook Air, Yokin’s FlashAirSync—which makes it very easy to change the target IP address—rules!
Conclusion
 The 16GB FlashAir card Toshiba was kind enough to send us (full disclosure: Tested Technology gets to keep it) initially seemed like an approximately straightforward replacement for the Mobi card that died on me a few years ago (or more accurately, was assassinated by EyeFi). Slightly less polished, more fiddly, but OK.
The revelations from the FlashAir Developers’ Forum have changed all that. There’s enough information out there on the Web to show me this is a malleable tool able to add 802.11b/g/n wireless features to practically anything with an SD slot. And, along with storage, to bring with it a Web server, a DHCP server (to hand out IP addresses to connecting devices when they need them), as well as a flexible and fast scripting language that is, I’m promised, simple to learn.
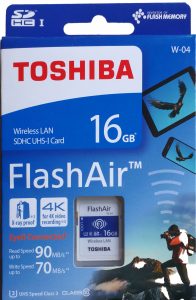
Various iterations of FlashAir are floating around the market. I’d recommend avoiding the first two generations (W-01 and W-02) as they use slower memory and lack some of the features.
The latest version, W-04, reviewed here, has speed ratings of Class 10 and U3. These relate respectively to how fast the card can handle still photos and video shooting. Class 10 means it’s good enough for RAW and U3 will let you shoot video right up to 4K.
But don’t expect those large 4K videos to appear any time soon over that wireless link. These speeds are storage transfer ratings, not wireless speeds.

Look out for those speed markings: U3 (video); C10 (stills) guarantee fast storage speeds.
Wireless-wise, Toshiba is claiming 31.4Mbps speed for the W-04, but this will obviously depend on distance and how you have the card configured. The W-03 is a lot slower in respect of storage but still has all the Lua goodness.
The slower speed rating of the W-03s suggest you should be able to pick them up as bargains. Sadly, no. They start at a capacity of 8GB on eBay for a little under £30, and you might be able to get a 16GB or even 32GB W-03 for not much more. However, eBay’s 16GB W-04 can be had at around the same price if you’re patient.
Officially the W-04 16GBs start at approximately £35 on Amazon. There are no 8GB W-04s and their capacity maxes out at 64GB for about £55.
Chris Bidmead
House of Cards
These cards come with Toshiba’s five-year warranty. But a lot can happen in five years. It’s Toshiba we’re talking about.
EyeFi users who found themselves unceremoniously dumped by the Californian company when it abruptly ceased support for its cards might be inclined to be sceptical about the FlashAir too. True, unlike EyeFi, the Japanese company is massive and far-reaching (from computer chips to nuclear reactors). But it’s recovering from a huge accounting scandal that came to light two years ago.
It gets worse. To cover the cost of a multibillion-dollar writedown at its US nuclear division, Westinghouse, Toshiba is in the process of selling its memory chip business—which includes the FlashAir line of products. Western Digital, which has a 49% stake in this chip business, is in litigation with Toshiba, warning that the sale might violate their contract.
Without the $18bn Toshiba hopes to recoup from the sale of its memory chip division there’s a chance that the whole company could fail. At the time of writing it looks as if a consortium led by Bain Capital that includes a substantial stake from Apple has secured the deal at that price. But the new entity formed by the consortium under the name Pangea has yet to clear the anti-trust hurdle, and possible continued legal action from Western Digital.
Unlike the EyeFi cards, FlashAir seems to be a good deal more open as far as its firmware is concerned. Whether that openness and the FlashAir Developers’ Forum will continue under Pangea remains to be seen.