
If you have a SIM-free phone and install a PAYG SIM from a service provider, the chances are that it will be a Triple SIM, the sort that is a (now more or less obsolete) full-sized SIM with perforations that allow it to be broken out into a microSIM or a nanoSIM, depending on the size your phone requires.
SIMs can be made like this because the essential components are small enough to fit inside the nanoSIM core area. The plastic surrounding this in a microSIM or full-sized SIM is just physical filler. If you were working up from the nanoSIM, you’d call the larger plastic shapes around it “shims”. And in fact you can do this. If you retain your shims you can use them to upsize your nanoSIM to a microSIM or a full-sized SIM.
The Triple SIM is fine idea. But a mammoth Gotcha awaits you if you opt for the microSIM size and are the tiniest bit careless about how you insert it.
 SIM HOLDERS COME IN THREE MAIN KINDS. Phones with sealed backs may have a tiny tray inset into one of the edges that you push out with a supplied pin-like tool. These can be fiddly to fit the SIM into, but if you’re reasonably dextrous they present no great problem.
The same remarks apply to the other kind of edge-located SIM holders that have no tray, simply a slot concealed behind a hinged lid. When you push the SIM into the slot it engages with a click when it’s flush with the edge, allowing you to replace the lid. To remove the SIM you open the lid and push the SIM slightly deeper into the slot with a fingernail until it clicks again, allowing an internal spring to push it out again. This is called a “push-push” SIM connector.
Phones with removable backs may have a different sort of SIM slot that gives you a much better view of what’s happening when you install the SIM. If the battery is removable (not always the case with removable back phones) you will probably have to take it out to slide in the SIM—not at all a bad idea, as this will ensure the phone is switched off.
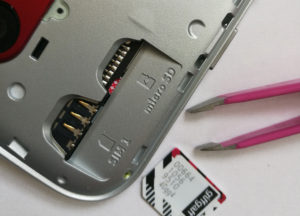 The Moto G (illustrated) has a removable back, but not a removable battery. But in both cases the SIM slot is very similar. You can clearly see the spring contacts that make the electrical connection between the SIM and the phone. These tend to be “push-pull” connectors: to get the SIM out you have to press down on it and pull backwards. Sometimes you may need a pair of tweezers.
These springy contacts are the Gotcha that’s just waiting for you to fumble the insertion of your newly split out microSIM.
The Gotcha
When you slide the microSIM/nanoSIM combination into the SIM slot, it’s easy to find you’ve pressed too hard on the SIM and the centre may just have come slightly out of alignment along one edge. Or—worst case—the nanoSIM centre may have become completely detached and perhaps even fallen out.
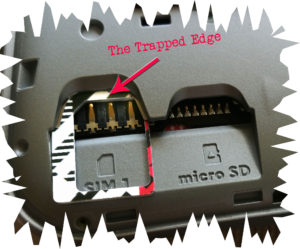 Once you’ve hunted around on the floor and found it, you’ll want to replace it inside the microSD shim. And this is where the problem starts. When you try to extract the the hollow frame of the microSIM shim, very likely you’ll find that it’s now jammed in the phone, the inside edge having caught against the three springy electrical contacts (see picture).
The temptation is to use brute force to pull out the shim. This is easy enough to do and gets the job done, if you define the job as simply getting the shim out. But the springy electrical contacts haven’t been designed to be pulled backwards like this. You’ll bend at least one of them out of shape, or break it off altogether. When you come to reinsert you SIM (or any subsequent SIM) the phone will be unable to recognise it.
Avoiding the Gotcha
Malkeat Badhan, mobile phone engineer with Wileyfox, has encountered this problem. His recommended first approach:
- Gently pull the shim out from the slot as far as you can without using any force.
- Carefully push the nanoSIM core back into the shim
- Push the nanoSIM/microSIM shim combination back into the SIM slot, applying gentle downward pressure on the nanoSIM core so whole assembly slides back into place.
- You should now be able to extract the SIM combination without it catching on the contacts.
I’ve called that a “first approach” because with some kinds of SIM slots it’s hard to reinsert the nanoSIM accurately into the trapped shim. There’s something else you can do if you can actually see the springy contacts inside the SIM holder when the trapped shim is pushed halfway back in.
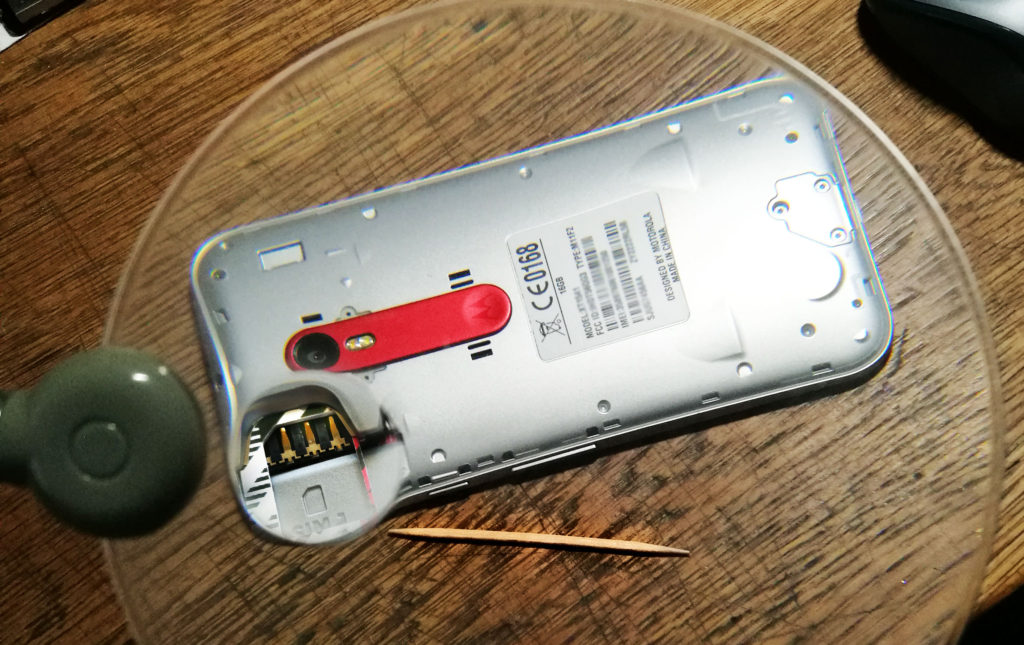 In this case, take a breath, set the phone on a flat surface in good light, equip yourself with a toothpick, get comfortable, and if necessary supplement your eyesight with a good magnifying glass.
You’re going to press down with the toothpick—gently—on each of the springy contacts in turn. Start with the one on the left, and when it’s suitably flattened, wiggle the shim to a position where it holds that contact down. Repeat with the centre contact, being careful that this wiggle keeps the left-hand contact down. Now when you use the toothpick to hold down the right-hand contact you should be able to slide the shim clear of the phone without doing any damage.
Reinsert the nanoSIM into the newly-released microSIM shim and you’re good to go, being careful this time not to press the nanoSIM centre out of the shim.
You might be tempted to secure the nanoSIM centre into the shim with sellotape. DON’T DO THIS. Sellotape running amok inside your SIM slot is going to be serious bad news.
Chris Bidmead: 22 Aug 2016