
While we wait for the major Unraid upgrade that will allow us to dispense with our pseudo Unraid array, we’ve been making a few cautious changes to the LincStation N1 installation we described in part 1. And although it remains without data redundancy, we’ve increasingly come to rely on it for media storage and deployment across the LAN.
This isn’t as stupid as it might sound. One of our key “cautious changes” is the implementation of Syncthing on the N1, which ensures that any data transferred to this Unraid machine gets copied across to the relative security of BTRFS on our Terramaster 4-bay F4-223. We could, of course, simply use the F4-223 directly for media deployment, as indeed we were doing before the N1 arrived. But there’s an excellent reason for bringing the N1 into the loop. And, indeed, making it the Star of the Show!
We’ve been looking at our electricity bill!
 TESTED TECHNOLOGY TOWERS RECENTLY became conscious that the cost of electricity has virtually doubled since the beginning of this decade. As a consequence, we’ve changed our minds about keeping our several NAS devices running 24/7. They’re now on a schedule: one of them comes up once a week, another just once a day in the late evening. One of them remains powered at all times, ready to deliver data whenever it’s needed. That last machine is the LincStation N1.
Once we’d hooked up our Meross smart plugs to all our NASes to check their power consumption, picking the N1 as the always-on choice was a no-brainer. Here are the relative standby power consumption figures, comparing the N1 to the F4-223:
| Approx Average (W) | Daily Power (KWh) | Daily Cost (£) | Extrapolated Annual Cost (£) |
|
|---|---|---|---|---|
| N1 | 9 | 0.19 | 0.05 | 18.25 |
| F4‑223 | 30 | 0.69 | 0.20 | 73.00 |
As discussed in part 1, the LincStation N1 is running Unraid, the NAS operating system bundled with the hardware. But as it’s an all-solid-state device there are some very important limitations.
Classic Unraid —What We Will Miss
A dedicated drive (or pair of drives) for parity checking: that was the single most attractive feature that originally drew Tested Technology to Unraid in 2019. A key point is that the data drives in the array remain truly independent of one another. In ordinary operation a drive spins up only when it’s needed to read or write a file. That drive and the parity drive are the only drives that need to be spinning.
There are just two occasions when all the drives are spinning: when the system is running a parity integrity check* and when Unraid is reconstructing absent data for a removed or corrupt drive. Even the two parity drives, if you’re using two, are independent of one another. One isn’t a mirrored backup of the other; each is checking parity in a different way.
By avoiding the classic RAID strategy of striping data across multiple drives, Unraid offers a couple of important benefits. We’ve already mentioned that the way data are written uncomplicatedly to each drive makes it very simple to remove the drive and read the data off it in another system.
 That’s a very valuable feature if the NAS enclosure hardware fails for some reason. In the course of ordinary operations, Unraid drives are like independent agents in a properly organised spy cell, each drive in its own domain, only active on demand, knowing nothing about any of the other drives in the array.
You can think of this classic Unraid array as a miniature version of the once-popular MAID storage design. The acronym stands for Massive Array of Idle Drives.
The M for Massive in MAID storage can mean hundreds—or even thousands—of hard drives. The energy cost of keeping an array like that running would be nonsensical. That’s where the Idle part comes in. Most of the time they’re not running.
Unraid is comfortable with a dozen or so drives, which hardly qualifies it to be called MAID. But with the rising cost of electricity, even for Unraid-size arrays, running up the drives only on demand can make a lot of sense. The obvious downside is that data delivery is delayed as the drive comes up to speed. But Unraid is a flexible enough proposition to offer ways of speeding up delivery when that’s what you need.
Alas, no more…
 We feel nostalgic about those previous paragraphs, knowing that our new LincStation N1 will probably never be using this original, economical and ingenious parity-checking technology. For reasons we explained in part one, an all-solid-state NAS like the N1 storing its data in NAND cells isn’t the proper place for bit-by-bit parity checking.
That’s OK, because Unraid—with the help of its underlying Linux operating system—has evolved to give us other ways to ensure the integrity of the data it stores. Yes, we’re back with the old-school RAID concepts we thought we were escaping. But the rich variety of the apps and tools that have burgeoned around Unraid during the course of its nearly quarter-century of existence, are carried over into the new era of BTRFS, ZFS array mechanisms. Unraid on SSD loses its unique selling proposition but all those goodies remain.
But Not our LincStation N1
So even without that classic parity-checked main array, a solid-state Unraid NAS can still store data resiliently and redundantly. But that’s not what we done so far with ours. While we await the upcoming Unraid operating system (version 7, we believe) we’re living—deliberately—with a simplistic, barebones implementation of Unraid.
We described in part 1 how our currently implemented Lincstation is just about as elementary as can be. The hardware was delivered with an internal USB holding the Unraid operating system and to this we’ve added only two other storage components. The main one is a single 2TB SSD installed as an unassigned drive. The other is a 2GB USB stick.
 The SSD currently just holds video data it shares across the LAN. The USB stick does… nothing. The current version of the Unraid operating system (6.12.10) insists that there must be a main array. It doesn’t have to include parity checking and doesn’t even need to be running, unless—thanks to a legacy limitation of the current operating system—you want to execute a Docker-contained app.
We’re relying on Syncthing to mirror our multimedia directories over the LAN, so our dummy array has to be running. By default, Docker-based apps like Syncthing are set to use the main array and you can’t install them unless that array is alive and kicking, even if you’re not going to use it. This requires some jiggling of the Syncthing installation configuration.
Installing Syncthing Elsewhere
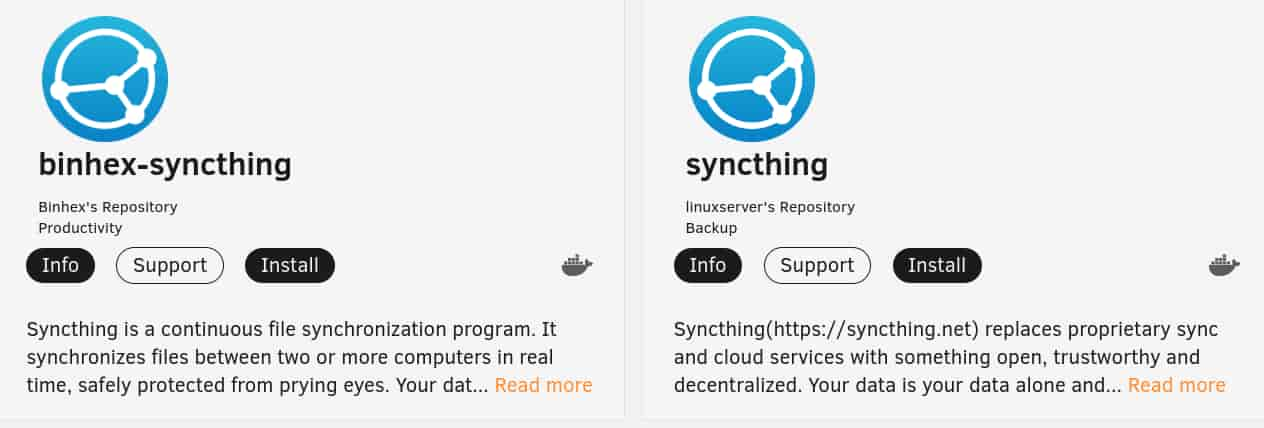
Syncthing is available for Unraid as a choice of two different Dockers, from the binhex repository and the linuxserver repository.
That Dockers are installed by default on the main Unraid array is something that will need to change in the near future when the Unraid array is no longer “main”, gets relegated to the category of “User-defined Pools” and can optionally be left out altogether. But for now, if we want to install a Docker like Syncthing we have to power up our dummy array.
But even so, we can’t install Syncthing on it. Our dummy array isn’t intended for use and is only 2GB in size. By default, the system creates four directories on this primary Unraid array: appdata, domains, isos and system. These are set up to house the Dockers that many of the apps, like Syncthing, deploy.
From the Unraid Manual
appdata– This is the default location for storing working files associated with docker containers. Typically there will be a sub-folder for each docker container.system– This is the default location for storing the docker application binaries, and VM XML templatesdomains– This is the default location for storing virtual disk images (vdisks) that are used by VMs.isos– This is the default location for storing CD ISO images for use with VMs.
Docker is a technique that deploys an application inside an isolating container rather than running it directly using the resources of the operating system. This approach bears some similarity to virtual machines, with the difference that rather than providing all the operating system resources inside the container, a Docker container can remain lightweight by only including resources needed uniquely by the app it is running. Common resources, notably the operating system kernel, that can be relied on to be present, are accessed from outside the container.
This reliance on common resources means that, unlike virtual machines, which can be used to run a guest operating system and its associated applications on an entirely different host operating system (MacOS and Apple apps on a Windows machine, say), a Docker needs to be closely tailored to the operating system it will run on. But if you’re adapting apps to run on a particular operating system, like Unraid, Docker containers are an efficient and safe way to do this.
Apps that run in a Docker container access files in a virtual environment unique to the container. These files are made available to the host operating system by way of a map maintained in the Docker’s configuration. This map can be set up prior to installation by editing the configuration file presented by the Unraid encapsulation of the Docker. If you leave this configuration file alone, by default mappings will be set up to point to the main Unraid array.
This is what made the installation of Dockers on our original 2019 Unraid system such a simple procedure. Unraid’s original array scheme lets you install Docker-based apps from the Community Applications store without needing to know anything about Dockers. But as our new LincStation N1 all-SSD NAS has effectively dispensed with the original array scheme, we now needed to mug up on Dockers.
The two relevant sections of the Binhex Syncthing Docker config look like this:
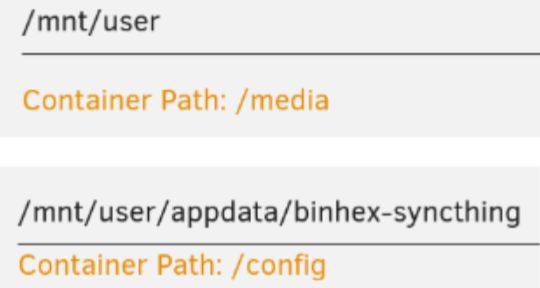
The upper mapping means that Syncthing’s media directory is linked by default to Unraid’s /mnt/user directory. The lower mapping is set to create the Syncthing config file where it can be located by the Unraid administrator (perhaps using the Unraid WebUI console) in /mnt/user/appdata/binhex-syncthing.
A couple of things to note about these maps. Firstly, /mnt/user (not be confused with the /usr standard Unix system directory) is an artifact of the Unraid Linux implementation. In our case it’s actually the same directory as /mnt/disk1, which is Unraid’s main array (our 2GB dummy).
Our investigations into this left us baffled for an embarrassing length of time. They were definitely the same directory because a new subdirectory we created in /mnt/user instantly appeared in /mnt/disk1 but when we looked for symlinks or hard links we couldn’t find any. That was when we learnt about shfs.
shfs
shfs is the power behind the unique way Unraid handles user shares. It turns out to be a command line utility of that name in /usr/local/bin.This is a proprietary application, exclusive to Unraid and indeed one of its core pieces of technology. shfs creates and manages an Unraid-exclusive virtual file system called fuse.shfs.
ChatGPT gave us the low-down:
Primary Functions of shfs in Unraid
- Unified Directory View: Aggregates directories and files from all disks in the array to create a single logical view.
- User Shares Management: Manages user-defined shares that can span multiple physical disks, providing flexibility in how data is stored and accessed.
- Dynamic Allocation: Handles file placement dynamically based on user share settings, including allocation methods, split levels, and disk inclusion/exclusion.
There’s a lot more to be said about shfs.But for present purposes all we need to know is that /mnt/user is a virtual directory that by default aggregates directories and files physically resident elsewhere. In this case, the “elsewhere” is our dummy Unraid array.
If we were just to go ahead and install binhex-syncthing using these default setting we’d risk overflooding our small USB, and in fact this is what happened on our first installation attempt. For our second try we switched to the linuxserver implementation of Syncthing. There seems to be little difference between the two but the fact that the linuxserver version had been updated more recently was our decider.
data1 and data2. There’s no suggestion on the configuration form as to what these directories might be for* but to be on the safe side we mapped them respectively to /mnt/disks/OWC/syncthing/data1 and /mnt/disks/OWC.
This meant that we could use the Docker’s data1 directory for any specific Syncthing transactions by creating a dedicated Unraid directory on the SSD under /mnt/disks/OWC/syncthing/data1. The data2 mapping would allow any Unraid directories on the OWC SSD (where our multimedia files are housed) to be accessible to Syncthing.
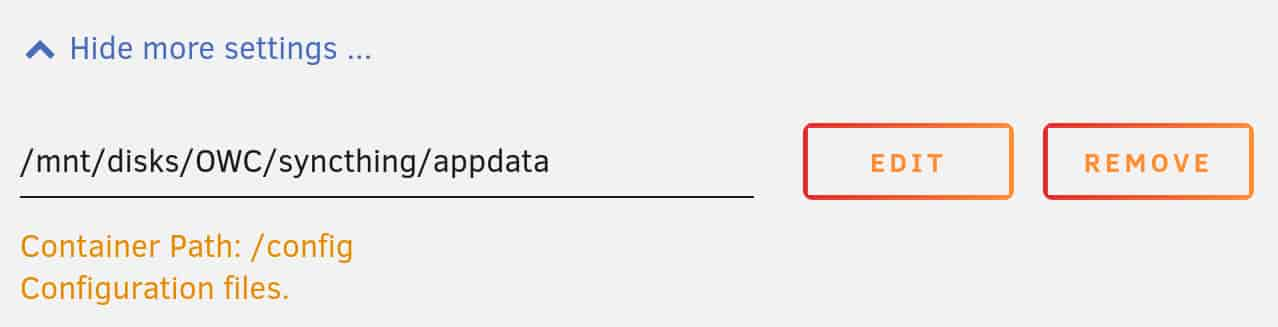
There’s one other key directory that isn’t shown by default in the linuxserver Syncthing config form. We missed this first time around because it’s hidden under Show more settings. This concealed setting defaults to mapping the Docker’s config directory to our dummy array, the USB stick. The fix was to open up the dropdown indicated by the downward pointing chevron and edit the entry to map to our SSD:
With Docker running, we can use the docker command in Unraid’s WebUI terminal emulator to show the mappings between the Syncthing container and the host operating system:
docker inspect -f '{{ range .Mounts }}{{ .Source }} -> {{ .Destination }}{{ println }}{{ end }}' syncthing
The heavy lifting here is done by the docker inspect syncthing part of the command, which produces a json file with full information about the docker. The floral decoration in the middle is there to refine this down to the directory mappings, giving us this:
/mnt/disks/OWC -> /data2
/mnt/disks/OWC/syncthing/appdata -> /config
/mnt/disks/OWC/syncthing/data1 -> /data1
This maps all Syncthing’s Docker directories to the OWC drive, allowing Syncthing to reach our multimedia files stored there. The Docker’s config file will also be accessible under ../syncthing/appdata in case we want to make any manual changes to it.
Syncthing is a magnificent app, well designed for the job it has to do. Its necessary internal complexity is intelligently translated to the user surface for good manageability. Wrapping any app in a Docker inevitably adds further complications but Unraid’s well thought through installation mechanism gives you all the help you need.
In fact, during our first round with Unraid in 2019, when we were using the standard parity-protected main array, the installation process for Dockers was so seamless that we were unaware these were anything other than standard applications. The unconventional configuration we’ve had to adopt for the LincStation N1 has obliged us to delve deeper into the nature of Dockers and learn something (very useful) about Docker directory mappings.
Our current implementation of Syncthing uses the Send→Receive mode, which is straightforward backup of a source directory (set in Syncthing as “Send”) to a Syncthing target directory (set to “Received”). This is different from the default, which makes every participating directory Send+Receive, meaning that any change to either directory is reflected in the other directory.
If you’re new to Syncthing it would probably be a good idea to start with Send→Receive. There’s a gotcha with using Send+Receive to mirror the directories, which we described last year.
The N1 with Unraid (and otherwise)
 An email from LincPlus tells us they’ve heard from many of their users that Unraid is “still difficult to use”. This certainly isn’t true of classic Unraid on spinning rust. But in the light of the workarounds we’ve found ourselves having to make as Unraid transitions to solid-state goodness, we can see their point.
LincPlus has plans to deal with this. Two-pronged plans, in fact. The company is preparing a tutorial about the best way to install and run Unraid on the N1. No easy job, as Unraid’s current profound transformation is likely to be a rapidly moving target.
The other prong could turn out to be one in the eye for Lime Technology. LincPlus will be offering their own operating system, Linc OS, some time later this year. We could find no details about this on the LincPlus Website but if Unraid continues to evolve as planned, it’s our guess that Linc OS will find itself struggling to compete. Nevertheless, competition is excellent news for N1 customers.
Meanwhile, in other LincPlus news…
Something for the (LincStation N1) Fans
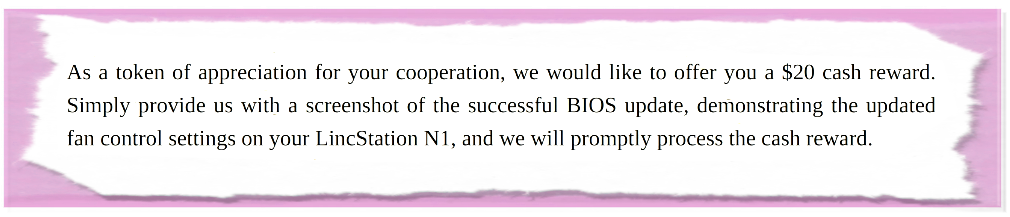
Earlier this year we had received a rather odd email from LincPlus. Advising us that a BIOS upgrade was now available for the N1 and including a link to the download with full instruction on how to install it was industry good practice. According to the email, “this update focuses primarily on the fan speed control system, providing smarter, low-noise fan speed adjustments to adapt to varying temperature conditions for better heat dissipation.” The upgrade oddness was the offer of twenty dollars for sending back a screenshot of the successful update.
Our small Tested Technology team has a total of around one hundred years experience of the IT industry. During this time we’ve undertaken uncountable similar firmware and software upgrades. But never before has a manufacturer offered to pay for the time we put in doing the work.
The upgrade was simple enough. First we had to download the BIOS zip file from the link provided and copy its unzipped contents across to a USB stick formatted as FAT32 and named UTOBOOT. With this USB stick plugged into one of the three USB sockets on the N1, and a keyboard attached to a second USB socket, hitting the F11 key on boot while holding down the the Shift key opened up a screen that automatically booted the system off UTOBOOT. The BIOS update then runs for a minute or two before restarting the system. If you have adeptly yanked out the UTOBOOT stick ahead of the restart the hardware should now be loading Unraid. Job done.
An improved BIOS and twenty dollars in the kitty. Kerching!
Well, not quite. To claim the prize, LincPlus was asking for “a screenshot of the successful BIOS update, demonstrating the updated fan control settings”. We’d managed the successful update, because it showed up in the Unraid Dashboard. But the fan settings would be buried down in the BIOS and we had no instructions how to get to the BIOS settings. And we could find no clue how to do that on the LincPlus Website either.
There seems to be no cross-manufacturer standard for accessing the BIOS. At boot time you machine-gun one of the function keys, or perhaps Esc or Del and hope for the best. We started with F12 and were lucky enough to hit the jackpot first time.
We responded to LincPlus’s email with a report of our BIOS upgrade and the screenshot that heads up this section. We’re still waiting to hear back from them about the bounty.
Chris Bidmead
I’m on the edge of the universe here… at work and writing this.
Hello Chris!
I have just finished listening again to the repeat of the second episode of the ‘The Joke About Hilary Spite’ and had to look up the author. And here I find you on a lonely tech product site..
Your play is extremely well done! Its brilliant. The dialog is magic. Well done.
As you have dragged me onto this site: what about a piece on Linux Mint? I have been trying to use Linux for the last twenty years but gave up every time until about three years ago when I started using Mint. My windows machines went into the bin. Even my, very few, games run in PlayOnLinux.
Another suggestion is ab article on the KODI media player. I refuse to by a TV licence so get my visuals on catch-up on KODI enabled by Real Debrid.
Thanks again for your great writing…
I look forward to hearing episode three tomorrow on 4 extra.
Regards
Mike
I don’t recognise your description of Tested Technology as “a lonely tech product site”, Michael. We’ve been around for a decade now and have a cosy collection of readers. Perhaps you’re missing the advertisements? Tested Technology doesn’t need the clutter.
Thanks for your appreciation of that old radio series of mine. I was hoping to be able to report that all six parts are available at archive.org. But I’ve just visited the site to discover: “This item is no longer available.Items may be taken down for various reasons, including by decision of the uploader or due to a violation of our Terms of Use.”
However, YouTube isn’t as bashful. Some entity called “Nikola Tesla Wireless Radio” seems to be making a few bob out of the ads attached to these six episodes of mine (and, of course, the cast’s).
Kodi is something we’ve discussed several times in Tested Technology, albeit a decade ago. You’ll find it in our early reviews of the Amazon Fire Stick and the Amazon Fire TV Box.
As to your experience with Linux Mint, yes, Linux has been a fairly tough proposition for beginners over the past many years. I talk about this briefly in the “Landing on Linux” series (https://www.testedtechnology.co.uk/?p=14115) But installation and maintenance of Linux distros generally has improved hugely more recently. It may well be that the very much better experience you had with Linux Mint isn’t just a feature of that distribution. More likely it’s part of a rising tide that has lifted all boats.
—
Chris