
Marcus Mazure, Tested Technology’s commercial applications adviser, is a technical expert with decades of experience in support, software development and hardware manufacture. He remembers the early days of RAID in the ’80s when it was the big new thing. But now, he feels, it’s past its sell-by date—at least as far as home users are concerned.
Tested Technology agrees. RAID devices are profligate with drive space and power and consumers can do better. Marcus and this publication have come to different conclusion about how to replace RAID—our solution is summed up in our UnRAID review. Marcus feels this is over-ambitious and suggests a cheaper, simpler solution that may be a much better fit for the average household looking for somewhere safe to store their music, movies, photos and data. ChB 10-Oct-21
Marcus Mazure: The NAS As Was
 I’ve always felt you should never put all your trust into a single storage medium even if it’s a RAID solution. So you’ll need backup. And if you’re backing up anyway, is RAID really necessary for simple home use?
There’s more to it than that. Some years ago, a proprietary NAS solution I was running using a pair of mirrored drives (RAID 1) turned out not to be very reliable, more than once leaving one of the drives corrupted. True, I didn’t lose any data, but this required re-formatting the drive and rebuilding the mirror—a tedious and lengthy enough operation back in the day when 4TB was a large drive. Today’s 18TB drives take several days to rebuild in a typical NAS system.
Any proprietary NAS solution will rely on the manufacturer’s continued support. Will they stay in business as long as you need them? Will there come a time (how soon?) when they decide that the latest version of their operating system will no longer run on your hardware (a story WD, QNAP and Synology customers will be familiar with)?
These are risks the home user will prefer to avoid. And avoiding them is surprisingly easy.
A New Solution
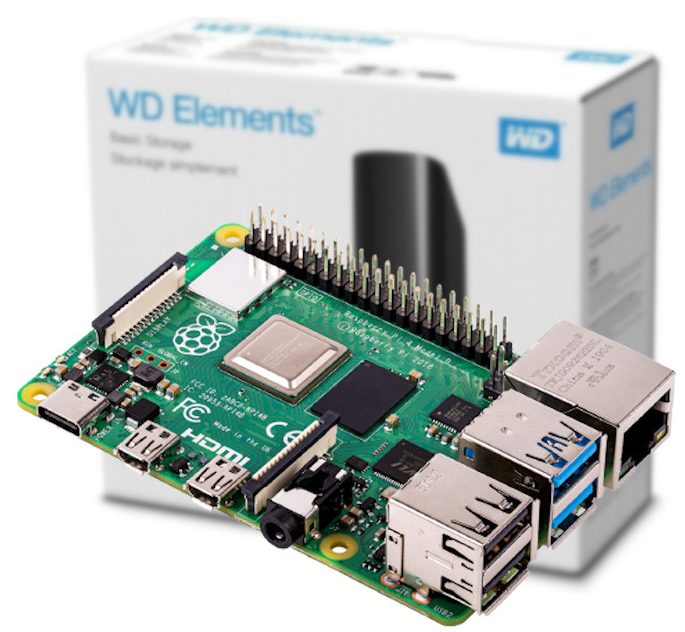
Several months ago I decided to see if a Raspberry Pi would meet my home storage and media server needs. When first released in 2012 the Raspberry Pi was fitted with 512MB of RAM.These days, Raspberry Pis come in various configurations—the latest and most powerful, the Raspberry Pi 4, can be bought with 2, 4 or 8GB of RAM. The most you’ll pay is around £85 for the 8GB version.
If you check out Tested Technology’s reviews of the DS-119j and DS-120j you’ll see that Synology feels that a NAS can get away with well under a gigabyte of RAM (a mere 256MB and 512MB respectively). So even the cheapest Raspberry Pi 4 with 2GB of RAM for at around £35 would do the job. But that version isn’t easily found today and may even have ceased manufacture. I settled for the 4GB version at around £50. (By the way, 4GB is the RAM capacity of Tested Technology’s current workhorse NAS, the 8-bay UnRAID.)
Before the Raspberry Pi 4 came out I’d been looking at using an old PC or laptop—a much simplified version of Manek Dubash’s adventure with FreeNAS. The pre-level 4 Raspberry Pis weren’t an option because they lacked USB 3, the much faster USB technology I’d need to attach the hard drive.
Old PCs and laptops come cheap. But they’re not cheap to run. A PC left on the whole time, as a NAS expects to be, racks up an annual electricity bill somewhere between £150 and £250. The arrival of the Raspberry Pi 4 with its two USB 3 ports (as well as a pair of USB 2 ports) promised to shave this down by a factor of 10.
According to my calculations, a Raspberry Pi 4 with an external, separately powered disk drive will cost approximately £10 to £15 per year in electricity.
That money-saving means that, compared with a PC-based solution, after just one year you’ve paid back the cost of this entire NAS project.
My Minimal Hardware
The Raspberry Pi 4 4Gb model cost me £54 from Pimoroni. The PiHut and others, like Amazon, sell it for similar prices. With its two USB 3 ports, a pair of mirrored drives would have been possible but instead I went for a single large USB 12TB external drive I picked up from an Amazon Prime sale for £160. It was a lucky purchase—current prices are well over £200 for a drive of this size.
Building a NAS around the Raspberry Pi appealed to me for several reasons:
-
Open source software: Open source software is well supported and normally very secure. You do not have to rely on a single commercial company for your NAS operating system and applications.
-
Hardware support: The Raspberry Pi has been going since 2012 and there’s a wealth of documentation and guides to help with just about anything you may want to do. There’s an excellent monthly magazine called The MagPi which covers all sorts of projects, hack and hints for Raspberry Pi enthusiasts. Worst case: a replacement Raspberry Pi is cheap.
-
More performant than a typical NAS budget solution: The DS120j, Synology’s current entry level NAS sells for about £95. That’s the cost of the enclosure unit alone without any hard drive. For that money you get a 2 Core Marvell A3720 CPU clocked at 800 MHz with 512Mb RAM. The Raspberry Pi 4, on the other hand, has a 4 core Cortex-A72 ARM 64 bit processor clocked at 1.5 GHz. And for less than the price of the DS120j you’ll be getting 8Gb of RAM.
-
Easy to back up NAS configuration: Any setup that you develop for your Pi-based NAS with media streaming can be easily backed up by copying the SD card that holds the operating system and applications. I use Win 32 Disk Imager on a laptop for this but there are many easy ways to make an Image of an SD card. Linux users have this functionality built into the Gnome Disks or equivalent utility and on the Mac, Disk Utility can be used for the same purpose. You can boot a Raspberry Pi from small SSDs but in this case I’d strongly recommend 32GB or upwards.
The Case for Cooling

My active cooling enclosure, complete with powerdown switch.
The Raspberry Pi can run hot under a heavy load. So you might assume the need for a cooling fan and a case to manage the airflow.
But the cheap case and 30mm fan I bought for under £10 made the operation disappointingly noisy. I didn’t want to squirrel the Pi away in a cupboard while it was under development, so this was something I was going to have to deal with.
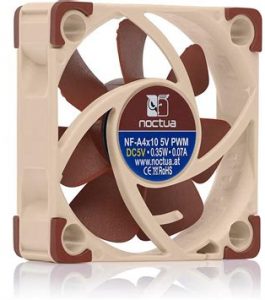
I upgraded to a Noctua NF-A4x10 5V PWM, Premium Quiet Fan—the 5V version and not the standard 12V model, as the Pi has no 12V power rail. This was far quieter, but the air hissing through the case air-holes was still annoying.

The finished active-cooling case looked good. But was too noisy. So, Plan B…
No Fan, No Powerdown
I eventually settled on a fan-less aluminium heatsink case. No noise and the Pi only runs 6⁰C hotter than using fan cooling (approximately 42⁰C), which is absolutely fine. If the temperature goes above 80⁰C, the Pi will automatically start throttling the CPU clock to save any damage to itself.
The fan-less aluminium heatsink case leaves no room for a powerdown switch or LED, but these are really not necessary for a 24/7 NAS/Media server.
Oh, yes, the powerdown switch. On full-blown computers, the power button isn’t just an on-off switch. It uses the Advanced Configuration and Power Interface (ACPI) protocol. Hitting the switch sends a very polite request to the operating system inviting it to very kindly request the motherboard to inaugurate an orderly shutdown. This is necessary because any abrupt interruption of power risks damaging the file system and perhaps even the hardware components.
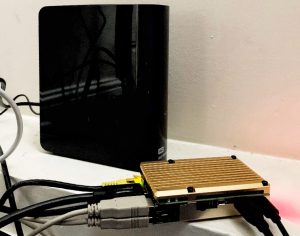
The Pi NAS under my desk, next to my Internet hub.
Implementing ACPI would have made the Pi more complicated and expensive than the designers thought justifiable. So users are supposed to observe their own manual protocol: shut down the operating system by issuing the sudo shutdown command and then pull the power cord.
This powerdown question set me off on a tangent, not unlike the “search for a quiet fan” diversion. So I tried adding a powerdown switch (there are other ways to handle this, as this article discusses).
I wondered whether a couple of LEDs would be a nice final touch. As someone originally from the hardware manufacturing business, I’ve always been drawn to a nice display of what the trade tends to call “blinkenlights”. The Pi makes it easy to add all kinds of bells and whistles.
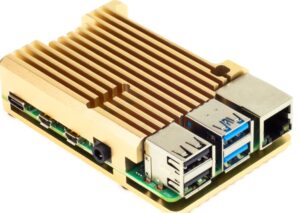
The Pi in my photo above is actually upside down. Less efficient, but it suits my cable arrangement. Right way up, the heatsink case looks like this.
However, when I got to know the project better, I came to the conclusion that none of this matters.
- No special powerdown arrangement for a device you intend running 24/7.
- No blinkenlights for a set-and-forget machine running out of sight under your desk.
- And no need for noisy active cooling, either. For a media-streaming home NAS, overclocking a Pi 4 is unnecessary. And if you’re not overclocking, there’s no need for the mechanical complication of a fan.
The little old Raspberry Pi 4 lends itself to all kinds of expansion and refinement. But it’s designed in the spirit of KISS (keep it simple, stupid). I took the hint.
More on Overclocking
The Raspberry Pi is a favourite among geeks, not least because it’s very amenable to overclocking. This is the technique of making a processor run faster by slightly increasing the voltage fed into it.
The Pi’s standard clock speed is 1.5GHz, which is to say it marches to a drumbeat of one and a half billion operations every second. But the voltage can be pushed up, making it run even faster. Applying an overvoltage, as it’s called is simply done on the Pi by editing a single text-based configuration file. You can find details of how to do this here.
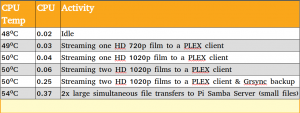
I successfully overclocked the Pi. And then realised this was an unnecessary flourish. My simple NAS just didn’t need more speed. And it certainly didn’t need the added CPU temperature resulting from the overclocking. I was happy to stick with the stock CPU clock speed, which in any case will drop down to 600MHz whenever the CPU isn’t busy.
The following table shows some average temperature and activity figures for the unoverclocked Pi NAS while performing different tasks. Note that these figures include that fact that VNC, Pi-Hole & Home Assistant are also running in the background.
The NAS Software
 Or perhaps not. NAS stands for Network Attached Storage and implies an operating system dedicated to that purpose. But do you really need a specialised operating system to do the job? Isn’t any device with shareable storage attached to your LAN, by definition some kind of “network attached storage”?
My NAS would be storing all my home documents data, photos, music and video and make all of this available to any of my computers, tablets or phones. These run operating systems including Windows 10, Mac OSX, IOS and Android.
I decided to avoid the open source Raspberry Pi dedicated NAS solutions to keep things ultra-simple. And I wasn’t sure I wanted to dedicate the Pi wholly to NAS duties*.
I simply used the Raspberry Pi’s standard operating system, an update of the original 32-bit version. The Pi is, of course, fully 64-bit and a 64-bit implementation of the standard Raspberry Pi OS became available earlier this year. But this is still in beta and has some quirks and 32-bit operation turns out to be as much as I need in this use case.
This first download on the list includes a full suite of applications, which would only have got in the way. The third item, the Lite version, was too bare-bones.
Samba installation on the Pi uses the standard procedure for adding new software:
sudo apt install samba -y.
That’s about all there is to it. But if you need detail, there’s more here.
One thing I needed to add to the desktop version was the SMB server. This uses the Windows-style file serving protocol, Server Message Block to share files across the LAN. SMB, or Samba as it’s affectionately known, is as much as you’ll need for making regular files on the Pi available across the LAN.
Media streaming is a rather different proposition and for this I installed the Plex server. One other very handy addition was VNC for remote access to my Pi console from my tablet or laptop so that I can manage occasional tasks such as backups. More on Plex and VNC in the “What Can You Do With It” section below.
Backups
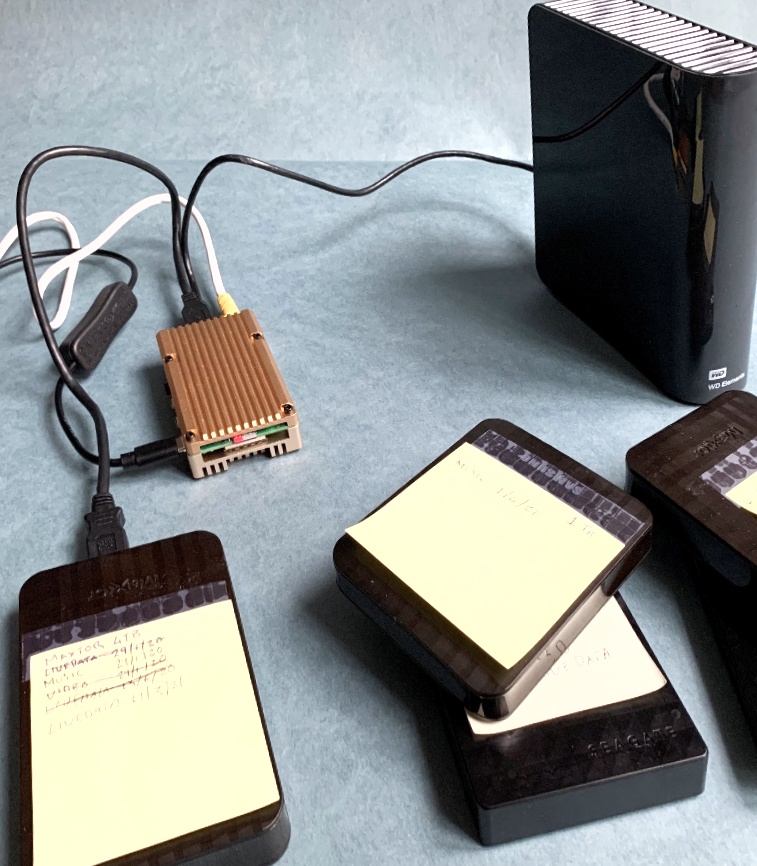
My Pi NAS connected to the permanent externally powered 12TB drive, along with an assortment of backup drives. The Pi 4 has only enough power to run one portable 2.5-inch drive on its own.
If you’re a technology enthusiast like me you’ll probably find you have several external USB hard disks lying around. I dug up an assortment of seven external drives ranging from 2Tb up to 5Tb.
As I mostly use a Windows PC for my day-to-day work, NTFS is the file system I’ve chosen for the external drives. In the event of a NAS failure, I can just directly plug a backup drive into the USB port of a Windows PC.
I use grsync to back up my data at regular intervals. grsync is a graphical version of the Unix command-line utility rsync. As the name implies, it’s a system for syncing directories, whether those directories are on the same drive, on different drives on the same machine or on machines linked across the LAN or over the Internet.
Before setting this up, it’s worth putting some thought into how you’re going to arrange the data on your NAS drive and how you name the backup drives.
I have separated my NAS files into separate directories for Video, Music, LiveData, Disk Images and Archived. This means I can easily perform backups of just part of my NAS, depending on how urgent I feel any backup is required. I use physical sticky labels on each of the backup drives to list the name and date of the backup.
Backup drive names
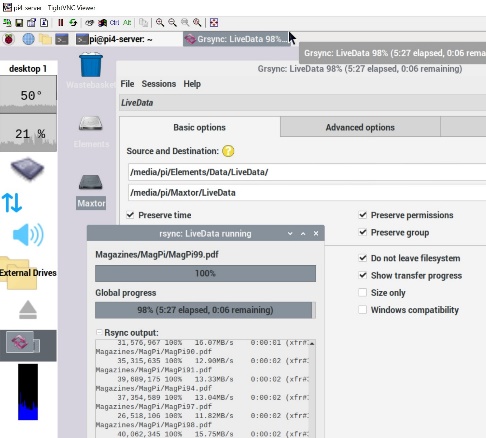
Using Grsync to back up my NAS to various USB drives
I give all my backup drives the same name internally, only using sticky labels to differentiate them. This ensures that grsync jobs will always work no matter which backup drive you mount.
My main NAS 12Tb drive is called Elements and all my backup drives are called Maxtor.
An advantage of doing backups to external drives is that you can remove one “off-site”—additional data security if your home suffers from fire, flood or some other disaster
What Can You Do With It?
A Raspberry Pi 4-based simple NAS server is a great cheap solution if you are prepared to put a little effort into getting to know how Raspbian Linux works at a basic level. There’s a wealth of documentation and YouTube videos to help you with just about any problem you might run into.
![]()
Plex is a great media server. It fills out your multimedia with metadata: artwork, synopsis, casting, reviews and more—useful for all those movies, TV shows, music and podcast you might be accumulating. Plex isn’t installed along with the operating system, but adding it to the standard installation is very easy to do.
Additional software you install comes from collections out on the Web called “repositories”. The standard installation already knows about some of these repositories; you may need to add data about other repositories in order to install certain software packages. That’s the case with Plex. There are plenty of tutorials on the Web like this one about how to set up the required additional repository and then install Plex from it.

The other essential I use on the NAS, VNC, is an even easier proposition, as it’s a standard part of the distribution. No need for an extra installation: you just need to find the radio button in “Preferences/Raspberry Pi Configuration/Interfaces/Enable VNC”.
VNC stands for Virtual Network Computing and is a way of connecting the keyboard, mouse and screen from one machine to another. By running the VNC server on the Pi and a VNC client on my other machines, I have no need to attach a monitor to the Pi and can manage the whole operation from any other machine on my LAN.
At same time as running Plex, and VNC, this little device is also permanently hosting my Pi-Hole installation and Home Assistant.
Pi-Hole blocks all those annoying ads that seem to plague every Web page you visit (except for here at Tested Technology, very largely thanks to the generosity of Machine Networks, our Web service provider) and will do so for any Web browser I use anywhere on my LAN. You can read more about this very valuable application here.
Home Assistant is the backbone of my home automation system. My own implementation of this very sophisticated open source project is only in its infancy at the moment, connecting motion sensors to the lighting system so that lights always go on when I walk into my windowless office and switch on in the lounge any time between dusk and dawn when I’m in there.
These lighting operations are independent of any proprietary solution like Google Home or Alexa, but Home Assistant can cope with these as well. I have TP-Link Kasa smart switches under Home Assistant control and it also manages warnings about my Brother printer ink levels.
The magic of Home Assistant, now that its installed and running on the Pi, is that I can keep expanding its capability as I add more Internet of Things (IoT) devices around the place.
So There It Is…
…a simple, easy to put together, practically invisible hardware and software solution with minimal capital cost* (if we put aside my various unnecessary diversions into active cooling and power management switches) and running costs very much more economical than proprietary NAS devices.
Even if you do happen to be tempted in the direction the UnRAID approach or Manek Dubash’s more complex ZFS solution, the beginner’s slope I outline here might be a good place to start. And you might find you need go no further.
Marcus Mazure 10-Oct-21