
In part 3 we fully populated the F4-223 with four drives. A deliberate mish-mash of wildly different capacities to test the limits of what Terramaster’s asymmetric TRAID system makes possible. Not particularly recommended, but it works well: at the time of writing, over the last couple of months this configuration has given us a consistently reliable network-attached storage of just over 7TB. Yes, we’re wasting the talents of that last 22TB Seagate IronWolf Pro we added. But we’re planning to fix that.
 THE PLAN IS EVENTUALLY TO REPLACE the smaller drives (two 1TB drives and one 6TB drive) with the very much larger drives available today. TRAID means we won’t have to use all drives of matched capacity, but the TOS 5 upgrade procedure does restrict us to replacing the drives one at a time.
This piecemeal pace means that the whole upgrade is going to be a leisurely business. We’ll just give a walk-through of the first drive swap here. The redundant parity data for each drive we replace will have to be written back from the remaining drives to the replacement drive. Only when that process is completed will we then be able to swap out the next drive.
You should expect a NAS to continue to be useable during a procedure like this, although performance will probably be affected in this case by the modestly powered 2.0GHz Celeron N4505 processor, busy juggling the drives in the background the whole time. To this effect, TOS 5.1 issues a warning, recommending leaving the NAS to get on with the rebuild by itself. More on this below.
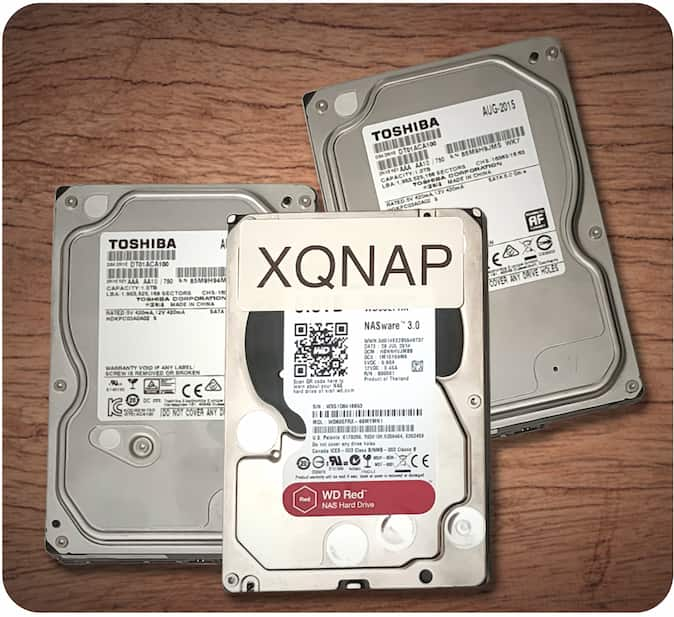 What drives are we using? You’ll recall we started with a pair of 1TB Toshibas to which we subsequently added a 6TB WD Red rescued from a failed QNAP. These were old spares we happened to have lying around. The point was to investigate how Terramaster’s TOS 5 TRAID array arrangement could keep down the cost of NAS ownership. These three drives in the four-bay F4-223 gave us a redundancy-secured working capacity of a little under 2TB. Total value of these three drives, based on current eBay pre-loved prices, around £100.
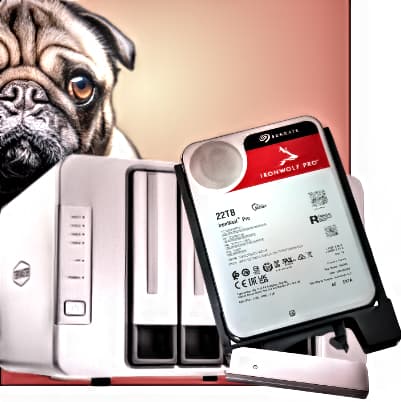
We blew this budget with the addition of our brand new fourth drive. Or would have, were it not for the generosity of Seagate in sending us their latest 22TB IronWolf Pro as a review sample. Adding this to the TRAID array brought the total working capacity up to around 7TB. Not exactly an economical use of a £450 asset, but, as we explained in part 3, there would have been no room on the other drives to support the parity of any additional data we might add to the spare space on the new 22TB drive. So TRAID ignored most of the new raw capacity.
An obvious way to counter this would be to swap one of the old, small drives for something of a similarly large capacity. Our thesis that TRAID provides an economical way of getting a NAS started is now pretty much proven. So the next step is to investigate how easy (or otherwise) it might be to move from the raggle-taggle drive arrangement we’ve landed ourselves with to a more orderly and sensible drive array offering very much more useable capacity.
That’s what this part of the story is about.
A Second 22TB IronWolf Pro
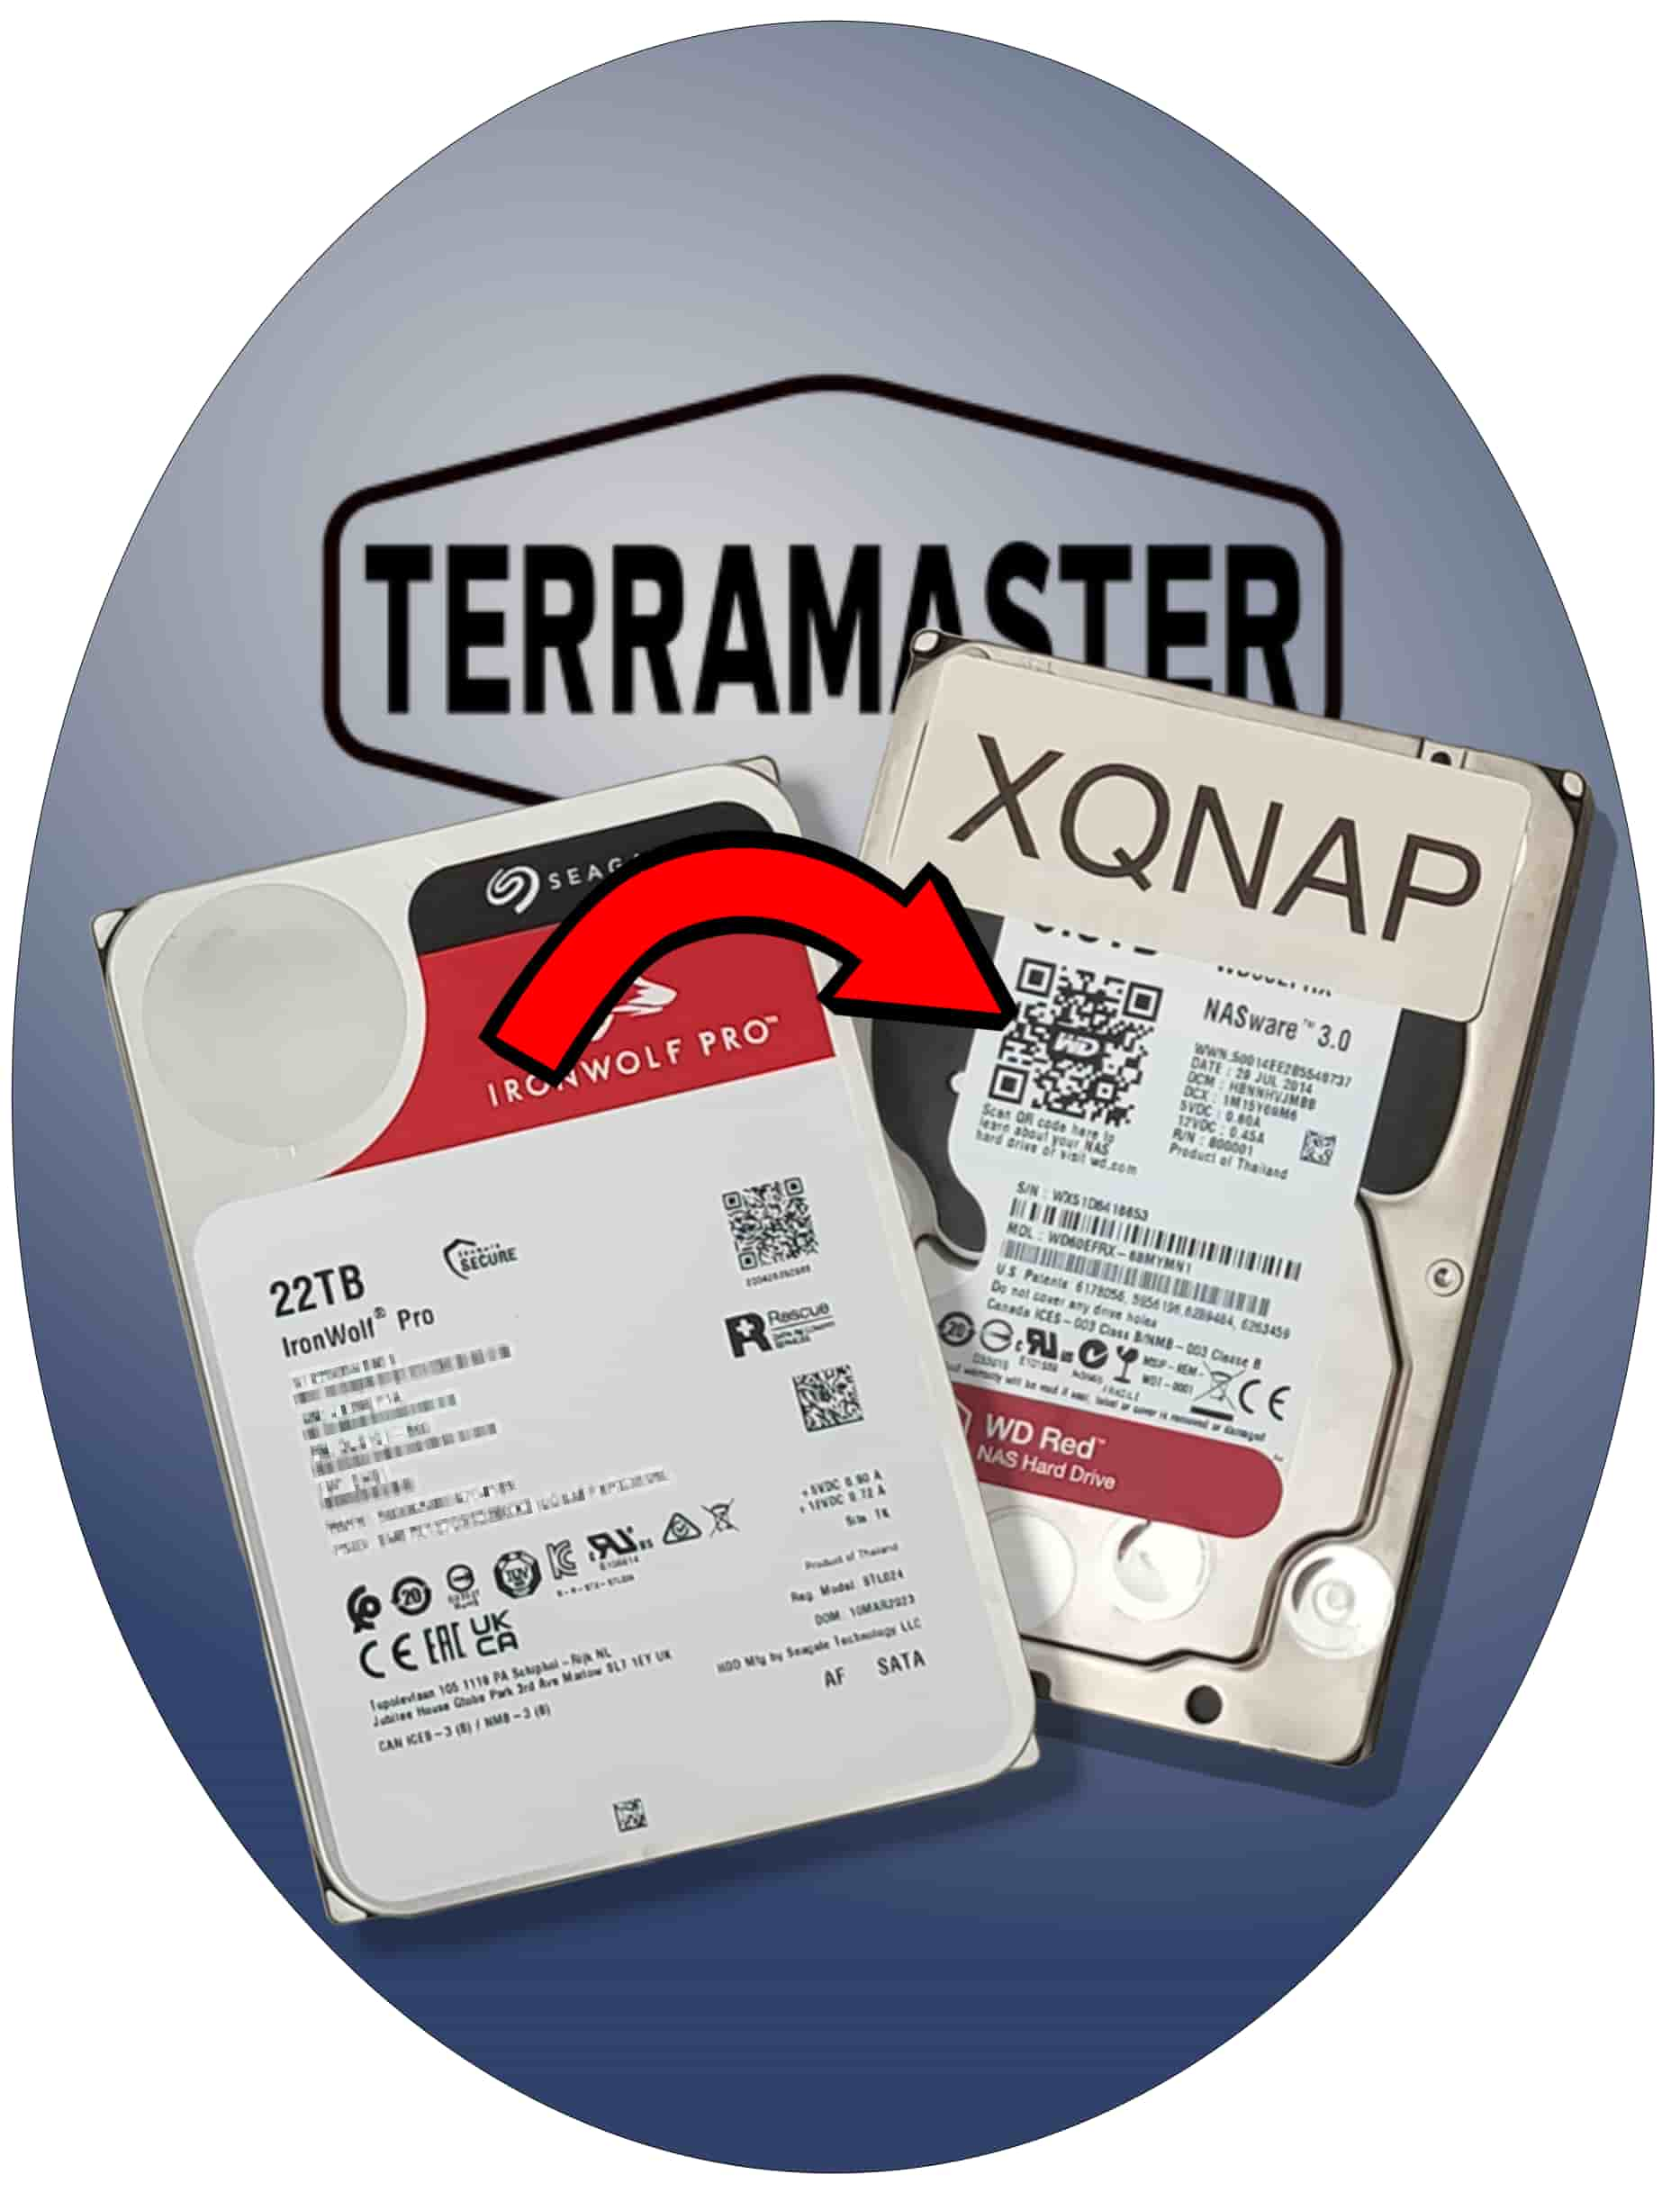
We pushed our luck to its limits, going back to Seagate with our dilemma that, Oi! That 22TB drive you sent for part 3 only got us a measly five extra terabytes.
Well, perhaps not quite. We explained how this TRAID expansion story was going and how a second 22TB drive should help to make the most of the raw storage space. Seagate thought this was a narrative worth exploring and couriered over a second 22TB IronWolf Pro.
TRAID would allow us to swap out any of the drives, provided the replacement drive was the same size or larger than the original. We decided the best swap would be the 6TB drive. That would leave us with a strange 1TB + 1TB + 22TB + 22TB configuration that at least had some symmetry to it. Later, once that had settled down, we’d be able to upgrade the 1TB drives as necessary.
 Unlike UnRAID, where you need to shut down the array before you can change drives, you can these TRAID drives as you would with any regular RAIDed NAS. The moment you pull the drive, the array pronounces itself as being “degraded” and the machine begins a persistent beep.
This sounds ominous, but you can go on using the NAS exactly as before. A degraded array won’t have lost any data, but to make up for the data on the missing drive it will be relying on the redundancy stored as parity across the remaining drives. But as there’s no additional redundancy backing up the missing data, the loss of a second drive at this stage will mean permanent data loss. So the warning beeps continue.
Thanks to the toolless drive mounting used by the F4-223’s caddies, removing the 6TB WD Red from its mounting was just a matter of pulling off the two grey plastic strips. We slipped the new IronWolf Pro into place, clipped the two strips back in position and slid the loaded caddy back into the NAS. It took less than a minute.
 The beeping continued. The machine was still loudly complaining about being degraded.
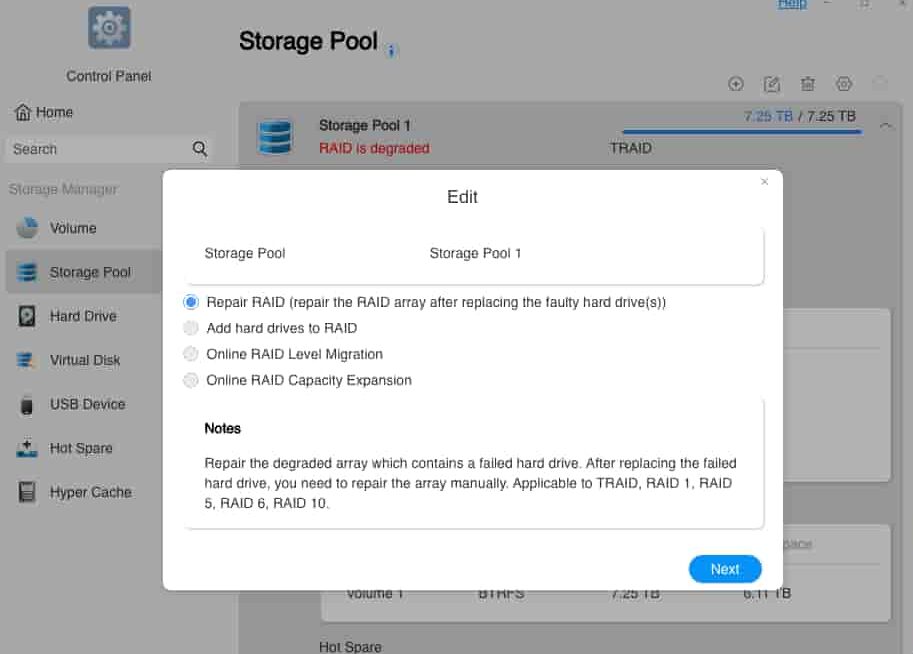
A quick survey of the options available in the Control Panel revealed that the Storage Pool tab was offering the choice to repair the RAID. But the process wouldn’t kick in automatically; it needed a decision from us.
We picked this option and the rebuild began. The beeping continued for a while, but finally stopped once the storage pool rebuild was underway.
It was a reminder of the sequence you’re required to follow:
- Create or repair the storage pool
- Expand the storage pool or add new pools to fill the new raw capacity
- Expand the volume or add new volumes to fill the available pool(s)
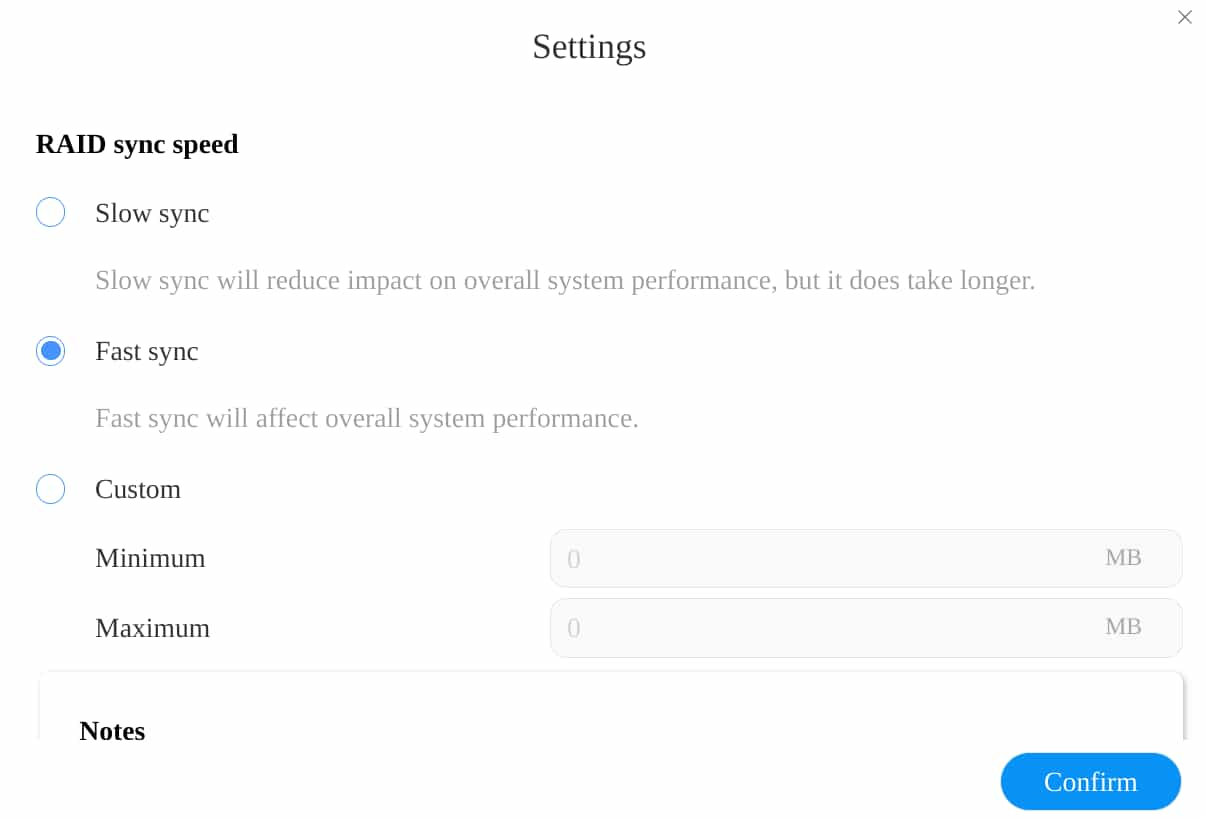 More about that warning not to use the NAS while it’s rebuilding: Hidden in the Storage Manager settings, a dialogue box you pull down from the small cogwheel icon, is the option to throttle the rebuild, stretching it out in time and minimising its impact on the processor. There’s even an option to fine-tune this setting. We decided we’d like the rebuilt to be finished as soon as possible, so left it on the default of Fast sync.
And despite the TOS 5 warning, even with Fast sync running we were still able to watch movies served by the F4-223 with no sign of buffering.
Beyond the Plumbing
 Tested Technology contributor Barry Fox suggests that readers may well be more interested in what a NAS can do than how it does it. It’s a useful warning, which is why we’re closing this discussion of “the plumbing” (as Barry has dubbed the inner workings) to make room for Terra Photos. This is a NAS app that may well be one of the first uses you’ll want to make of your Terramaster installation.
At the time of writing, Terra Photos isn’t installed automatically with the operating system. But you should find it in the App Center on your TOS 5 desktop.
If you’re starting your TOS 5 NAS from scratch, you might be tempted, as we were, to run it exclusively as an administrator, because this gives you automatic access to all the applications. But don’t do this.
Most of the operations we’ve been describing here so far, setting up storage pools and volumes and installing applications, have been administrative. So logging in using the admin name and password (but don’t use “admin” as the admin name) has been appropriate. But now that we’re dealing with a regular app we need to create a regular user to do that. The regular user has restricted privileges and so is less liable to mess things up.
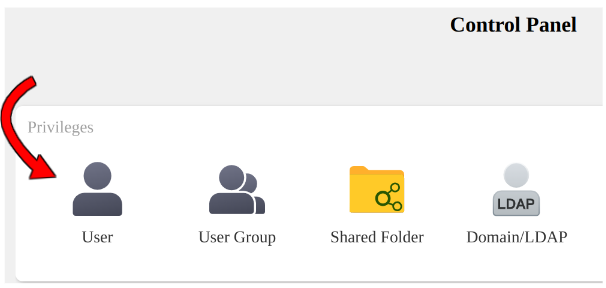 Of course, you’ll need to log in as an administrator to create a regular user. Open the Control Panel and in the Privileges section, select User. Hitting ⊕ in the array of top right-hand buttons opens up the dialogue to invent your new user.
Give your user a name and a password and save your work. You can now log out as admin and should be able to log in again under your new name. But…
The first thing you’ll discover is that you’re looking at an empty desktop. The only icon available is the File Manager, which opens to only a very limited number of files. Yes, we did say the regular user has restricted privileges.
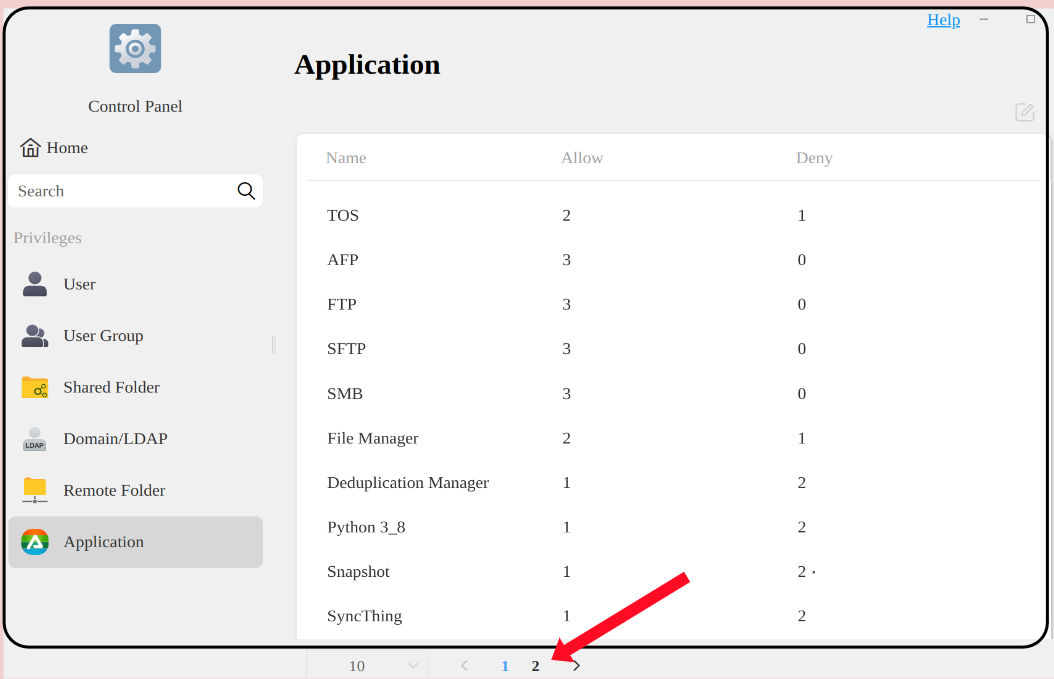
If you log in again as administrator you’ll be able to fix that. For the purposes of this exercise we want to give our regular user access to the Terra Photos app. As administrator, revisit Control Panel/Privileges/User. The bottom entry in the list of vertically aligned tabs is Applications. Open this tab and you should find Terra Photos.
 A WebUI gotcha that often completely stumps beginners (and which we’ve fallen victim to several times) is what you might call the “waistband cutoff”.
Web designers regularly locate important function buttons at the very bottom of the window they’re presenting—seemingly without realising that, depending on the degree of browser zoom the user is employing, those crucial buttons may not be visible.
If you don’t see Terra Photos in the list of applications (assuming it’s actually installed), it might be on a second or later page. And the page-switcher is, of course, right at the bottom of the page. To find it, you might need to reduce the zoom.
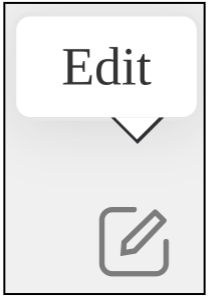
Once you’ve found and highlighted the Terra Photos entry you’ll have access to the edit icon which appears top right. This opens a dialogue box where you can define whether the user will be allowed to access the app.
 Currently, your new user has a tick in the Deny column, meaning that they won’t even be able to see that Terra Photos has been installed. A tick in the Allow column will fix this when you hit the blue Apply button.
![]() Now when you log back in under the new regular user name, the Terra Photos icon should be waiting for you on the desktop. Compared with the scope of the full administrator, there is very little that this user can do with the NAS, other than manage photos. But that’s the point of this exercise. And now you know how the administrator can add new apps to a user account as needed.
Now when you log back in under the new regular user name, the Terra Photos icon should be waiting for you on the desktop. Compared with the scope of the full administrator, there is very little that this user can do with the NAS, other than manage photos. But that’s the point of this exercise. And now you know how the administrator can add new apps to a user account as needed.
Loading the Photos
When we mentioned Terra Photos over a year ago it was still in beta. It needs to be run in conjunction with the Media Indexing system, which proved very taxing on the processor. Now that the app is out of beta it’s noticeably more responsive and we were able to test it by dumping onto it quantities of the casual photos that tend to accumulate on our phones over the years.
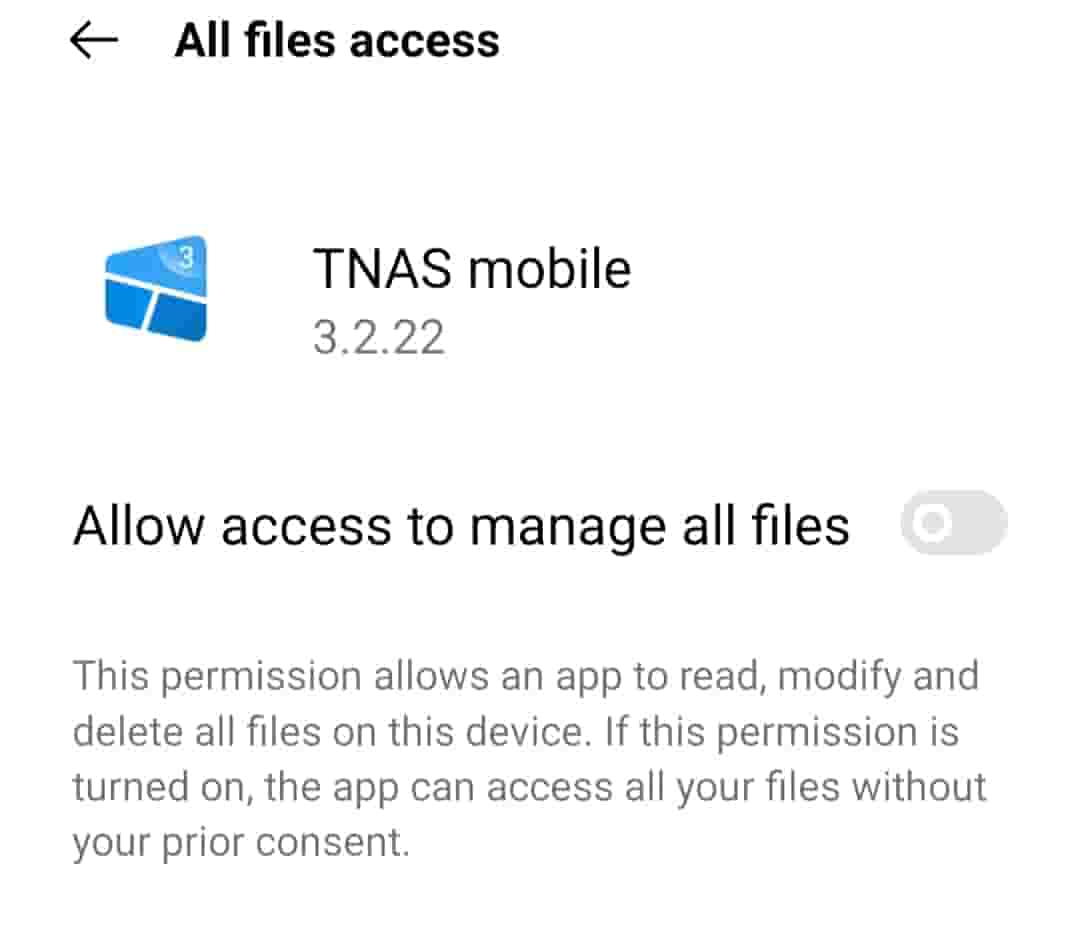 “Dumping” makes the transfer sound simpler than is it. Yes, the Terramaster Android app, TNAS Mobile, does include a feature that automatically backs up your photos to the NAS. We were wary about using this and you’ll see why when you read the warning notice TNAS Mobile throws up as you begin to activate this feature.
We really didn’t want to rush into giving the Android app permission to start deleting files of all kinds without our “prior consent”.
Instead, we used the Gnome Shell extension, GSConnect on our Ubuntu desktop in conjunction with KDEConnect on an Android phone. This connection, a virtual wormhole between the phone and the laptop, is something we use constantly for transferring individual photos when assembling these Tested Technology reports. But it works equally well for bulk transfers. And versions of this very useful software are available for all major operating systems.
You’ll need to decide the best way to transfer photos onto the NAS depending on your source and its operating system.
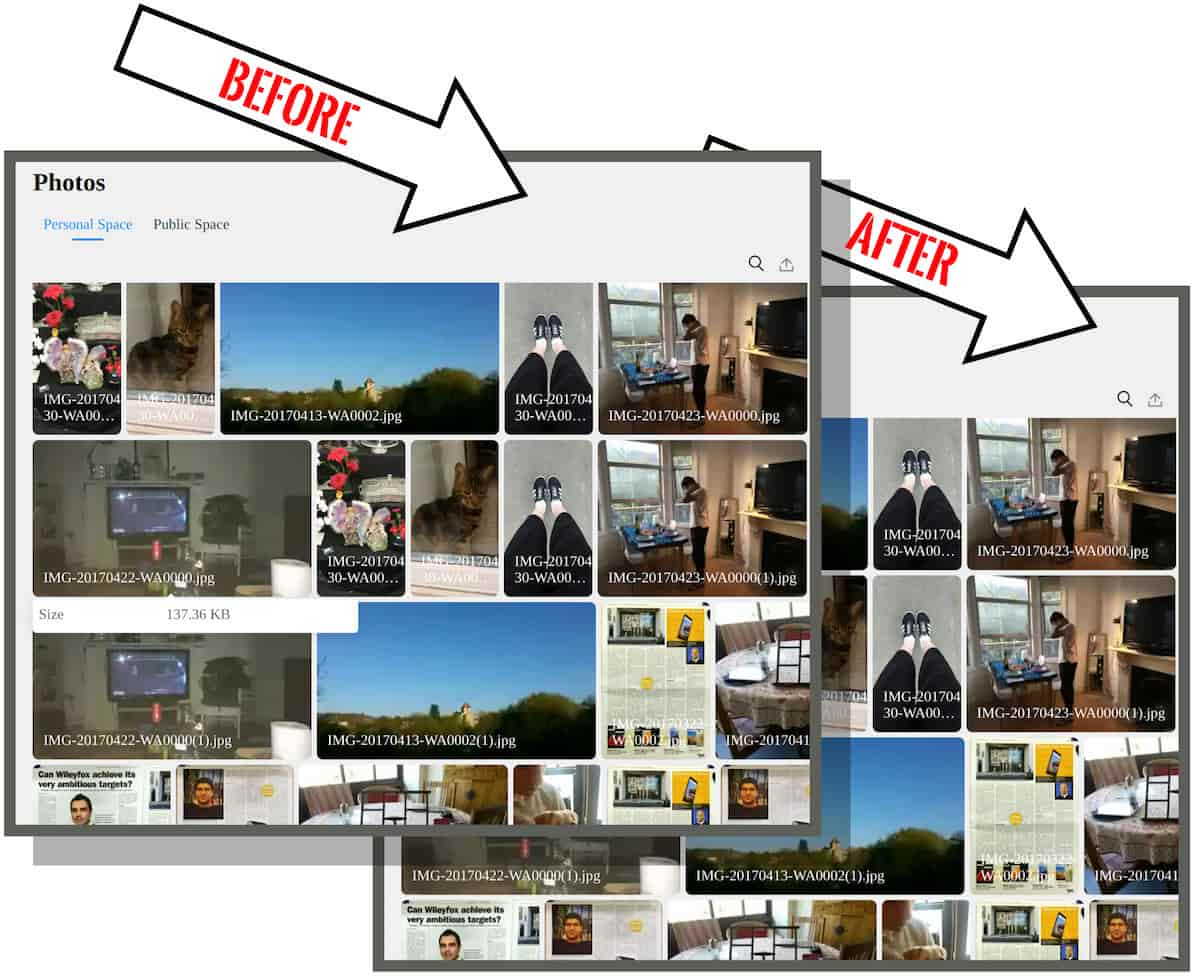
The pictures received in the Download folder of our Framework laptop are then getatable from Terra Photos on the Forbay WebUI running on the same machine. We’d prefer to create a collection inside Terra Photos called, say, Random Phone Stuff, and load the test pictures directly into that. But that isn’t how Terra Photos works.
The photos all reside physically in one of two groups, called Personal Space and Public Space. Yes, you can create individual Albums to sort these out into various different subjects but they still stay in either of the two Spaces you originally loaded them into. So the Albums aren’t like individual directories or folders, they’re really just the sorted result of tags you attach to each photo.
This is a perfectly logical arrangement. Among other advantages, it allows you to file that photo of your kids at the beach in both the Family Album and the Holidays Album without having to make a duplicate. But you need to understand Terra Photos’ structure or you’ll be wondering why, after sorting your photos into Albums, you’re still left with the original jumble in either of the two Spaces.
Attack of the Clones
During our perhaps too casually organised phone photo dump we discovered we’d copied over several of the photos more than once. Of course, this had created physical duplicates. So an excellent opportunity to test Terra Photos deduping capabilities.

Except that it turns out that Terra Photos doesn’t have deduping capabilities. Surprise! Hopefully Terramaster will be adding this feature at some future date. But in the meantime, a separate deduping app, Deduplication Manager, is on hand in the official Terramaster App Center.
Terra Photos had uploaded our phone photos in a subdirectory in our home folder, <Username>/Photos. Within this subdirectory the photos had been sorted into sub-subdirectories, grouped by date.
We hoped to be able to point the Deduplication Manager specifically to the subdirectory containing the uploaded photos. But the app only allows you to dedupe individual outer directories. So we had to feed it our entire home directory.
To run the dedupe you hit the plus symbol to create a new job. Give the job a name and then dropdowns allow you to choose the Volume you want to operate on (you’ll recall that our Forbay presents all its drives as a single Volume 1). Then, within that, you select the outer directory.
You can also set a minimum and maximum size for the files you want checked. This is also where you choose the method of duplication detection. The app isn’t just looking for duplicate names and/or file sizes. It’s very properly running checksum algorithms on each file. You get a choice of three different methods that offer various balances of speed against accuracy.
md5: A widely used cryptographic hash function that produces a 128-bit hash value from an input of any length. It was devised a little over 30 years ago and is considered inferior to newer alternatives. However, it is fast and probably adequate in the context of deduping. The MD stands for “message digest” and this is the fifth version of the algorithm.
sha1: Secure Hash Algorithm 1 creates a longer, 160-bit hash value, making it slightly less speedy but marginally more accurate than md5. Devised by the NSA in the United States in 1995, in the light of today’s readily available fast processing power it’s now deprecated for cryptographic use. But, again, for deduping it should be solidly reliable. Terramaster has made this the default hashing algorithm.
sha256: As you might guess, this sha variant produces a 256-bit hash value. For any given hardware this will be a significantly slower process that currently has the full approval of the NSA.
When is Deduping Not Deduping?
Terramaster’s Deduplication Manager has a surprise in store. It doesn’t dedupe!
 That was our first impression, at any rate. And it will be yours too when, after running a dedupe job on your photo files, you see the same scattered collection of identical photos you had before.
Even though, as it turns out, a genuine deduplication has been carried out. How can this be?
Hard links are the answer. It turns out that what the Deduplication Manager is doing when it detects twin files with the same hash value (which are very likely to be identical) is to delete one of them (freeing up space) and simply rearrange the directory link that pointed to the deleted file to point now to the remaining twin.
So as far as the directory and any app (like Terra Photos) relying on the directory is concerned, both twins are still in play. But redundant storage space has been regained.
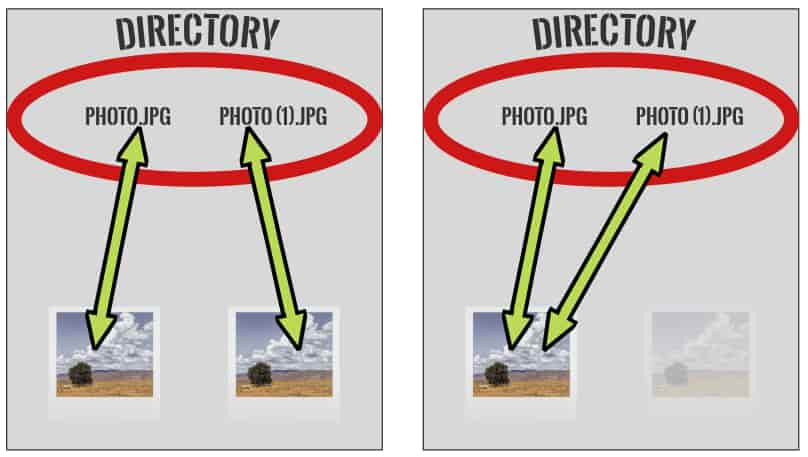
This respected industry method of deduping regains storage space but doesn’t help the visual logic of an app like Terra Photos. Until Terramaster (preferably) adds deduping features to Terra Photos or (alternatively) makes full deletion a user option for the Deduplication Manager, the best bet is to use a third party, network-aware app like DupeGuru.
DupeGuru has been a Tested Technology favorite for several years now, through multiple different versions, across Windows, MacOS and Linux. As an adjunct to Terramaster’s Terra Photos we label it “indispensible”.
Once you’ve opened DupeGuru on your client computer, LAN-connected to your Terramaster NAS, you should be able to drag and drop directories from your File Manager (the one running on the client machine, not the NAS) onto DupeGuru.
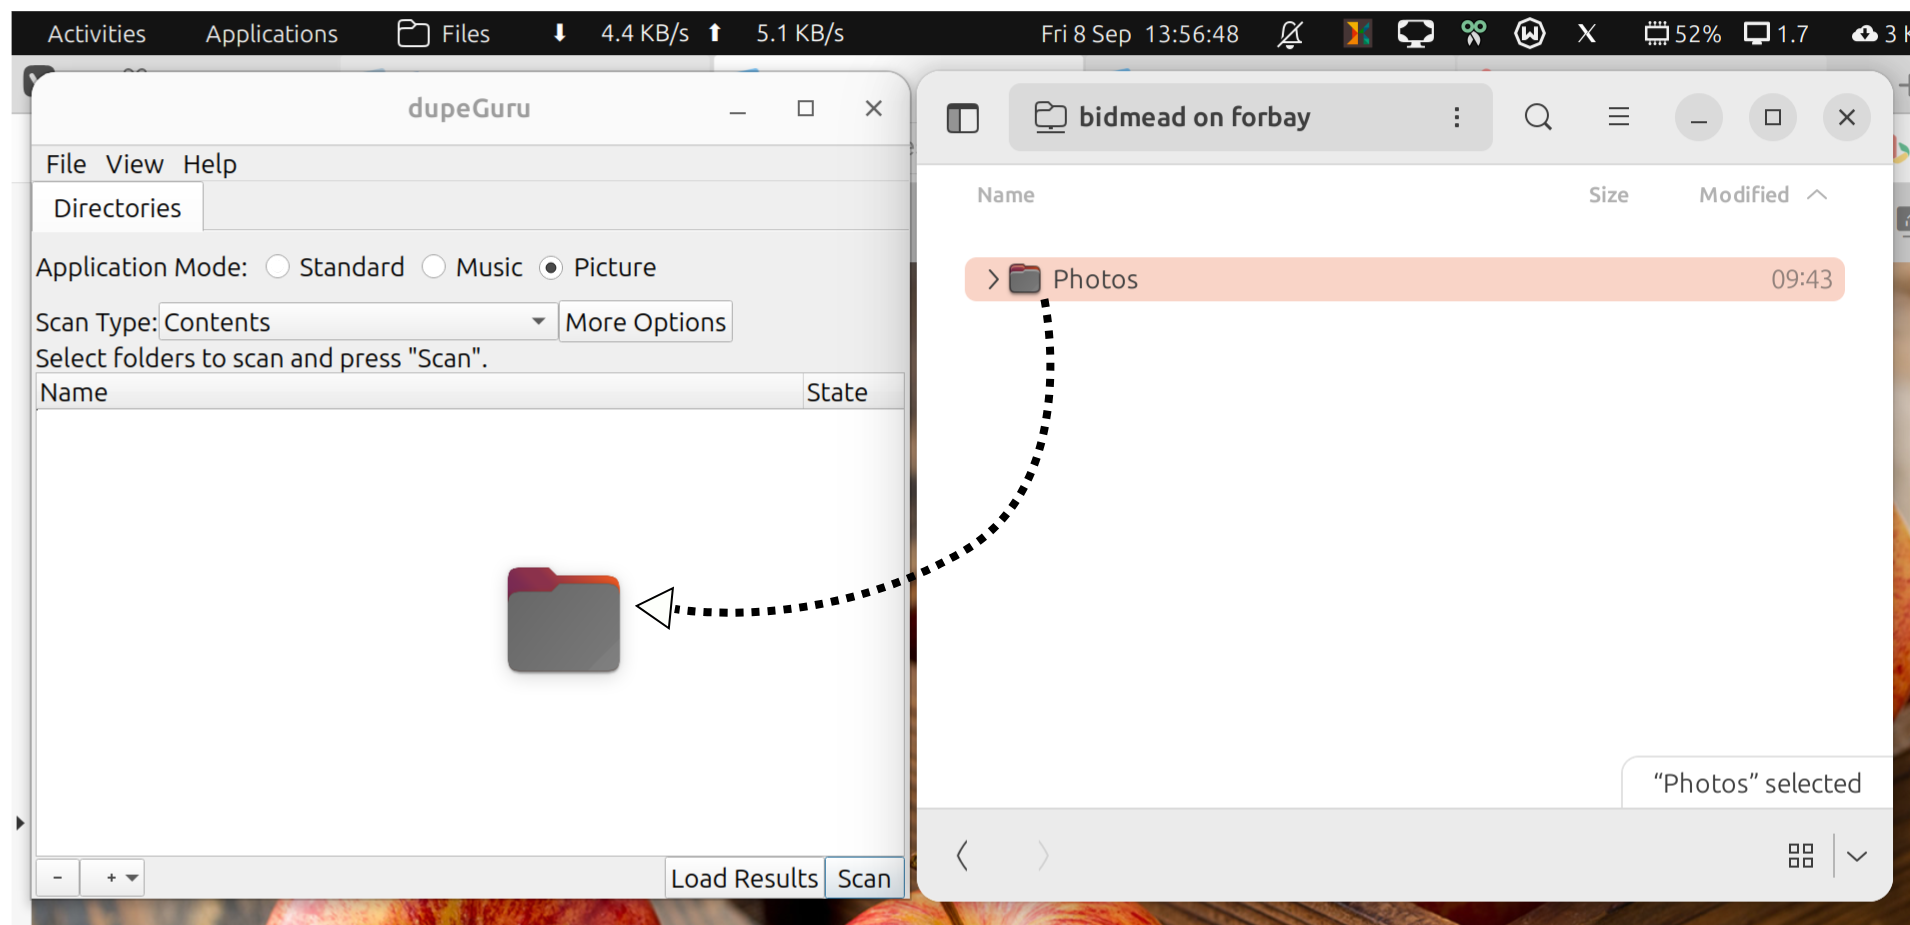
Left to right, DupeGuru and Nautilus (our LInux file manager). Simply drag one or more directories across to have DupeGuru dedupe them.
Here we’ve set the Application mode to Picture, which uses extra processing to detect the same photo in different sizes. Standard mode might have been more appropriate here as we’re simply looking for identically duplicate files.
Terra Photos also includes a face-finding feature. Whenever you load in a new bunch of photos, if you’ve ticked Enable AI facial recognition, you’ll see an alert that looks like this in the top right corner of the Terra Photos People tab:
![]()
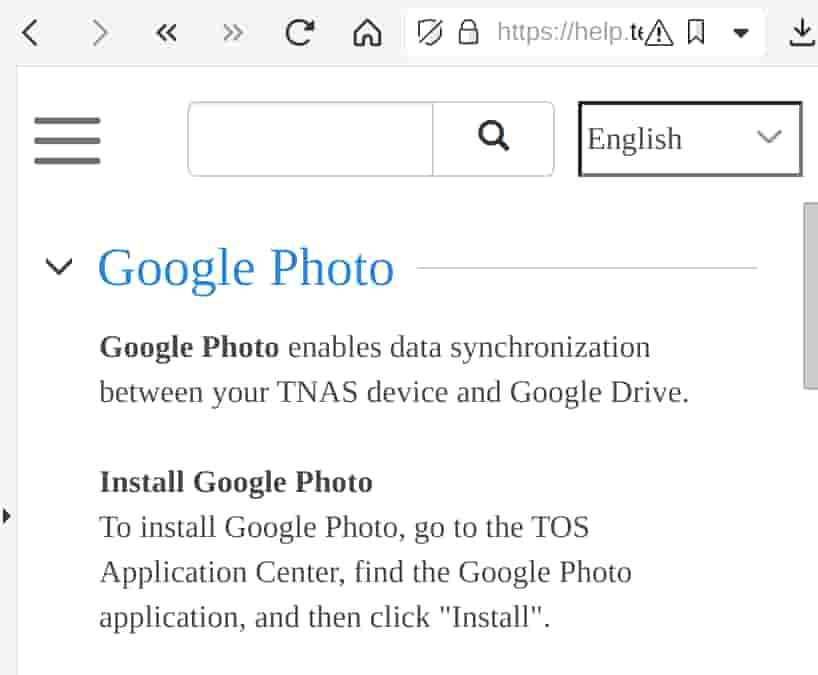
A curious anomaly: Terramaster’s Help List includes instructions for installing an app called “Google Photos” from the TOS 5 App Centre. No such app is available, there or in the Community Forum.
This is an advanced feature of TOS 5 that follows the lead of apps like Google Photos that use AI to categorise photos of faces. Google’s face recognition requires you to have an Internet connection and the grunt work is carried out on Google’s remote server farm. Terramaster’s approach relies solely on the local processor in your NAS.
This is asking a lot from a NAS like the F4-223 with its modestly powered dual-core, dual threaded N4505 processor. Terramaster acknowledges this with a warning that the process takes a long time, consuming a lot of system resources.
We weren’t able to show any results from the AI face recognition after running the process for several days. So our conclusion is that for simpler devices like our F4-223 that are in general use as network file servers, switching on AI facial recognition isn’t something we’d recommend. As a general purpose local picture library—particularly in conjunction with BTRFS snapshotting—Terra Photos should serve you well.
*Soon to be incremented, according to reports in the Terramaster Forum…
It’s possible that newer versions of Terra Photos may be optimised to handle entry-level hardware. In any case, we’re hoping in the future to be able to report on more powerful Terramaster hardware that will give a fuller picture of the capabilities rapidly being added to the TOS 5* operating system.
Meanwhile, we’ve decided to wind up this series with a final chapter testing the 2.5Gb/s Ethernet ports in conjunction with a pair of 2TB NVMe solid state drives.
Chris Bidmead
Chris Bidmead