
W e’ve come to the final episode of our adventure together, although I hope it’s just the beginning for you. I appreciate that I’m leaving you in what might seem strange territory and it may take time for you to find your way around. But you have Libre Office for everything you might have been doing in Microsoft Office, you have the Firefox Web browser (or virtually any other Web browser you choose to install) and—of course—you have KPatience and its superb implementation of FreeCell whenever you get stuck, or bored.
OK, so that’s not quite enough. Let’s wind up by shaping up the Ubuntu installation and round it out with some additional applications.
 Before we do anything else, let’s make sure our new Ubuntu installation has an Internet connection. If you’re using an Ethernet wired desktop machine you should be there already. The (usually) wireless-dependent connection from a laptop may need an extra step.
Up in the top right-hand corner of your screen you should see a set of icons. Click on any one of these to pull down a menu including a section where you can switch on Wi-Fi, select your Wi-Fi access point and enter your password or connect using the WPS button on your router.
Now you should see the Wi-Fi icon join the others up in that top right-hand corner. The Firefox browser included among the installation software should confirm that you now have an Internet connection.
One of the very first things I like to fix with any new operating system installation is a nuisance innovation (introduced, I believe, by Apple) called “Natural Scrolling”. When I move the mouse downward, or drag two fingers downwards over the trackpad, I expect to be scrolling downwards. So-called “Natural Scrolling” scrolls down as you move your fingers up. For me, down is down. My fingers are moving the view, not the document.
Whether or not you’re as annoyed as I am by the wrong type of scroll, this is good opportunity for us to visit Ubuntu’s Settings, found in a pull-down menu at the top right-hand corner of the screen. That black bar running across the top of the screen is called the Panel (or, more accurately, “a panel” as you can have many more of them if you like) and the vertical bar at the extreme left of the screen is the Dock.
Background offers you a choice of desktop backgrounds and the opportunity to add your own. Under Users you can set up your fingerprint log in, change your password and add new users to your system.
And on that note…
 There’s a lot to learn here in Settings but that’s only the beginning. The very best thing you can do as you start experimenting with all this is to take notes. My own go-to for this is a note-taking app I touched on earlier. Joplin ticks all the boxes
- Cross-platform (Linux, Windows, Mac, Android, iOS)
- Free, open source software
- Easy to get started with, but with a lot of depth
- Syncs data between your various Joplin installations.
You’ll find it in Ubuntu Software, where there are two versions of the GUI app. The one I’ve installed, James Carroll’s implementation of Joplin Desktop, is the newest version at the time of writing.
Once this (or any new application) is installed, you won’t immediately find its icon in the Dock. That’s reserved for Favorites. The Joplin icon will reveal itself when you hit the Super key (by default, this is the so-called “Windows” key on many desktops) and start to type its name into the search box that appears centre screen at the top. You can now drag the icon across to the Dock and drop it in there anywhere you like. The existing Dock icons will make way for it and it will be welcomed there as another Favorite.
Get to know Joplin—it comes with some ready-made pages on how to use it—and make notes as you explore the new territory of Ubuntu.
A Virtuous Patience
 I’ve mentioned KPatience before and here I go again. Because it’s occurred to me that if you’ve been following this step-by-step you won’t have it installed yet. Instead, Ubuntu has given you a Patience app called AisleRiot. Although AisleRiot doesn’t appear among the Favorites in the Dock, you can use the Super key, as we did with Joplin, to put it there.
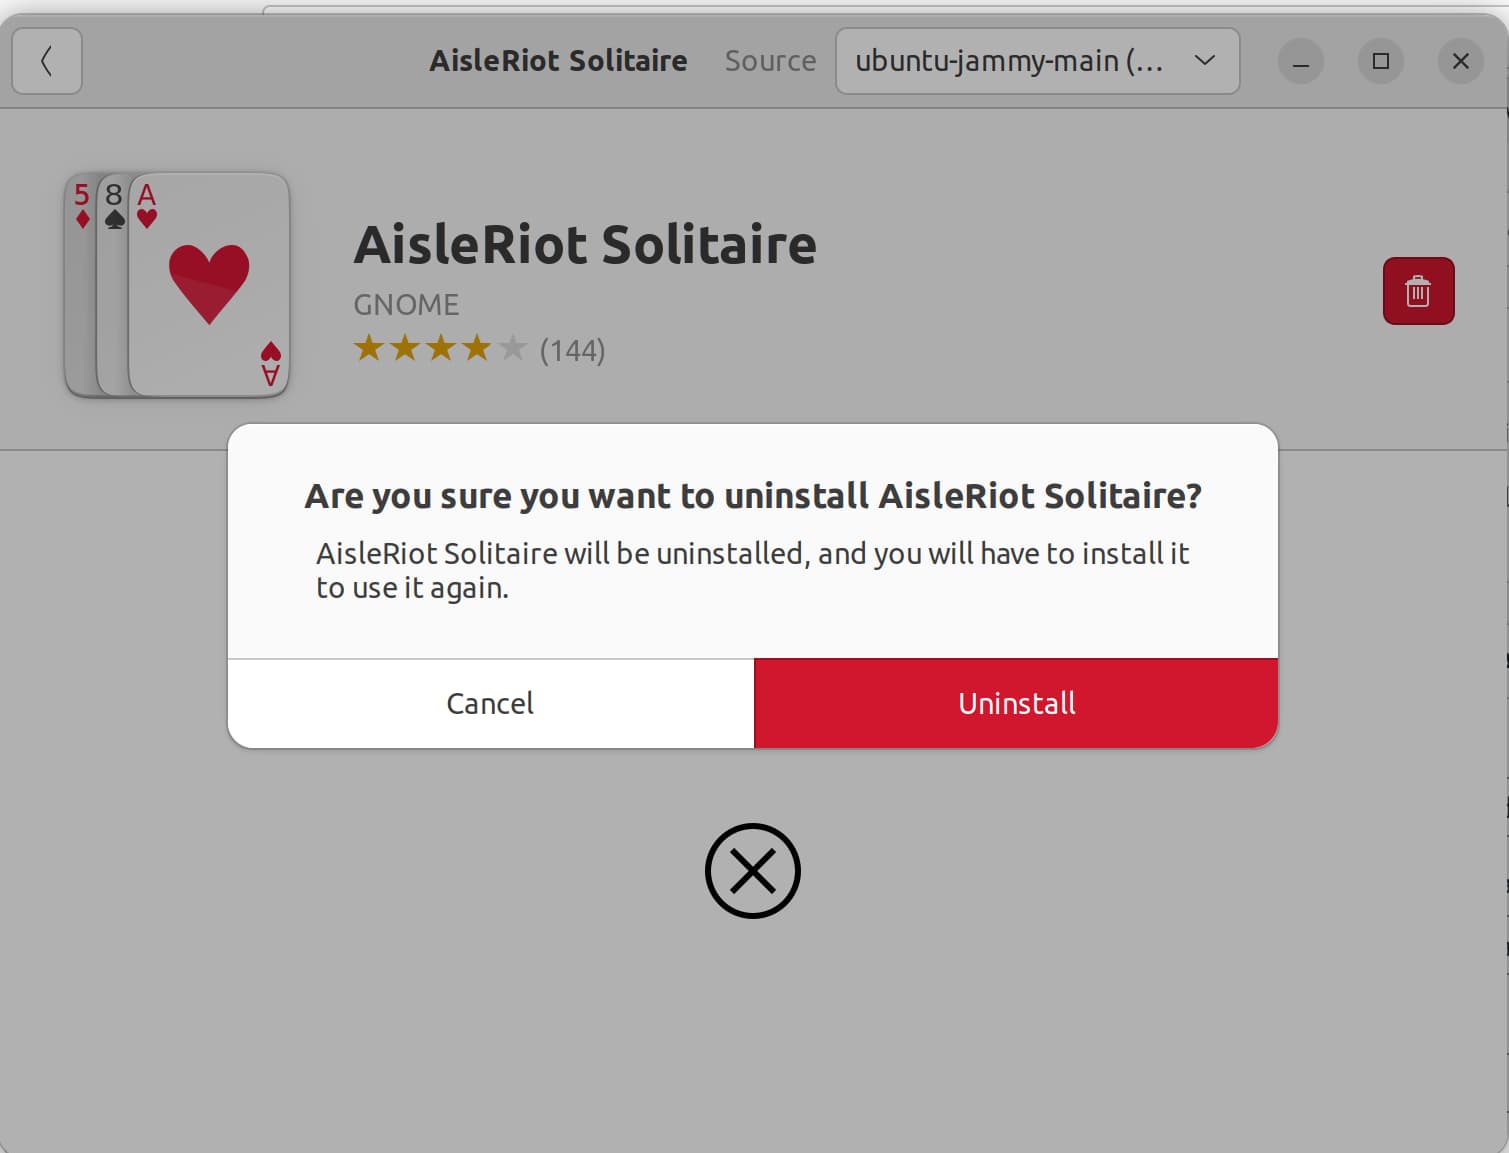
But don’t. In fact, this is a useful opportunity to learn how to uninstall an application, because KPatience is superior—certainly as far as Freecell is concerned.
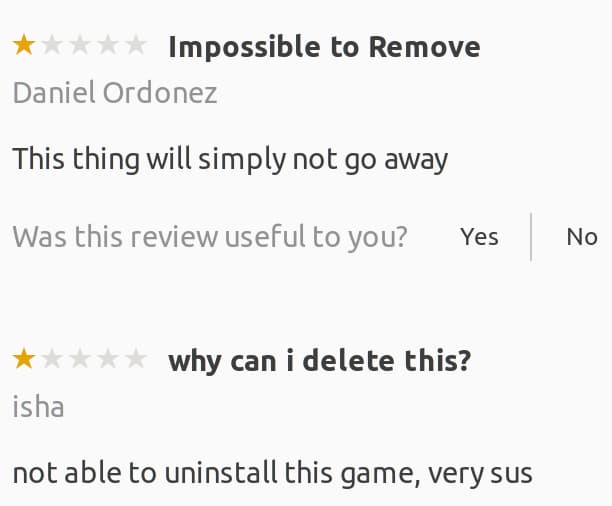 The Super key search method will find AisleRiot but doesn’t give you the option to uninstall it. To do that you need Ubuntu Software again. Search inside Ubuntu Software for AisleRiot, open up the page about it and read some of the comments there.
Other commentators suggest using the command line. sudo apt remove aisleriot -y will certainly do the job (apt being Ubuntu’s command line installation and removal tool). But it may well be that these complainants haven’t expanded the Ubuntu Software AisleRiot window enough to have discovered the enticing red dustbin on the right-hand side. As you’ll have guessed, clicking on this icon is the GUI way of disposing of the app.
Now look for KPatience inside the Ubuntu Software app and install it. Add it to Favorites as you did with Joplin and it will always be to hand.
Is there any use for something like this, other than time-wasting? Actually, yes. One Ubuntu neophyte who has been helping me put this series together is a barely experienced user of a Mac desktop machine. Transferring from Mac to Linux and from keyboard and mouse to a laptop trackpad is a double transition.
The new operating system, I realised, could be a cause of confusion—for instance, the use of the control key instead of the command key for processes like copying, inserting and deleting text. I hadn’t reckoned with the unfamiliarity of the trackpad. Playing Freecell could be a useful exercise for those making a similar transition.
With your Internet connection to answer any questions you’re going to have about Ubuntu (and there may well be plenty) and Joplin ready to log what you discover, I should be able to duck out at this point. What follows are some additional optional tweaks I’ve made to Ubuntu and you easily can too.
Hiding the Dock and the Panel
As with most easily carryable computing devices, the screen of Tested Technology’s Framework laptop offers limited real estate*. So you probably don’t want the Dock taking up all that space on the (by default) left hand side of the screen when you don’t need it. In Settings you can adjust the icon size down to as little as 16x16px (with my old eyes I settle for around 22x22px) and the Dock will slim down accordingly.
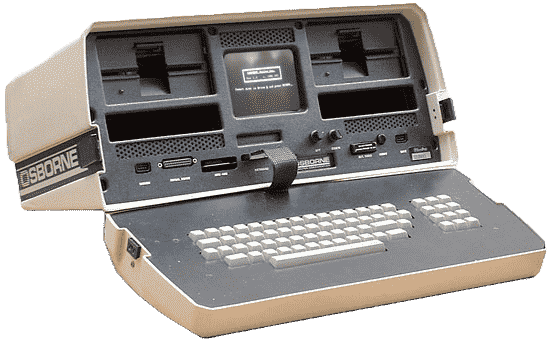 At the time, 1981, I was Doctor Whoing at the BBC with my Vector Graphic MZ System B desktop computer and as a side hassle starting to write for “Practical Computing”. Adam Osborne’s Osborne 1, launched that year, folded into a kind of heavy lunchbox you could lug about. But it had to be plugged into the mains to power its tiny cathode ray tube display, seen here flanked by the two rather larger floppy disk drives.
As is evident from this picture, borrowed from the oldcomputer Web site, screen real estate for portable computers has improved somewhat since then.
Better still, as with other operating systems, you can hide the Dock completely when it’s not wanted. You’ll find a Hide the Dock switch in Settings.
You can do the same thing with the Panel. But in the current version of Ubuntu, Settings has no provision for this. Which fact conveniently takes us into the business of Gnome Extensions.
More Gnome than you Gnu you’d Gneed
![]() Originally known as the GNU Network Object Model Environment, Gnome is the name of the default desktop manager used by Ubuntu. That word “default” here is a clue that if you don’t happen to get on with the look and feel of Ubuntu, you can still keep the same underlying operating system and just swap out Gnome for something else—there’s plenty of choice.
Originally known as the GNU Network Object Model Environment, Gnome is the name of the default desktop manager used by Ubuntu. That word “default” here is a clue that if you don’t happen to get on with the look and feel of Ubuntu, you can still keep the same underlying operating system and just swap out Gnome for something else—there’s plenty of choice.
But there’s even more you can do to enhance Gnome. As well as the Tweak app, you can also add extensions . There are several ways to do this, probably the simplest being to install Extension Manager using the Ubuntu Software app.
Install and open Extension Manager, switch to the “Browse” tab and search for Hide Top Bar. Install it if you want the Panel to disappear until you need it. Then, for a bit of fun and to get a glimpse of Gnome extensions capabilities, search for the word “burn”.
The Burn My Windows extension this brings up isn’t an expression of disgust at what Microsoft’s operating system as become. It’s a visual effect—one of a now growing collection of visual effects—that change the way Gnome Windows open and close.
Resist the easy temptation to spend the rest of the afternoon messing around with these window effects. That’s my job. But while we’re in Extension Manager, consider another extension.
By default, Gnome has a rather strange habit of sometimes popping up an alert to notify you that the window you think you’ve just opened is “ready”. This suggests that the open window is hiding behind another window. Click on the alert and the hidden window will pop into view.
I say “fix suggested” rather than “fix” because if you install this, in my experience you’ll still encounter occasions where the window you hope to evoke hides behind another window. But now there’s no alert to warn you.
This could be infuriating. You’re inside an app, you’ve made changes to the data and you hit Save As. You’d normally expect to see a new window offering you your file system so you can choose a save location. But there’s nothing. Worse still, your app now appears to be frozen, responding neither to the keyboard, mouse or trackpad.
These input operations are actually now being directed to the new window, which has come into play but is hiding behind the current window. It’s the exact situation that this Window is Ready alert was designed to solve.
 As long as you understand this, the fix is literally at your fingertips. Hitting the Super key and the Tab key simultaneously brings up your app switcher, which reveals a window labelled Portal. Switch to Portal and you’re back in business.
The Extension Manager is also where you’ll find what I’ve come to regard as an essential component of my workflow. I touched on GSConnect in part 3 when I talked about worm-holing between Ubuntu on the laptop and my Android phone. The Android end of this connection, KDE Connect, is installable from the Google Play Store. For iOS and other operating environments, check out the official download link here.
Compose yourself
Let me leave you with one other must-have feature you need to implement following any fresh Linux installation. Your keyboard offers a limited set of characters and you know by now, if you didn’t know already, that you can extend these with a combination of Control, Alt, and Function keys. We’ve also added the Super key, which evokes a display of all your open windows when used on its own and gives you a direct view of the Desktop in conjunction with the “d” key.

The Compose key was a standard feature of 1970s minicomputer keyboards
Once that’s set up, you can do this, for instance: For the French “e” acute (é), hit the Compose key, then the single quote key and then e. Note that these keystrokes are SEQUENTIAL, not simultaneous. You’ll find that most of the keystroke combinations make sense by having some kind of mnemonic connection.
So That’s It…
You’re on your own now.
Hardly. There’s a wealth of Linux sites you can turn to for help and advice. For example:
Finally, I must thank Framework for helping this project along by donating Tested Technology a fully repairable and upgradeable, Linux-friendly Intel Gen 11 laptop. Starting with part 5, this machine has been responsible for all the practical experimentation as well as the final WordPress publication. Framework has its own Linux section, which is well worth visiting even if you’re not running Linux on Framework hardware.
But I do want to make clear that none of this is a sponsored ad for Framework. I promised you a list of manufacturers who will sell you Linux-ready hardware without Windows (or the Windows tax). Tested Technology has only had experience of Framework and so can’t vouch for the others on this list.
Linux-Friendly Manufacturers
“Linux-friendly” means that the vendors’ hardware works well with Linux, can be bought without Windows installed or with Linux pre-installed, and that support is offered for Linux.| Manufacturer | Model Name / Range | Remarks |
|---|---|---|
| Framework | Laptop (12th Gen Intel® Core™) | Highly repairable and upgradeable¹ |
| Purism | Librem 14 laptop + wide range of Linux machines | Strong emphasis on privacy² |
| Hewlett-Packard | Dev One | Only available in the US³ |
| Tuxedo Computers | Infinity Book Pro 14 + a full range of Linux-based desktops. | "Linux-first" inhouse development⁴ |
| System 76 | A full range of Linux-based laptops and desktops | Own specialised version of Linux (Pop!_OS)⁵ |
| StarLabs | StarBook laptop | Will preinstall your own choice of Linux⁶ |
| Laptop with Linux | Range of Clevo laptops and mini-PCs | Linux for freedom of choice, transparency and privacy⁷ |
| Dell | N-Series computers and other select products | Paid-for support available for hardware bought with Linux installed⁸ |
| Notes: ¹ Frameworks ships with nationalised keyboards. Linux DIY version is an easy self-build: user installs supplied RAM, NVMe and downloaded operating system. ² Purism ships globally from its Web site. Keyboards are US only except for bulk and special orders. ³ H-P's Dev One was developed in partnership with System 76. We have no information about plans to sell this machine outside the US. ⁴ Tuxedo offers optional 5 year support with pickup and return for this German company's tailor-made, individually configured Linux-optimized hardware. ⁵ System 76 offers lifetime support. Open source hardware, software, and firmware direct from their factory in Denver, Colorado. ⁶ StarLabs is a UK vendor with a good service reputation. Sells and supports a range of preinstalled Linux distributions. ⁷ Laptop with Linux is a Netherlands-based supplier offering optional pre-installation of Linux with lifetime free support and advice. ⁸ Tested Technology has not received a response from Dell to questions about Linux guarantees and service. |
||
Chris Bidmead 26-Oct-22