
The nVidia Shield TV is a powerful Android device. nVidia has positioned it as a games hub, but it can do much more.
For this you’ll need to supplement it with new apps, either downloaded directly via the built in Google Play Store (which offers only a limited selection in the nVidia Shield TV version), or by sideloading from elsewhere.
Kodi is one of the first supplemental apps I’d recommend. It’s available through the built-in Google Store. But content downloaded with Kodi remains stuck in the Shield’s internal storage. Although Kodi includes its own file manager, it doesn’t yet know how to ask permission to write to attached USB sticks, microSD cards or network storage. This requirement was introduced with the Marshmallow Android update.
To shuttle data out of the Shield’s internal storage I’ve been using an app that does know how to ask these permissions. It’s called X-plore and you can get it directly from the built-in Google Store.
And it all worked just fine… until last week…
Ouch
Quite suddenly, X-plore began refusing to write to my USB drives.
The app I had been using for months to transfer data out of the nVidia Shield TV onto a variety of different external devices (microSD cards, USB sticks, the Toshiba Canvio Premium portable hard disk drive) was showing me the attached storage. But every attempt to open it was greeted by:
No supported partition was found
Yes. Ouch!
The problem
It took me days to find out what was going wrong. So forgive me if this Data Sheet nudges its way at some length into all the intricacies of the problem.
Executive summary: It seems that a recent update to X-plore had introduced a new feature. It added a filesystem driver for Android devices that don’t have OTG support.
The OTG driver supplied with the recent version of X-plore supports only a single format: FAT32.
See the problem? The Shield sets up an OTG USB drive for you by formatting it as exFAT. X-plore finds the drive, but if you try to do anything with it, writing or reading, throws in the towel with the message “Unrecognised partition”.
And this will happen with any other of the formats the Shield natively understand. All except FAT32.
So does this mean that henceforth all your USB drives intended for the Shield will have to be FAT32 formatted (necessarily on a different machine)?
Actually, no. Loading X-plore’s built in OTG driver is happily optional. Without it, X-plore will use the native nVidia drivers and be able to read and write to all the usual formats.
Suckered
So you might be wondering how I’d fallen into the trap of loading the X-plore driver in the first place. Yes, I wondered the same thing too.
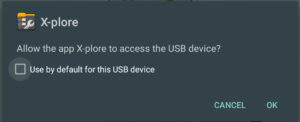 But take a look at this dialogue box that X-plore pops up when it first encounters an OTG drive in the Shield.
You’ll immediately understand why and how I fell for this.
There are two problems here. Firstly, although you may not want to use X-plore as the default app that opens every time you insert a USB drive (so you leave the box unticked), you’re still likely to dismiss the dialogue box by ticking OK.
In my efforts to make the USB drive writeable I tried first not ticking the box. When this failed I ticked the box. Same result both times—failure to write to the drive.
What it took me days to realise is that by clicking on OK I was telling X-plore to go ahead and load its own OTG driver.
It’s Not OK
I accept that this internal OTG driver might be a godsend on other non-OTG devices. But it’s a menace on the nVidia Shield TV. Because of it I very nearly disavowed X-plore, and actually did uninstall it.
I missed it almost immediately. In every other respect the app is a superb complement to the Shield. Unlike my previous favourite, ES File Explorer, X-plore isn’t built around the premise of a touch screen. As a last resort I emailed the developer at Lonely Cat Games.
The somewhat terse reply came quickly:
“X-plore works only with FAT32 formatted drives”
But Michal at Lonely Cat Games also supplied a useful link, and this is where I learnt about X-plore’s own OTG driver. The page describes the driver as being able to handle both FAT32 and exFAT. As exFAT is the format natively used when the Shield sets up a USB drive for external storage, this would indeed make life much simpler. But after extensive experiment I’ve concluded that the X-plore driver doesn’t actually do exFAT, at least not writeably. (If you think I’m wrong about this, do please get back to me with details).
Stick with the Shield
If you want to make sure that you’re going to stick with the Shield’s own OTG arrangement, and never see that ambiguous USB drive pop-up again, there’s a tick-box inside X-plore’s Configuration you’ll need to take care of. Unfortunately, its wording is every bit as ambiguous as the pop-up:
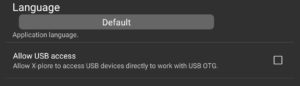 It sounds, doesn’t it, as if you’ll have to tick this box if you want X-plore to access the USB drive. Actually, for Shield users, the reverse is true. LEAVE THIS BOX UNTICKED.
A Few Other Quirks
To tidy up the subject, there are one or two other minor gotchas to watch out for.
When you change the USB stick using the Shield Settings/Storage and reset you may find that X-plore is still showing the earlier drive. If you exit from X-plore and open it again, you may see no USB drive at all.
If this happens, open Settings/Apps/X-plore and Force Stop (if X-plore’s running) and Clear data.
This forces X-plore, next time you open it, to re-examine its environment. It should now find the USB stick. Clearing data won’t affect that all important “Allow USB access configuration” switch, which should remain off, although the app will ask for permission again to access your photos, media and files. Say yes to this (you’ll have to, or X-plore will be useless).
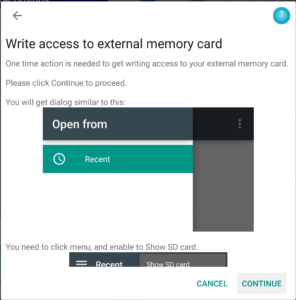 Now you can set up write access to the USB stick. Select it and try to create a new directory on it (I like to call this test directory just “t”, because that’s the default letter offered by the pop-up keyboard). This should bring up the “Write access to external memory card” dialogue box. Follow the instructions and you’re good to go.
When you’ve done that you can test writeability by deleting your test directory. You can now be confident that you can write to this device.
I’ve found the odd occasion when, for some unknown reason, this process won’t work and the “Write access…” dialogue box won’t show up. You’re now what we technically call “stuffed”. Without that dialogue box you’re never going to be able to write to the new storage.
We now enter the realm of magic.
I THINK this should probably work. Enter screen recording (hold down the O touch key on the game controller). Manually record something, anything…
The Android system (not X-plore) will be able to write to the USB stick, and the new recording will appear ON THE USB STICK under Android/media/com.nvidia.nvgamecast/Game Recordings.
Now open X-plore. Find the new recording on the USB stick. Try to delete it. This should now bring up the desired dialogue box. Follow the instructions and you’ll have write access.
All of the foregoing will work with any USB drive, whether it’s 2.0 or 3.0 or later. But as the Shield’s equipped to handle the very much faster 3.0 USB drives it makes sense to use them whenever possible.
Chris Bidmead: 16 Dec 2016