
A useful unintended consequence of starting this story with a prelude numbered “Chapter 0” is that each chapter number corresponds to the number of drives included at each stage of the project.
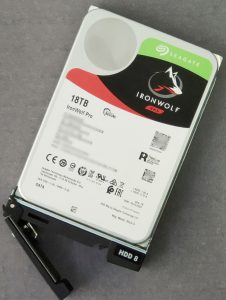
In Chapter 1 we inserted a single data drive, unprotected by any error correction other than the (presumably very adequate) internal safety net provided by the manufacturer’s sector-level error-correction code (ECC). In this case, that drive happened to be a rather costly and especially trustworthy Seagate IronWolf Pro, thanks to Seagate’s decision to chip in on this project. But a key point worth re-emphasising here is that you can get started with UnRAID using practically any old drive you have knocking about.
Let me qualify that. Prior to being accepted into an UnRAID’s array, the drive has to undergo a testing process called “clearing”. More about that in a moment. Once it’s passed that test the drive can be regarded as thoroughly NAS-worthy and you can start (as we did) sharing its contents across the local network.
The second drive we added in chapter 2, the parity drive, is there to keep a bit-by-bit watch over the data drive, and it will also serve to do this for any other data drives we add later.
Now we’re going to add a third drive, a second data drive. But first, it needs to be cleared.
 ANY NEW DATA DRIVE you add to an UnRAID NAS has to have all its bits switched to zero before it can become part of the array. The zeros ensure that a drive added in that state will have no effect on the bit-by-bit values stored on the parity drive, so when the new drive is added, the parity drive won’t even have to spin up.
UnRAID knows the drive is cleared because it’s just done the clearing. But one useful recommendation from Lime Technologies is always to have a cleared drive handy in case you need to replace one that’s failed. What happens if you install a drive like this that you cleared last January and only now need to press into use?
Clearing leaves a drive not entirely devoid of 1 bits. It writes a signature to the drive that marks it as cleared. When UnRAID finds this signature on a newly added drive it knows it can skip the clearing process.
Clearing and PreClearing
In the early days of UnRAID, everything had to grind to a halt while the clearing took place. The array had to come down, so there would be no way of accessing the NAS for data while this was going on. Clearing left you NASless.
To run a command line script you need a command console. Traditionally, to do this you’d have to access the NAS some other way than through a browser, by way of telnet or ssh.
One of UnRAID’s brilliant innovations is that you can open the UnRAID command console directly from the WebUI.
Something of a downer, this, you might think. The UnRAID community thought so too. Particularly as, in 2008, drives were getting to a size where the clearing process might take several hours. A couple of UnRAID community users decided something extra was needed here and wrote command line scripts that would do the job. The scripts required some Linux knowledge to install and run and were eventually wrapped into a user-friendly plugin by community member gfjardim.
Once installed, the PreClear plugin melds seamlessly into the UnRAID WebUI. Arguably it’s perhaps less important now that the current version of UnRAID is able to walk and chew gum at the same time. Insert a new drive the system hasn’t seen before and UnRAID version 6 will charge right in and start clearing it with the array still running.
The PreClear plugin still has its uses. though. If you want to diminish the impact on your system, the plugin will clear a drive attached using the USB port. You could even run the trial version of UnRAID for free (it’s fully functional) on any other machine and use that for the preclear.
Scientology
![]() A Preclear is someone who is receiving Scientology or Dianetics auditing on their way to becoming Clear.
A Preclear is someone who is receiving Scientology or Dianetics auditing on their way to becoming Clear.
If this sounds like Scientology, no, you’re OK. There’s no Ron Hubbard hiding in the UnRAID cupboard. These are drives that are being cleared, not your brain and wallet.
But you might legitimately be wondering why it should take so long simply to zero a drive. In fact, clearing does more than just that. These are the stages:
By default (you can change the options) the PreClear app will in turn:
-
- Read every bit on the drive to check read accuracy.
- Zero every bit on the drive
- Re-read the drive to ensure all the bits are zero.
During these stages it will also attempt to simulate real-world use (which, of course, isn’t non-stop sequential reading, writing and re-reading the whole drive) by including random movements of the head across the platters. And between these stages the app checks the SMART readings to ensure no inconsistencies show up there.
Finally, as we’ve mentioned, it will set a signature on the drive so that when it’s added to the array UnRAID knows it’s been precleared and won’t need to check the parity again.
From the Unassigned Devices list. The device on the top line is the unused QNAP DOM.
Any drive, new or old, that passes this thorough test is pretty well sure to be trustworthy. And when, as it will, it sooner or later becomes untrustworthy, UnRAID’s warning systems should be able to give you plenty of notice.
Once the clearing is done you’ll need to add the drive to the array as it will still be listed as Unassigned. When the array is stopped, the Main page of the WebUI shows a list of (theoretically) available disk slots, 30 of them in all*, including the optional two parity drives.
Slots that are already filled will be shown against their drive’s product identity, serial number, capacity and Linux device name. All the empty slots will be marked “unassigned”. But this data field is a pulldown which when activated will offer a list of all the available unassigned devices known to the system.
Use this pulldown to add the new drive as a candidate for the array. This is also where you choose the file system for the new drive.
With the new drive assigned to a slot you can bring the array back online. Now that the array is running, the MAIN page will display the drive with your selected file system. Somewhat confusingly, though, the data shown for the drive will also include the warning that the drive is “Unmountable: No file system”.
The UnRAID WebUI is magnificently detailed and the clarity of the physical layout is exemplary (QNAP and Synology please note). But I found the logic occasionally defeating me. Happily, the UnRAID forum seems always ready to help at short notice.
The newbie (as I was) might panic at “Unmountable: no file system”. But the drive is simply telling you how things are.
DRIVE: Sorry, punter, but I can’t make this drive available for reading and writing until you can be bothered to put a file system on it.
PUNTER: But I have selected a file system.
DRIVE: Yeah, selected, yeah. But we drives can’t format ourselves. You have to make it so.
The file system you selected is only the candidate file system. To implement this you need to scroll down to the bottom of the Main Page to find the FORMAT button. That will write the format to the drive (changing the parity drive accordingly). With the drive now acknowledged as part of the array, you can share it across the LAN and start adding data to it.
The Live New Drive
For someone like me weaned on the rigour of RAID NASes, there’s a rather wicked sense of naughtiness about being allowed to chuck in new drives of whatever size like this. And to have the free choice of formatting. The first data drive was formatted using UnRAID’s default xfs file system. For this new drive, I chose btrfs and there were several other choices I could have made, some of them using Linux’s own encryption system.
The Linux native encryption system is called LUKS. The acronym stands for Linux Unified Key Setup. It encrypts an entire disk or a disk partition against a passphrase that needs to be supplied every time that disk is mounted. I was interested in investigating encryption but I wasn’t sure that I wanted to encrypt the whole of this new drive or mess with partitioning.
![]() So I turned instead to VeraCrypt, a cross-platform encryption system that, like LUKS, is aimed at the entire drive or partition but also allows the creation of a mountable encrypted file. This file behaves like an encrypted disk but can be transported across the LAN or the Internet.
So I turned instead to VeraCrypt, a cross-platform encryption system that, like LUKS, is aimed at the entire drive or partition but also allows the creation of a mountable encrypted file. This file behaves like an encrypted disk but can be transported across the LAN or the Internet.
We don’t need to get into details about VeraCrypt here except to understand that it’s an application that runs on any Mac, Windows or Linux machine. I installed it, not on the UnRAID NAS (there’s no easy way to do that) but on a client Mac, using it to create a 200GB mountable image file on the new UnRAID drive, now shared out across the LAN. You generate this image against a passphrase without which it can’t be mounted. You can also generate it against a keyfile, which might be a picture, making the crypto very hard indeed to crack.
Having created this encrypted disk image and mounted it to the Mac with Veracrypt I can start moving files into it exactly as if it were a regular external drive. For test purposes I’ve dumped nearly 200GB of multimedia files into it. Now I dismount the disk image.
That done, I can now leave the image on the second data drive or move it across the LAN or the Internet, secure in the knowledge that its contents are safe from unauthorised eyes. To get to the content you’ll need VeraCrypt and the passphrase or keyfile to mount the disk image again.
I’m leaving the encrypted disk image in situ, served up from the NAS like any other file (although, at 200GB, this is a big one).
Oh, but look! I’ve, er, accidentally pulled the new data drive out of the UnRAID NAS and it’s now lying on my cluttered desk, unpowered and motionless. So easily done with these drive caddies.
But wait… That second data drive still appears to be shared to my Mac. And inside that share, I can still find the encrypted disk image. And when I use the VeraCrypt app and my passkey to mount that image… it mounts!
I can now root through its 200GBs of multimedia files. I drop one of the movie files into the VLC media player and up come the opening credits of A Star is Born (the version with Judy Garland and James Mason, 1954).
I’m watching an old movie playing from a ghost drive…
On this occasion, I pulled the hard drive while the array was running. This is how hotswapping is supposed to work. And it did—I got away with it and the missing drive began to be emulated.
But be warned that UnRAID really doesn’t like this kind of hotswapping, as I discovered on plugging the drive in again with the array still running. NEVER DO THIS TO A DRIVE THAT’S PART OF THE ARRAY.
Hotswapping hardware like this QNAP does have the advantage with UnRAID that you won’t need to power down the system before removing or adding drives. But you do need to spin down the array.
The Ghost New Drive
 You’re probably well ahead of me here and know what’s happening. Thanks to the presence of the parity drive, every single bit of data on that extracted drive is also preserved inside the remaining UnRAID array. As VLC reaches across the LAN to reel in the data bit by bit, between them the parity drive and the remaining first data drive feed realtime information into the NAS’s processor so it can calculate whether each missing bit would have been a 1 or a 0. The whole movie and the whole of every other file inside the encrypted disk image—everything is still there, emulated.
I chose an encrypted disk image for this experiment because any single bit failure would have precluded the image mounting. And also because I wanted to explore VeraCrypt. I was impressed that the complex decryption and the rather simpler parity maths could be simultaneously handled so smoothly between my Mac and the QNAP’s very modest low-power processor. The movie played with no hint of buffering.
Speaking of that second data drive, now lying on my desk, you may have been under the impression that it’s the twin of the Seagate IronWolf Pro we’re using as the first data drive. That was the original plan. But this is Plan B. Or Plan C. Or something. I’ve lost count.
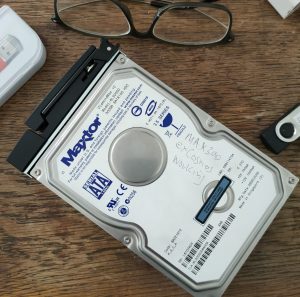
I mentioned above that a key feature of UnRAID is that you can employ any old drive that happens to be lying around. Provided it passes the clear test it will be worthy of the array whatever its size and age. This current second data drive is just such a drive. Its a Maxtor 300GB drive, used in that original Cosmos Hackintosh implementation. Its warranty expired on the 11th of March, 2009.
I do intend to add that second Seagate IronWolf, of course. But that’s rather going to spoil the symmetry between this story’s part numbers and the number of drives making up UnRAID. Instead, we could just remove the Maxtor on my desk from its caddy, replace it with the 18TB Seagate IronWolf Pro, plug that back into the UnRAID server and see what happens.
Which would be what, do you think?
A Confessional Aside
One important advantage in choosing to set up UnRAID on the 4-bay QNAP TS-451 is that (operating system allowing) it’s a hot-swappable device. You can pull drives and plug in new drives without having to power down the machine.
UnRAID allows this kind of behaviour when the hardware supports it. With a caveat. Unassigned drives can be hot-pulled and hot-plugged. But drives associated with the array require the array to be spun down first. Yes, we’ve just hot-pulled a drive from the spinning array with apparently no adverse consequences. But you’ll see why this isn’t generally a good idea in the next section.
Of course, if you’re repurposing an old PC (as was Tested Technology’s original intention) and having to unplug SATA cables, the official UnRAID recommendation to stop the array and power down the device before changing drives is very sound advice.
At this point, I have a confession to make. Having eventually come clean with you about the Maxtor 300GB drive, I feel that now is the time to let you know that the whole UnRAID system has been on the move since our previous chapter. We’re now no longer physically limited to the QNAP TS-451’s four drive bays. The TS-451 is back on duty, running its original drives as a QNAP NAS.
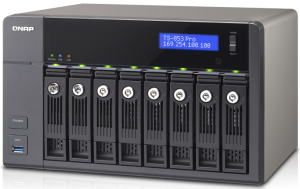 The newcomer is also a QNAP device, but now we have 8 drive bays to play with. After much hair-pulling (not that there’s a lot left to pull) I decided to blow pretty much the whole of 2021’s Tested Technology hardware budget on a pre-loved eBay special. Not the one Prasanna put up for sale but a slightly older, slightly less capable machine with more drive bays.
QNAP devices appear expensive when compared with similarly capable generic hardware. Yes, they are. What you’re paying for is the operating system, the support and—as we discovered during our lengthy QNAP adventure—the rapidly evolving software development.
This 8-bay TS-853 Pro first appeared on the market in 2014 with a price of around $1000 for the diskless version. So to the neophyte, its arrival on eBay six years later for a starting price of a mere £400 (+£20 delivery) might have looked like a bargain. At that price, it wasn’t. It uses a Celeron processor like the TS-451 (but a J1900 quad-core instead of the TS-451’s J1800 dual-core) and has the same 4GB of RAM.
Despite its age, QNAP still offers limited hardware support for this NAS but it’s frozen on an earlier version of the QNAP operating system and officially goes end-of-life at the end of this year. The QNAP goodness, which is mostly what that $1000 was paying for, is on the way out.
Tested Technology wrestled with the vendor over the price and clinched a deal. That old Cosmos machine would have made a pretty good UnRAID server (and perhaps still will). But this rather less old TS-853 Pro, with plenty of room for drives and a processor not too greedy for juice, was exactly what we were looking for as a Cosmos replacement.
This is the machine we’ve been using with UnRAID for the purposes of this current chapter. It may be about to pass below the horizon of QNAP’s TLC but as an UnRAID server—provided you don’t expect it to run multiple virtual machines on 4GB of RAM (and we don’t)—it’s pretty close to ideal.
Upgrading the Maxtor
I learnt a lot in this part of the experiment: about how smart UnRAID is and how dumb I can be when I don’t keep my eye on the ball. I won’t waste space here with my tale of folly. But the curious reader can pick up the story in the UnRAID forum. My gross stupidity is on full display there but it should also help you appreciate the value of a forum of wise, experienced and kindly users.
Let’s get to the good bit. Ah, yes—we’d just pulled a fully functioning drive while the array was running, simulating a total drive failure. But UnRAID kept delivering the goods as if the drive were still present.

The red alert warns of disk disabled. The yellow alert reports errors now the drive is missing. The green alert recognises the return of the drive. But it’s still emulated.
Thanks to the cunning parity emulation, the reason it’s not a good idea to pull a drive from the spinning array only becomes clear when you plug it back in again, having first stopped the array. The question I asked above was: What happens when you do this? The answer is nothing. Spin up the array and the drive goes on being emulated!
This is accompanied by what seemed to me a rather misleading notification telling me the array was now “good”. Actually, nothing has changed. Because the drive continues to be emulated even though it’s now physically present.
It turns out that with the drive returned in its original state, UnRAID refuses to say Thanks, OK, we’re back to the status quo. It won’t consider the array as properly functional until—get this—it has totally rebuilt the data on the returned drive to match the emulation it has been offering in its absence.
Surely a major bug, was my first thought. My second and third, too. Eventually, thanks to the forum, arriving at an understanding of why I was quite wrong about this and UnRAID was quite right, was a valuable educational journey.
But first, let’s talk about that reassuring green notice telling the punter that the array is now “good”. Because it actually isn’t.
It’s “good” in the sense that the drive is physically back in its disk slot and the parity across all the drives still pans out as zero for every accounted for bit. OK. But one of those drives isn’t an actual, physical drive. We can’t let that real drive back into the array until we can be sure we can trust it. So we’re still working with its understudy, the ghost drive, its contents calculated using parity against the other physical drives.
So it’s unsurprising that the parity pans out. We’re using parity to calculate the ghost drive and the ghost drive is being used to check the parity. Recursion.
Is this “good”? No. Because if a second drive now happens to fail, the parity will flag the error but it won’t be able to restore any data on the second failed drive because that very drive was part of the calculation sustaining the emulated drive. More recursion.
In that very important sense, the state of the array isn’t in the least “good”.
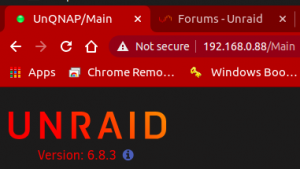
The green icon in the tab top left is what you’re looking out for. The “not secure” triangle below is something different—it just means the UnRAID WebUI isn’t using encryption.
I was quite wrong to have felt assured by this notification. I should have kept my eye on the little icon that appears in the browser tab when you’re logged on to the WebUI. This ought to be a nice green ball. When it’s a warning triangle you know your array is either in trouble or attempting to recover from trouble. When you take heed of that warning and inspect the drive state in the WebUI you’ll find a matching warning triangles against the drive or drives causing the problem.
How you get UnRAID to acknowledge the return of the drive isn’t immediately clear. But, once again, the forum came to my aid. As the drive is to be completely rewritten, the procedure turns out to be exactly the same as if you were to replace the emulated drive, not necessarily with the original, but with any other drive.
The most obvious reason you’d want to this would be to expand your UnRAID capacity by substituting a large drive for a smaller one. So that’s what I did.
I thought back to Manek’s struggles to expand his FreeNAS array, having to copy the data off all his eight drives and reinstall it on the new set of identical, much larger drives, that made up his new set. With UnRAID you can expand capacity drive by drive whenever you like. And during the process, the NAS can continue seamlessly to operate across the LAN.
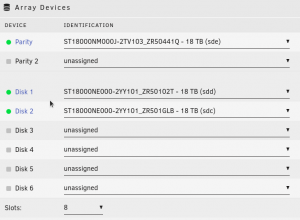
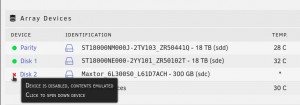
Our three drives in place, with the contents of the 300GB Maxtor now safe in on Disk 2. These “Disk slots” are virtual, in no way tied to the physical drive bays of the TS-853 Pro.
Whether the drive to be replaced has died or you just want to put in a bigger one, the process is the same. Stop the array, remove the drive and, on the MAIN page of the WebUI where the drives are listed, use the pulldown of drive names to set that disk slot to “unassigned”. Then power up the array.
By unassigning that disk slot you’re telling UnRAID that the drive is no longer present. No data is lost—UnRAID knows to offer the emulated version of the drive.
Now spin down the array again and insert the replacement drive. This is where I introduced the second Seagate IronWolf Pro. In this case, I’d used the PreClear plugin to check the entire drive and ensure its data bits were all zeros. But as we will be rebuilding the drive, that turns out not to be essential. During the rebuild, UnRAID already knows the parity of each bit of the old Maxtor as it lays it down on the new drive. When it’s used up the Maxtor data it will then clear the rest of the available drive space.
Running preclear does have the advantage of providing a gruelling testbed. If a drive is going to fail it will tend to be either right at the start of use or towards the end of its estimated useful life.
Either way, now spin up the array, so that UnRAID becomes aware of the new drive’s existence. It will need to be explicitly assigned to the same slot as the drive being replaced and this is something you can’t do while the array is running. The new drive will appear in your list of Unassigned devices.
Once you’re sure UnRAID knows about the drive and has registered its manufacturer’s identity and serial number you can now spin down the array again and then use the pulldown against the logical disk slot the Maxtor used to occupy to assign the new drive to that slot.
This requirement to spin the array up and down several times does mean that, unlike a typical RAID system, you won’t be providing continuous NAS services over the LAN during this drive replacement procedure. And, as we’ve said, if the hardware isn’t, unlike these QNAPs, intrinsically hot-swappable you will also have to power down the system altogether whenever you insert or remove a drive.
With the new 18TB IronWolf Pro sitting in the disk slot previously occupied by the 300GB Maxtor, I spun up the array again.
Aware of the new drive occupying the disk slot of the old drive, UnRAID now knows it has to get to work writing the emulated data back into that slot. But as far as the client devices on the LAN are concerned, life carries on as before, using the emulated data until the write-back has been completed.
With an 18TB drive to be serviced like this, the task took about a day and a half. But during this processor-intensive procedure the UnRAID system remained fully useable, with no perceptible reduction of response. And at the end of the process Tested Technology now had a NAS with its useable capacity doubled to around 36TB.
Moving on
As I’ve mentioned, this narrative is far from being a complete tutorial on how to set up an UnRAID NAS. I’m skipping a ton of detail, confident that readers with access to the Internet and in particular YouTube, can find all they need to know. You’re getting the highlights (and occasional lowlights) of an on-going adventure Tested Technology is engaged in and sharing here in the hope that you might fancy trying some of this for yourself.
In the next chapter, we’ll be lubricating the data flow with that fourth drive, a cache drive, and tidying up some of the (many) points we’ve so far skated over.
Chris Bidmead: 19-Dec-20