
 As we’ve seen, running Linux side-by-side with an existing operating system installation like Windows is a fairly simple proposition. The ability to boot from a cheap USB stick has many advantages: you have a portable, easily backed-up complete system that can travel with you in your pocket and work with any compatible hardware and nothing on your main operating system need be affected (although you still have access to all the data there.)
If you’ve been following this process, I hope by now you’ll have discovered that Linux can do pretty well everything you need to do on your computer (and much more). If there are one or two Windows- or Mac-only apps that you still need, there are workarounds I’ll be covering later. If this is you, now could be the time to back up all your data, kiss your proprietary operating system goodbye and start a fresh Linux installation.
Getting Practical
A fresh install isn’t something I’ve done, at the time of writing this, for many months. But rather than reminisce about my own experience of Linux installation or purely theorise and offer links to reports elsewhere on the Web (but I’ll be doing a bit of that too), I thought it would be useful to march myself through the whole thing all over again and report the step by step process here.
 I wanted to start afresh, with a new machine. As Tested Technology makes no income from advertisements or affiliate links there’s little in the way of budget to finance new hardware. Thankfully, there are several manufacturers out there who understand this and are prepared to donate equipment to this publication. These transactions are always transparent to our readers, who understand that our commentary on any of these products will remain at arm’s length from the manufacturers. We don’t promote, we just report.
And here’s some good news. A laptop manufacturer has stepped up to the mark, one that could hardly be more appropriate to the theme of this series.
The fundamental principle of Linux is its openness. Unlike the proprietary operating systems we’ve grown up with, the code Linux is constructed from is modular and open source. Designed to be taken apart for anyone skilled in the art to inspect, criticise or modify. No patents or non-disclosure agreements—quite literally an open book. It’s a living, evolving manifestation of the “Right to Repair“.
Hardware manufacturers in general have been moving in quite the opposite direction—even to the extent of spending millions of dollars lobbying the American Congress against the Right to Repair movement.
The same sentiment shows in their products. The two components of a modern computer notebook that are guaranteed to fail over time are the battery and the solid state drive. And even those, along with everything else in a typical modern laptop, will be soldered down and/or entombed in glue, encouraging you to chuck the whole machine away and buy a new one every five years or so.
The good news is that there are signs of change among manufacturers. One company is way ahead, leading the charge with a light and slim Ultrabook-style notebook that, like Linux itself, is modular. It’s designed to be taken apart for repair and upgrading and comes complete with the one tool you’ll need to do just that—a dual-head screwdriver that doubles as a spudger.

Yes, the company is Framework. And Framework has chosen to join Tested Technology in this adventure. No pressure at all on our readers—Linux will almost certainly run just fine on your existing hardware, or there are several manufacturers ready to deliver a new machine with Linux preinstalled. (We’ll be covering this later.) But when it comes to repairability, Framework really does have the edge. It’s well worth visiting their Web page to see how it’s done, whether you’re in the market for a new machine or not.
A Cunning Plan
Framework loves Linux, although it isn’t especially Linux-centric—they’ll sell you a fully built laptop with Windows 10 or 11 pre-installed. But, at our request, the company delivered the “DIY version” that requires assembly and is sold without any operating system. It happens that Framework is currently (mid-June) taking orders for their second family of machines, based on Intel’s 12th generation processors and were able to spare us one of their current Intel 11th gen machines.
Rather than just installing Linux straight away (my personal inclination) I thought readers might find it more informative for me to:
- Install Microsoft Windows (to bring the machine up to par with what many readers will be using already).
- Show how you can run Linux inside Windows usefully (for small values of “usefully”).
- Create a dual-boot system that offers the choice of Windows or Linux at boot time for a fuller operating system experience.
- Do a complete Linux installation to arrive at my (personally) preferred Linux-only configuration.
So Here We Go
The UPS package arrived during that scorching June spell in London and I was feeling miserably ill. How plants engage in their reproduction process is a matter I would be happy to leave to them. But their technique intrudes upon my life: they wastefully saturate the air with pollen and I’d been coughing and sneezing all night.
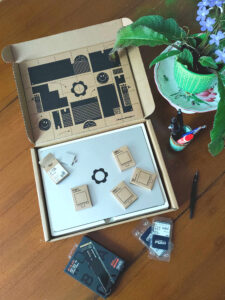
The Framework is not entirely in bits—the mainboard containing the central processor, its heat sink and associated components, is already installed inside the case, which includes the fully connected screen.
In fact, my telling you I “built the DIY Edition” gives me credit I don’t deserve. The trickiest bit of the assembly, the videos had warned me, would be plugging in the tiny wireless card and connecting its two delicate aerial leads. My wireless card turned out to be already installed.
The only two components requiring my DIY skills were the 500GB WD Black M2 solid state drive and the two Crucial 8GB low profile SO-DIMM RAM cards. Getting to the innards is really easy. Use the supplied screwdriver/spudger to undo five small captive screws at the bottom of the case, then turn the thing the right way up again and spudge open the magnetically attached keyboard. You’re now gazing at the entire entrails of the machine.
The company describes the difficulty of assembly as “moderate”. It’s certainly not something you can charge bull-headed into and if you’ve no experience at all of working with electronic components it may seem forbidding. But Framework is ahead of you: it’s all there in the illustrated Laptop DIY Edition QuickStart Guide.
Disassembly is equally a breeze and you can take it even further than that assembly process. The mainboard can be disconnected from the case (just five fasteners) and replaced with something more powerful like Framework’s latest mainboard built around Intel’s Gen 12 processor family.
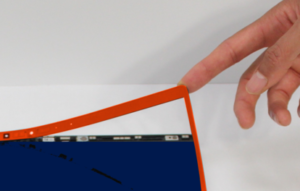 If you break the screen, or Framework offers some newer version you’d prefer, replacement could hardly be easier. The bezel round the edges of the screen is magnetically attached (don’t like the colour? Just swap it out) and once you’ve lifted that off with a fingernail, the whole screen comes out when you unplug its cable and remove four fasteners.
A replacement screen from Framework costs around £180. (For replacing the smashed screen on my old MacBook Air I was quoted around £600 by a third party repair shop. The much higher repair prices you’ll be quoted at the official Apple Genius Bar are designed—of course—to encourage you to buy a new machine.)
All the fasteners and screws are turned using only the provided screwdriver/spudger. Not all the screws are captive like the five holding on the bottom cover. But if you’re careless enough to lose one, there are five spares screwed into the inside of the bottom cover. Need more? The full specs of every screw in the machine are listed in the illustrated Fasteners Guide.
It hardly needs saying that this is how products like this should be. The copious illustrated documentation you’ll find on the Framework Web site will be as much as you’ll need to help you fix your machine. But if you’d rather turn repairs over to a professional, you won’t need to seek out an “authorised” repair shop with special (and often secret, restrictive) ties to the manufacturer. The documentation and the spares are accessible to anyone you might feel like trusting your machine to.
That’s All Very Well, But…
 There’s one caveat: the mainboard schematics.
The electronics at the heart of any machine of this kind will almost never be designed by the manufacturer whose brand is on the outside of the case. And typically the third party “original equipment manufacturer” (OEM) of the mainboard (or “motherboard” as we called it back when gender was less of a tender subject) will have sole control over the intellectual property behind that part of the system.
This effectively means that the mainboard of a Framework laptop will be a “black box” as far as you, the owner of the machine, are concerned. If it goes wrong you can replace it relatively easily but not cheaply. If you had the schematics, describing every component and its connections, you’d be in a position to replace individual parts: a bloated capacitor, a connector with a broken pin, a burnt-out resistor.
Cost of the spare part? Possibly just a few pence. Replacing the entire mainboard: several hundred pounds. The schematics might even help you track down an oxidized solder joint, a fix that would cost you nothing.
 But for most of the work you’d need much more than the schematics. Servicing a modern motherboard requires expensive equipment you’re unlikely to find outside a computer repair shop. But without the schematics, even the best equipped repair shop will be hunting in the dark.
Framework is in something of a bind about this. The company’s instinct seems to be that you, the customer, should have access to everything you need to know to fix your machine. And everything Framework can tell you, it does tell you—with copious illustrated how-to Web pages. But it can’t put the schematics up on the Web because it doesn’t own the intellectual property (IP) rights.
The solution Framework has arrived at is a compromise. But it’s workable.
 You’re not equipped, skill-wise or tool-wise, to fix the mainboard yourself. So you take it in to a repair shop that has what it takes. Everything, that is, except the schematics. However, Framework has arranged that in return for signing a form (presumably a non-disclosure agreement that ensures the IP of the mainboard manufacturer remains sacrosanct) that repair shop can receive the schematics.
So IP is still getting in the way of full Right to Repair. But in practical terms this is a win. There’s no arrangement here that says if you replace a component with an identical official component you have to ring head office (Hello, Cupertino!) to get a special authorisation code before everything’s working again. Framework’s products look like being the most repairable slim notebooks on the planet.
In this video you travel on a risky e-bike ride as Rossman commutes to his repair shop in West 27th Street through the race-and-jam traffic of New York. The video is worth 30 minutes of your time for the ride alone. But stand by for some raw New York expletives as he talks through the issues with Framework and its schematics while negotiating his way through the undisciplined driving styles of his fellow commuters (the expletives are directed at them, not at Framework).
With my copy of Windows 10 Pro ready to install, we’ll get started with The Cunning Plan in part 6.
Chris Bidmead 20-Jun-22