
Almost an entire year has passed since part 4 of this review, which I concluded with “to be continued”. You deserve an explanation.
The Yamaha RX-679 and the QNAP TS-451 were two bits of kit that turned out to be much more fascinating than I’d anticipated. I knew when I got started that each of these was going to be a serial story but I didn’t foresee that together they’d more or less take over Tested Technology for months on end.
I wound up the Yamaha review (although there was more to say) after six episodes. The QNAP NAS was a different proposition. Not only was there, after four episodes, plenty more to say. There was a whole new aspect of the device I’d vaguely hinted at but still hadn’t got round to tackling.
I decided to back off from the NAS for a month or two to widen the coverage to include a variety of other products. Tested Technology turned to mobile phones, headphones, projectors and even adjustable reading glasses and an electronic water-bottle attachment.
Having broadened the brief, in the third quarter of last year I realised it was time to get back to the QNAP and, in particular, start discussing that key feature I’d only hinted at. I’m talking about the HDMI output. Connected directly to a display device like a TV set or a projector, the QNAP TS-451 becomes (if you so choose) a standalone multimedia server and player combined.
And as soon as I got started with that… one of the 6TB WD Red drives went into fail mode!
A NAS Drive in Distress
 BEFORE WE GET ON TO THE HDMI PART of the story, I need to fill you in about that failed drive. Well, not actually “failed”. Technically, “failing”.
And in a way, I’m not too unhappy with the occurrence.
Yes, it was miserable not being able to unfold the full riches of the QNAP TS-451 before you as promised. Until the replacement drive arrived, I thought it best not to strain the system, and ran the device in skeleton mode, shutting down several of the multimedia daemons I’d have needed for the HDMI stuff. But I saw this as an opportunity, once I’d got the drive fixed, to take readers on a living, breathing walk-through of one of the great fundamental features underpinning a well-designed NAS.
Here are the things to know about this. At the lowest level, something called SMART protects individual drives like the 6TB WD Reds from unpleasant surprises. On top of that, a properly implemented RAID system (which we talked about in part 3) protects the overall storage from the total failure of a single drive (or even two drives, if you’re lucky).
And in a semi-pro NAS like the QNAP TS-451 (and upwards) the failure of a single drive is so inconsequential that you can even swap out the dud drive without having to take down the system. Business as usual. Other users on the LAN can go on saving files and playing media without even knowing that one of the four drives is being removed and replaced.
It’s called “hot-swapping”.
SMART
But let’s start with SMART. Self-Monitoring, Analysis and Reporting Technology is a system built into nearly all of today’s hard disk drives and many solid state drives. Its aim is closely to monitor the activity of the drive to make guesses about the likelihood of failure, report those parameters in a loggable way, and, to some extent, take steps where possible to ameliorate deterioration.
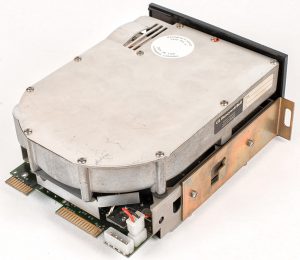
Honeywell re-badge of the Seagate ST-506, the first desktop hard drive. Capacity: 5MB. Price in today’s money: around £3,500.
When I first became acquainted with hard drives (in 1982 I added my first Seagate ST-506 to my dual floppy Vector Graphic MZ System B), we knew they were prone to failure. But never when. It was sudden death: a screeching noise like the squeal of a stuck pig would suddenly fill the room, and you knew your data was a goner.
By the late ’80s that terrifying squeal was replaced by a very much quieter, ominous tick-tick-tick, like a deathwatch beetle in the roof beams. But this discreet announcement was no less sudden, and it heralded the same bad news. Everything on that drive was very likely toast.
SMART was introduced in the early ’90s. The idea was to give some warning in advance of a drive failure so the user could rescue the data in good time. Originally SMART simply based failure prediction on its monitoring of the disk activity and the temperature of the drive unit. Today SMART is a lot more sophisticated. For example, it regularly checks the quality of all the sectors, whether used or not.
And it was this that the SMART system monitoring my four drives started to worry about. The 6TB WD Red in the drive 2 slot began reporting a very high Current Pending Sector count. The result showed up in the QNAP Web interface with a Warning flag attached to it.
But if the data are unreadable, what gets remapped? The answer is: nothing. The dud sector is added to the Current Pending Sector list, where it will be periodically perused. Still unreadable? Stick it back on the list. Have another go later. If, even if only once, the sector eventually yields up its message (and the error checking built into each drive sector will confirm its accuracy) that data will get written to a new, good sector. The old sector is written off and removed from the Current Pending Sector list.
Like you (probably) I had no idea what a Current Pending Sector count was or meant (see Box). But the NAS knew. The status of the QNAP system as a whole was now marked down to “Degraded”.
I raised the issue in the excellent QNAP user forum (avoid any major product that doesn’t have a user forum). Helpful QNAPpers there suggested that although the drive (and therefore the NAS) would continue to be usable, the Current Pending Sector count was dangerously high and I should replace the drive as soon as possible.
The Warranty
WD Reds come with a three-year warranty, and I was well within that limit. Rather than bother the WD PR folks who’d very decently sent me the four drives back in 2014, I thought it might be a useful part of the story to report on the WD standard RMA (return merchandise authorisation) process that readers would have to go through.
Ha! I learnt a couple of things from this. The warranty only applies to drives bought from an authorised distributor or authorised reseller (and not to drives included as components inside another manufacturer’s product. If a WD drive inside a Dell fails, talk to Dell).
OK, I hadn’t actually bought the drive. But WD’s support desk assured me the 3-year warranty still held, even though the serial number, when entered into WD online database, said the warranty had expired. All they would need to validate it would be, er… the name, address and phone number of the retailer I’d bought it from, and the date of purchase.
I’d said up front that there was no retailer. The drives had come directly from WD’s PR folks. But if I was confused, so indeed was WD’s support desk. It took a week, and half a dozen back-and-forth emails, before Mark Seleznev, WD’s very helpful support technician, came back to me with the news:
Dear CHRIS BIDMEAD,
I have spoken with our admin team. I apologize for the delay. I have verified the status of the drives and they are marked as QS which means it is a Quality Sample. As I was explained, this drives have 1 day warranty so basically they have no real warranty attached to them. This doesn’t mean that we can’t replace those drives though. The process needs to go through the same department where you got them from. (The ones that sent you the Quality Sample).
So it turns out that drives supplied gratis to reviewers come with this special Quality Sample Warranty that also applies to units sent out to distributors for evaluation. A ONE DAY warranty!
On reflection, this one-day QS warranty makes perfect sense. It guarantees replacement for any dead-on-arrival drives, but at the same time guards against sample drives getting illegitimately mixed in with the those intended for customers. And as Mark said, an informal replacement could always be arranged through the original supply source.
Except that I now discovered that Jeff Lea, MD of Chillifish, WD’s official (and very efficient) PR company at the time I started this review, was now no longer on the job. I won’t bore you here with the full saga of the occasionally nail-biting four months it took me to follow this through. Let’s just cut to the happy ending.
In much the same generous spirit, WD’s in house PR team, Paul Wooding and Hannah Oliver, felt that a worthy replacement for a single failed 6TB Red would be a new 6TB Red and a second backup 6TB Red. I’m hugely grateful.
The Hot-Swap
It seems weird to be pulling out a drive from a machine without switching it off first and, indeed, unplugging it from the mains. Don’t try this with your standard desktop computer. But I checked in the QNAP forum, and was told, yeah, go ahead.
I also checked in the QNAP manual, where I read: “The NAS supports hot-swapping the hard drives when 1 member drive crashes in RAID 1, 1–2 member drives crash in RAID 5 or RAID 6.”
Was the NAS in “degraded mode”, the manual asked. Yes, indeed. Had I a new hard drive, the same capacity or larger, ready to replace the old one. Tick. Then “Unplug the failed drive from the NAS. Wait for about 20 seconds or until the server beeps twice.”
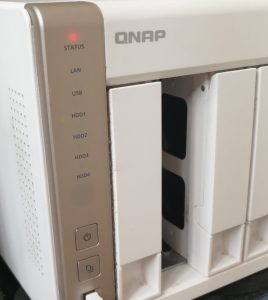
 The drive trays on fully professional NASes are lockable to prevent casual theft. On the semi-pro TS-451 the drive trays simply unlatch when you put a finger into the recess at the bottom and pull.
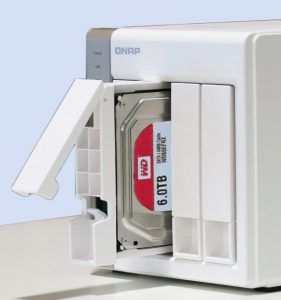
The drive is attached to the tray with four screws, so there’s a bit of fiddling with a screwdriver before you’re ready to slide the tray, equipped with the replacement drive, back into its slot. At this point the device gives two long beeps… and you’re done.
And this was also when I noticed the warning sign at the bottom of the manual page covering hot-swapping:

I’m assuming this is just something insisted on by QNAP’s legal department. Obviously it makes nonsense of the hot-swap concept, and in any case, with the power plug at the rear of the drive disconnecting the moment the drawer is levered open, it’s hard to imagine how the user could possibly have any contact with electricity. As long as you don’t try poking a screwdriver into the opened empty drawer.
Ignore the warning. Hot-swap. (So sue me…)
The whole process took about seven minutes. Here’s the log to prove it (read it from the bottom up):
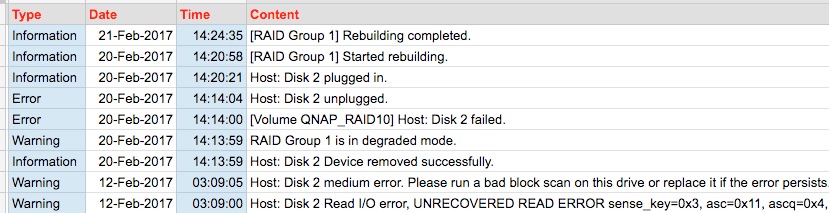
The two entries at the bottom are typical of warnings I’d been getting for months. The first 20 Feb entry indicates my hot-swap removal of the drives, characterised merely as “Information”, because the NAS continues to function, happily delivering Art Pepper to my Yamaha music system. A minute later, however, this is reinterpreted as an “Error”: the drive in bay 2 has “failed”. Failed to perform, because it wasn’t there. But Art Pepper plays on.
It takes the system four more seconds to remind itself that the reason for the total failure is that the drive’s been unplugged, reclassified now as an “Error”. Undeterred, Art Pepper’s divine alto sax continues to fill the room with his 1981 rendition of “Everything Happens to Me”. Meanwhile, I’m removing the four screws holding the dud drive to the drive caddy, screwing in the new drive and sliding the caddy back in—approximately six minutes work. Another 37 seconds later and the “rebuild” is underway. Seven minutes in all.
That’s if you don’t count the rebuild. The rebuilt time came as a surprise, although it shouldn’t have been. I’d written in part 3 that “Restoring data in a 4 drive RAID array when each drive is 6TB in capacity might take a whole day.” And you can see from the log that this was exactly right, to the nearest five minutes.
In the next part, I promise—if the fates allow—I will finally get around to QNAP’s direct HDMI magic.
Chris Bidmead