
The traditional dedicated camera has one huge advantage over the smartphone you’re starting to use to take all your pictures. Its large lens captures a lot more light.
But your phone’s always with you. These days that camera you may have paid several hundred pounds for a few years ago is quite likely to be stuck in a drawer somewhere.
The handy, always-with-you aspect of smartphones isn’t their only advantage over traditional cameras. Crucially, your phone is wirelessly connectable to your LAN, and so to the computer you probably use for editing and collecting your masterworks.
Several of the newer dedicated cameras now include wireless connectivity (but at a price). And the chances are that camera you’ve stopped using doesn’t.
But that’s fixable. It’s what the Toshiba FlashAir Wireless SD card is for.
Just Add Wireless
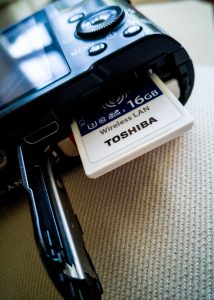 ALMOST ANY CAMERA THAT TAKES standard SD memory can be upgraded to wireless by sliding in a Toshiba FlashAir card. I tested the 16GB FlashAir card in a venerable Canon Powershot A640 and the pocketable Sony HX7V. The Sony camera is about seven years old, and the Canon, the last of the Powershots to run on standard AA batteries, dates back a full decade.
The FlashAir requires no set-up if you’re happy to accept its defaults—which include its SSID (service set identifier, the name it announces to wireless connecting devices) and its password (12345678). Toshiba (and common sense) recommends that you change these once you start using the FlashAir in earnest.
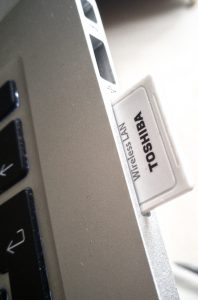
Taking power from your camera, the wireless circuitry built into the FlashAir advertises itself over the air with its SSID (something like “flashair-xxxxx”) inviting you to connect your WiFi notebook or phone.
When you’ve done this and supplied the WiFi password, the second piece of additional magic in the FlashAir card kicks in. As well as flash storage (obviously) and the wireless subsystem, the card also includes its own Web server. A wireless connected browser directed to the URL 192.168.0.1 then gets to see the card’s internal directory, and so has access to the data stored there.

Web browser view
That’s the basics of the FlashAir card: storage, WiFi, a Web server. You can get the card to do more or less everything you need on just this basis, with no additional software. And this is where I’d strongly recommend you kick off. It gives you a firm grasp of the fundamentals.
Which you’re going to need. Because if you start by following the steps laid out in the official manual you can end up very confused indeed.
As It Is Written
The first confusing thing about the manual is that—apart from the perfunctory combined Getting Started Guide and Warranty leaflet—there isn’t one. You have to fish about on the Web to find the associated software. Download this (I used the Mac version) and you’ll find it comprises a pair of apps. I’ll come to the FlashAir Drive app in a moment. The other app, FlashAir Tool, is the one with the embedded manual, accessed through its Help button.
That link to the associated software takes you to the latest versions of the two apps. Confusingly, there are other URLs to previous iterations of the apps that Toshiba has left on the Web for no very good reason (because the latest updates of the two apps will also work with previous hardware versions of the FlashAir card).
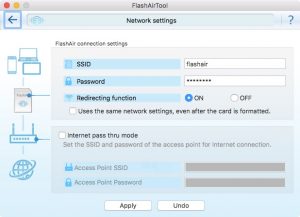
 In order to run the FlashAir Tool app you’ll need to insert the card into an SD slot on your computer. Once that’s done, the first options on the FlashAir Tool menu are straightforward enough: change the SSID to the name of your choice, and set up a password instead of the default “12345678”. For the changes you make to stick you’re instructed to remove the card and plug it back in again. By doing this, you’re effectively applying the “I.T. Crowd” solution—switching it off and switching it on again.
This part of the menu is also where you can set up the “redirecting function“. According to the manual “The redirecting function automatically redirects the browser to “http://flashair” when accessing the FlashAir™ card with the browser…” This saves you having to type in the URL when accessing the card through a Web browser.
Staying in Touch with the World
The second section of the Network settings is where you’re invited to establish “Internet pass through mode“. Your direct WiFi connection to the FlashAir necessarily disconnects you from your regular wireless access point, so severing your connection to the Internet. To use Internet passthrough you give the FlashAir card the SSID and password for your wireless access point, which will enable it to relay Internet requests.
 Nice idea. But whoever designed this seems not to have thought it through. You may not have this problem, but it happens that my own LAN is on the subnet 192.168.0.x, which is the same subnet that FlashAir uses. Worse, my Virgin Media router appears on the LAN as 192.168.0.1, which is the identical address used by the FlashAir Web server to deliver its internal directory.
Without Internet pass through mode enabled, with my laptop wirelessly connected to the FlashAir, the address 192.168.0.1 delivers the contents of the FlashAir with no problem. This is because although the FlashAir and my LAN have the same subnet address, I’m now completely disconnected from my LAN. But if I arrange for Internet pass through, while connected to the FlashAir that 192.1.68.0.1 address gets diverted from the FlashAir Web server, passing seamlessly through to my LAN and so to the Virgin Media Router. I never get to see the photos on the FlashAir card.
To make this work I’d need to change the address of the FlashAir card. But there’s no provision to do this. So I have to leave Internet pass through mode firmly switched off. (Ah, but see part 2)
Startup Mode
By default, in automatic startup mode the FlashAir card is set to power up its wireless the moment the camera is switched on. If no attempt is made to connect to the FlashAir after five minutes, the wireless powers down to save juice. If you want to switch the wireless on again you have to power-cycle the camera.
That five-minute timeout can be changed to between 1 minute and 30 minutes using the FlashAir Tool.
Alternatively, the FlashAir Tool can set the card to manual startup mode. In this mode, when the camera is switched on the card behaves like an ordinary memory card. The wireless function remains off.
Toshiba’s cunning work-around is to include a dummy photo in directory separate from the real photos. Most camera menus will allow individual photos to be set to “protect”, which prevents them being accidentally deleted. In manual startup mode the FlashAir constantly polls the dummy photo to query its “protected” status.
The dummy start/stop picture.
The rules aren’t entirely straightforward. Regardless of whether protection of the dummy is on or off, when in manual startup mode, wireless won’t be turned on. Thereafter, turning protection off (or on and off if it’s already off) will switch the wireless on. Switching protection on (or off and on if it’s already on) turns the wireless off.
Recite that to yourself for a few weeks every bedtime and you’ll soon get the hang of it.

FlashAir Drive Setting
This feature is intended to show the content of the FlashAir card in a directory in your Finder (or for Windows users, File Explorer) as if the card were a shared network directory on your computer. It uses a standard Web protocol (WebDAV) that enables the tiny Web server inside the FlashAir to behave like network attached storage (NAS).
The FlashAir Drive app for the Mac and Windows is included in the download from the Toshiba Web site. You’ll first need to setup the FlashAir card with the FlashAir tool to use this feature. The app needs to know the SSID and wireless password you’ve set for the card
Although it sounds as if it might useful to have the contents of your camera appear as a drive on your PC or laptop, in practice this turns out to be awkward and not particularly reliable.
The wireless link is slow, so although the file names of the photos may be there in the directory, pulling up the photo itself will take a little time. There’s also a significant time lag between taking a new picture and its appearance on your computer. At the very least I found I had to manually refresh the WebDAV directory before any new photo turned up in it.
Warning: the FlashAir Drive app crashes unceremoniously if the parameters haven’t been correctly set up beforehand using the FlashAir Tool.
Toshiba’s FlashAir Drive solution is neat when it works, but isn’t something I felt able to rely on. The straightforward method we started with—manually switch the wireless connection and visit the default FlashAir URL in your browser—is much more solid.
But perhaps there’s a better way?
Ricoh to the Rescue (sort of)
Ricoh, which acquired and renamed EyeFi’s Cloud storage business and related applications in the summer of last year, fields a family of apps (across all the major operating systems) now called Keenai that will handle FlashAir as well as EyeFi. Ricoh seems to be using this to persuade you to enlist in its $50-per-year subscription plan. Not a bad price when you consider that members have the advantage of unlimited backup of all their photos of any resolution (including RAW).
Do you need to sign up to the subscription plan? Good question. See below.
You know up front that if you don’t stump up for the subscription after 30 days you’re going to lose all the photos and videos you’ve sent to the Cloud. Fair enough. The key question (for me, at least) is: will I still be able to use the Keenai app to transfer data locally?
I winged off this question to Keenai support, proceeding on the basis that the answer from any 21st-century company would be Yes.
I was astonished to receive this 1980s-style response:
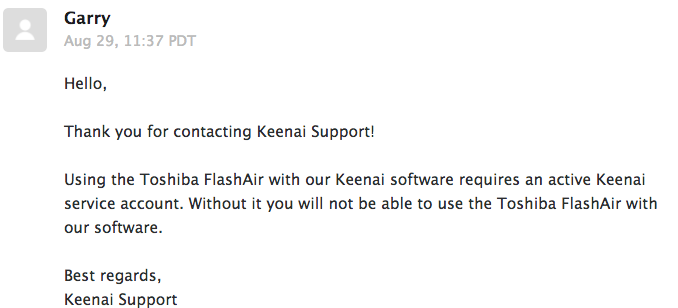
Hmmmm…
There’s some undoubtedly good stuff in the Keenai app—for example, as the transfer from camera to computer is taking place a recognisable thumbnail of each shot appears on the Mac screen with a progress bar. Keenai will also run on your Android or iOS phone.
I started to write this all up at some length while I was waiting to hear back from Keenai Support Garry. But in the light of his very disappointing response, and to make room for other FlashAir techniques I’m actually going to use, I won’t include any of that here. If you want to plunge into Keenai’s subscription service, the Web can supply you with plenty of information about how it all works.
The Chrome(book) Solution
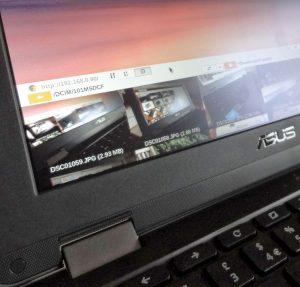
Yokin’s FlashAir Sync on the Asus C213NA Chromebook
A modest refinement of that basic Web browser solution we started with is a Chrome browser plug-in called Yokin’s FlashAirSync. This app works more-or-less wherever Chrome works (not phones, sadly, but it does, of course, includes Chromebooks), automating some of the basic process. You’ll still have to switch to the FlashAir wireless connection manually (at least, until we get to part 2 of this review). But having done that the contents of your camera turn up swiftly in the browser as thumbnails.
I used the Sony HX7V to take the photo on the right and watched each shot float effortlessly onto to the Asus C213NA’s screen within a matter of seconds.
You can set up in advance the directory on your computer you want to transfer pictures to and arrange for all the camera contents or only the newest to be sent there. You also get the option to download individual pictures. Unlike Keenai, there isn’t the luxury of seeing a thumbnail of your photo sliding in from the side of the screen, but the transfer is efficient and fast.
FlashAir Beyond the Mac
 So far we’ve confined the discussion to wireless transfers from the camera to a computer. I’ve focused on the Mac, but everything we’ve talked about so far should work equally well on Windows machines. The base mechanism: storage, WiFi, Web server, is built around cross-platform standards and so will work practically anywhere.
Keenai is offered for the Mac and Windows and the open source repository Github offers Keenai solutions for Linux.
Android and iOS are also covered by Keenai and Toshiba’s own FlashAir app. I’ve spent no time on them here because transferring photos from camera to phone isn’t something I see much need to do, as the phone isn’t where I edit or store my media. But I’ve tested both the Toshiba and Keenai Android apps enough to know they work as well as those transfers to my Mac.
 But I can envisage a situation where your editing computer might be Ethernet-wired into your LAN with no wireless facility. At first glance, it might seem the only way to handle this would be to use your phone as an intermediary. But hold on…
Beyond the Mac, beyond the desktop, beyond connection to phones and tablets, Yokin’s Chrome plug-in started me off in a whole new direction.
And this (as we’ll see in part 2) where the FlashAir story takes a whole new twist.
Chris Bidmead
The Wireless SD Card Market
The Toshiba FlashAir series of SD cards is now in its fourth generation. Originally launched in 2011 as the “World’s first SDHC memory card with embedded wireless LAN functionality to meet the SD Memory Card Standard”, it was, in fact, trailing in the wake of the pioneering manufacturer, EyeFi.
The EyeFi devices needed a special USB card reader and proprietary software. They arrived on the market in 2009 and were enthusiastically received by amateurs and professionals alike. Until, that is, a sudden announcement by EyeFi Inc. in the summer of 2016.
EyeFi shocked its users with the news that it was about to discontinue updates and Cloud support for all its previous wireless cards. By October of that year, customers were alarmed to discover that all EyeFi cards were being listed as “discontinued”.
Some of them may have taken comfort from the official EyeFi Inc. announcement that it had entered into a “technology sharing agreement” with Toshiba. But many felt that this had the distinct air of a sell-out to the larger Japanese competitor. A further complication was that EyeFi’s subscription Cloud service had passed into the hands of camera manufacturer Ricoh, who renamed the service Keenai.
EyeFi is still a presence on Amazon, although for some reason its cards are priced there at almost twice that of the Toshiba equivalents. EyeFi’s Web site has contracted down to a single page placeholder, and all the signs are that the brand is now little more than a name looking for a home.
There have been a few other manufacturers of similar products along the way. The two chief ones remaining in the market are Transcend (Taiwan) and ezShare (mainland China).
Brilliant & informative piece on Flashair.
I have just bought one and was struggling with the 192.168.0.1 problem too. Thanks for providing the reason for the problem, and potential work around.
I shall look at some of the options discussed here.
I was planning to use the Adroid app on a tablet and hadn’t given much thought to using a browser, but as I now see I can manipulate that I will give it a try.
Thanks for the info.
Thanks, Den. We do try very hard to be informative. Brilliance, we can’t always guarantee.
Yes, the FlashAir turns out to be rather surprising, once you get into it. There’s a lot you can do once you start messing with that CONFIG file.
—
Chris
Thank you so much for writing this article. I have been a Eye fi user in the past. I am still interested in Wifi cards. Because most of the cameras in my fleet do not have built in wireless. There are some good options for the New WIFI cameras. DigicamControl and DSLR Dashboard.
But tethering a camera with a USB cable does not last. The cables suck and the connection is too fragile. The cameras will last way longer than the USB connector.
I think I may try the FlashAIR 4 with Keenai or the ChromeApp
My workflow is one, where I change the FileName to the students name.
only a few software programs that let you do that. But I can always do it POST. With a macro.
Thanks again.
Thanks for your appreciation, Daryl. I agree with you about having to plug USB cables in and out. A wireless system, if you can get it running smoothly, is a much better option, particularly if you’re not shooting RAW.
—
Chris