
 We’ve explored two ways of running Linux inside Windows. But now we’re going to make Windows and Linux equal partners, sharing the hardware between them. In my case the hardware is the Framework Gen 11 Intel i7 laptop, generously donated to Tested Technology for this series.
It turns out to be just as well that I decided to work through this practically on new hardware rather than rely on what I remember from the last time I set up this kind of dual boot. Because times have changed.
Back in the day, setting up a dual boot system was perilous and you were lucky if the original operating system was still there to say hello to once the operation was all done. In fact, dual boot systems would never have been anything I’d recommend.
Last time I did this I started with an empty disk drive, divided it into two separate partitions and installed Windows on one partition and then Linux on the other. But you probably don’t want to have to uninstall the system you’ve been using and would just like to squeeze it down in size to make room for Linux. I hear you.
And, it turns out, so do the folks at Ubuntu. Because they’ve made it all so absurdly easy that you really don’t need me at all.
A Diversion about Drive Size
Let me say something here about the size of laptop drives. The last time I set up a dual boot system the entry-level drive size of most consumer machines had become 1TB. These were rotating hard disks, known in the trade as “spinning rust”. And they were cheap.
The majority of modern consumer laptops have superseded spinning rust with solid state drives (SSDs). These boot very much faster and are generally more robust, particularly for portable devices. But they’re also many times more expensive, so manufacturers have responded by dropping the entry-level capacity, typically to 250GB.
 I’m fine with this. Because essentially I don’t trust hardware. I’ve been using IT hardware for getting on for half a century, and that stuff dies, I can tell you. I don’t even trust this new Framework laptop. Clarification: Unlike much other hardware, I absolutely trust it to be repairable if it goes wrong. But I don’t trust it not to go wrong.
The advantage 250GB has over 1TB is that it stores less data! There’s less to lose when the inevitable happens. Mission critical data should not be allowed to accumulate exclusively on your computer.
All the notes I make in Joplin are instantly replicated across two desktop machines, a NAS and my phone. I’ve set up FadeIn, my screenwriting app, to do the same thing. Every word and every picture I add to Tested Technology is simultaneously stored at Machine Networks where the whole publication gets automatically backed up twice a day.
So a local 250GB drive should be more than enough to store the essentials: apps and their immediately associated data, configuration files and so on. Oh, and that’s another reason for not relying on proprietary software. When you lose your free software apps you just reload them from the Internet. Reinstalling apps that require serial numbers and/or authorisation from the vendor can be a lengthy nightmare.
This machine’s 500GB will split nicely, then, into a pair of partitions for Windows and Linux. But how do we squeeze down Windows to make room?
Belt and Braces
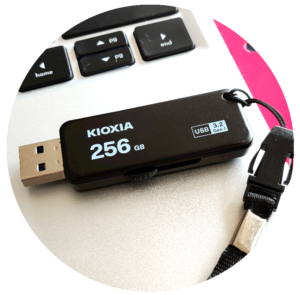
In case anything might go wrong (but it didn’t) I backed up the whole Windows system, with its apps and data files onto a 256GB USB 3.2 stick very kindly donated by the Japanese manufacturer Kioxia. Kioxia (the name is a combination of Japanese words meaning “memory value”) is a spin-off from Toshiba, the company credited with inventing the game-changing technology Flash memory in the early 1980s.
This was belt-and-braces as far as the data were concerned because the important files were replicated elsewhere. But a Windows reinstallation can be painful and time-consuming.
There are several ways you can do a full Windows backup and one is built into Windows itself. Called Windows System Tool, it’s no longer maintained by Microsoft although it’s still there in Windows 10. But on the recommendation of Tested Technology contributor Barry Fox I’d used Macrium Reflect in the past with some success, so I settled on that. Its free version* can create a compressed image file of your entire Windows partitions, which gives you a quick way of restoring everything.
However, if for work reasons you still need to run Windows apps, a dual boot setup like this is a good way to do it.
I’ve been urging readers to back up for decades, although never thoroughly following my own advice. On this occasion, although there was nothing especially precious to me in my WinSlapped Windows 10 Pro installation, I thought it worth while carrying out the procedure by the book.
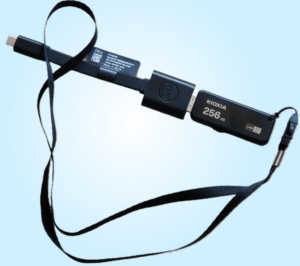
Even if you have a NAS—and Tested Technology is lucky enough to have several—a good sized USB stick from a reliable manufacturer like Kioxia is very handy for specific backup jobs. The trick then is not losing the USB stick. I always make sure they’re attached to a lanyard so I can hang them up somewhere conspicuous or carry them round my neck.
A large USB stick can be a very handy way of doing these one-off backups. But when USB storage gets to this size, make sure its fast USB 3. It can take forever to transfer large files to and from the much slower older versions of USB.
I’d also recommend that you never attach these physically larger USB sticks directly to your USB port. Having something this size sticking out of the side of your machine isn’t just awkward. Any accidental impact on the protrusion could damage the stick and, more importantly, your USB port, which could be . I like to use a flexible adaptor. But make sure the adaptor is USB 3 compliant.
Going for the install
With Windows 10 Pro sprawled all over this Framework laptop’s 500GB SSD, I inserted my SanDisk Ultrafit 32 GB USB stick, set up with Ventoy and the Jammy Jellyfish iso as discussed, into the USB socket and booted the machine from it.*
By the way, these tiny UltraFits barely protrude from the side of the machine and I’m happy to use them without a flexible adaptor. Be aware, though, that they tend to get quite hot with intensive use and this slows them down. That’s why I prefer large capacity USB sticks to be physically larger, like the Kioxia.
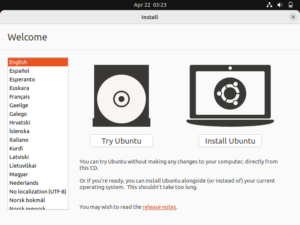
Up to this point the process has been no different from the Ventoy adventure we embarked on in part 3. But now we’re not just going to “Try Ubuntu”. We’re going to choose the “Install Ubuntu” option.
Conventional wisdom has it that you set up a dual boot on an existing Windows system by going first into Windows and shrinking down a partition to make room for the newcomer. All the YouTube videos I’ve seen still recommend this approach.
YouTube videos are a great source of information. But you need to judge them critically (as, indeed, you should anything on the Web, even if it’s called “Tested Technology”). I viewed these videos and noticed that they also all suggested you create your bootable Ubuntu iso with Rufus. Old school. And Windows-centric*.
The installation automatically detects surrounding wireless access points and asks if you want to connect. It’s a good idea to do so because this allows Ubuntu to update itself from the Internet at the same time as it’s installing from your USB stick. So I ticked the box and entered my wireless password.
What happened next surprised me. No detailed discussion of how I wanted to proceed next: Ubuntu automatically detected the presence of Windows and simply asked me if I wanted to replace it or have Ubuntu cohabit with it.
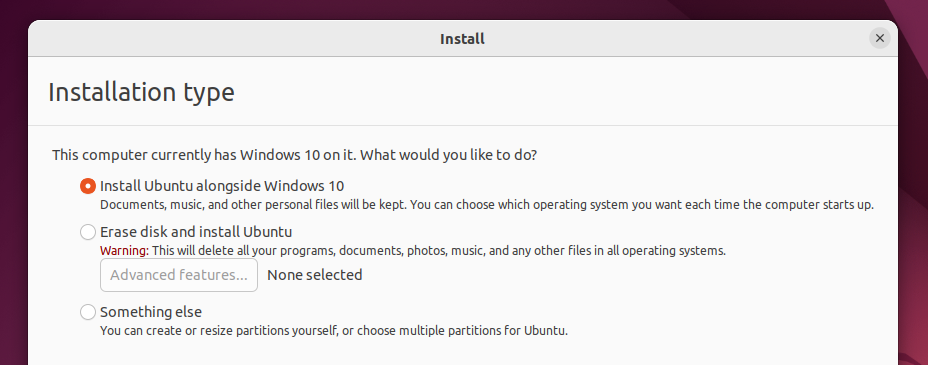
And when I chose the cohabit option, instead of baffling me with questions about partition sizes, Ubuntu presented me with a graphical illustration of my 500GB drive with a large slider in the middle, inviting me to slice the drive like a piece of cake.
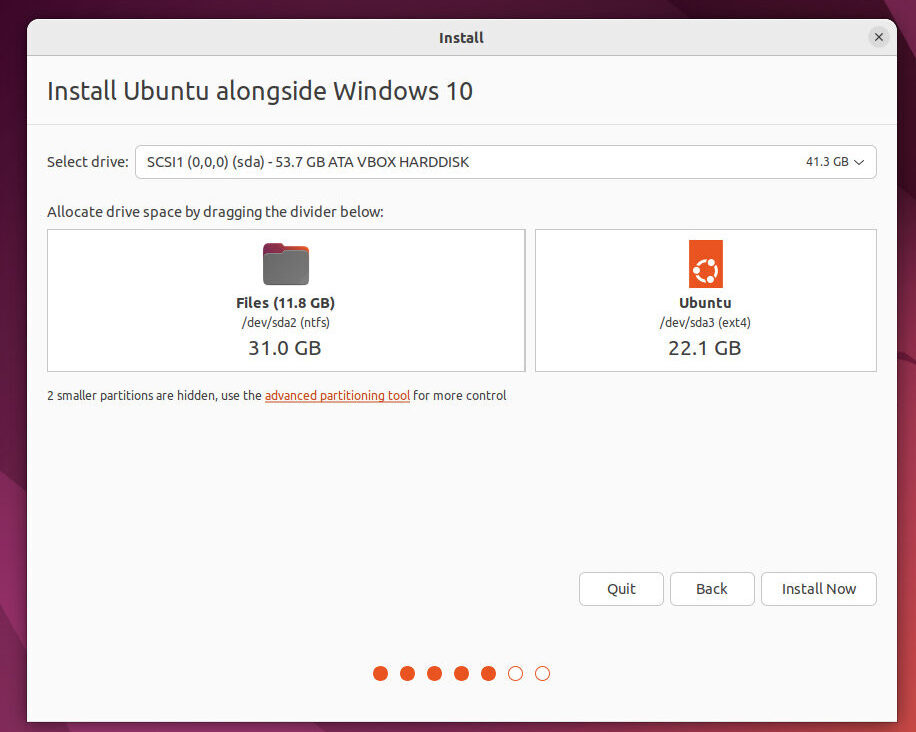
The division between the two partitions can be dragged left or right to apportion the drive between the two operating systems. This and the previous screenshot were very kindly provided by Daniel Griffiths of Canonical, the company that maintains Ubuntu.
So setting up the dual boot was, indeed, a piece of cake. There really was nothing more to it. Having chosen to split the drive equally between Ubuntu and Windows, the installation chugged away on its own and in a few minutes was done.
In part 9 we’ll be finding our way around the new system.
Chris Bidmead 30-Aug-22