
I wound up my 5 part review of the nVidia Shield TV at the beginning of this year. But it was clear at the time that this useful device would be a key player in living room entertainment, and if nVidia had any sense we’d see further developments.
The Shield I’d been reviewing was running Android Lollipop. But no sooner had I (sadly) sent the machine back to the PR company than nVidia issued an upgrade to the next Android version, Marshmallow. Clearly the nVidia Shield TV proposition needed revisiting. But I’ve waited a while for things to settle down.
 MARSHMALLOW UPS THE ANTE for the Shield by several notches. It simplifies the initial set-up process, gives you more control over the layout of your Home screen and—this is the biggie—brings some interesting new memory management that removes the 16GB limitation for the cheaper standard version that may leave owners of the so-called “Pro” version wondering if it was worth paying about £100 over the odds for the 500GB version that uses a mechanical hard drive. I’ll be covering that topic in part 2 of this postscript.
The Set-up
When I first got hold of the Shield at the beginning of the year the set-up process involved:
- Getting the Shield to find my wireless access point
- Logging into the access point with my password (by driving the clunky on-screen keyboard from the games controller)
- Logging into my Google account (clunky keyboard again).
I’m not saying this wasn’t fun. It adds to the thrill of anticipation. (You’ll see from part one of my review that the thrill of anticipation was further extended by the collapse of the HDMI connection—all forgiven and all history now).
But Google knows you’re impatient to get stuck in, and all that staggering around the on-screen keyboard is somehow so… 1980s. So here’s the new Marshmallow way of doing it:
- Pick up your Android phone or tablet
- Say “OK, Google. Set up my device
- Follow the on-screen instructions.
Google will look around the environment for the new device, then put up a security code on the nVidia Shield screen and on your phone. Ensure these codes match, choose the Wi-Fi network to connect to from the list on your phone, and then similarly select the Google account you want to use for the Shield, and… all the information your phone already has about your Wi-fi access point password, your Bluetooth settings and Google account details will automagically be transmitted to the Shield.
Sorting the Home Screen
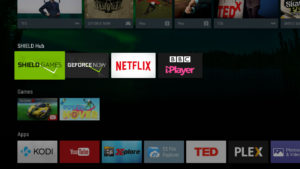 The Home screen, aka the Leanback Launcher, is what you’re looking at when you first power up the Shield. You can always get back to this by using the O touch button on the games controller—a very useful tip if an app hangs.
There’s a row nVidia calls SHIELD Hub comprising the four panels for Shield Games, GEFORCE NOW, and the two hardwired “System Apps”, Netflix and the BBC iPlayer. This row you’re seemingly stuck with (ah… but see below).
The row listing your Games can be ordered however you like: simply select the panel with a long press on the A button and use the left and right cursor buttons to shift it wherever you want. You can also use the down cursor button to dump any particular games panel into the trash.
Any of the panels appearing in the Apps row can similarly be shifted around or dumped. This is the default, but if for some reason you find you can’t do this with either of these rows, visit Apps and Games Rows in the Settings and choose Customise Order.
 The unnamed Top row is where Google and nVidia’s often annoying so-called “Recommendations” appear. The good news is that Marshmallow brings them under control, although you can’t reorder them in the same way as the other panels. Their presence is controlled by the notifications owned by each individual app. The YouTube app, for example, will stick panels up here that it calculates you might be interested in.
With Marshmallow you control these notifications, and if you don’t want to see YouTube’s helpful suggestions you can fix this. But not on the Home screen itself. The fix is down in Settings/Apps, or in the case of YouTube Settings/System Apps. Select the app in question from this menu (you’ll find YouTube at the very far right end of the long horizontal list of System Apps), wind through the vertical list of parameters until you see “Notifications” and switch this to “Off”.
The shadowy bowels of the System Apps also harbour a handy secret for those who, like me, may have opted not to subscribe to nVidia’s game service and don’t have any particular use for that SHIELD Hub row. It appears on the Home screen courtesy of the notifications permission allocated to a System app called “Nvidia Customizations”. Switch this app’s notifications to “Off” and the SHIELD Hub row will vanish from your Home screen.
Tidiness is a virtue, but there’s also a practical advantage to clearing out these unwanted panels in the Top row. Every time the Shield powers up from zero, once the operating system has loaded afresh the first thing it does is collect up all the notifications that apps have permission to proffer, and the boot process treads water while a spinning arrow declares it’s “Collecting Recommendations”. Fewer notifications should shorten this hiatus.
In part 2 of this nVidia Shield Postscript I’ll cover nVidia’s implementation of the new Marshmallow memory/storage enhancements.
Chris Bidmead