
I’ve shied away from ultra short throw projectors in the past: I’ve found the optics fiddly to set up, unless you’re making a permanent installation, and these devices tend to come at a premium over equivalent standard throw projectors.
But there’s another side to this argument. To balance things up I’ve spent the past couple of weeks exploring Optoma’s GT5000. Let’s check out the benefits…
THE GT5000 CAN PRODUCE A BRIGHT PICTURE of up to 100″ from as little as a foot away from the screen. For a minimal cinema system the GT5000 is all you need, thanks to its built in 16 watt mono audio system. Unlike standard throw projectors provided with sound output, the audio will be originating from the right place, not echoing from behind you.
In this respect the ultra short throw (UST) arrangement much more closely resembles the familiar TV, and like a TV the screen won’t get shadowed by people walking across the room.
The setup procedure of the GT5000 is an improvement over those early UST projectors. But it still seems to be more fiddly than when dealing with standard throw. A pair of tilt adjustment feet at the rear and a third one at the front tune the physical pitch and yaw until the projected screen is level and square. But the short distance seems to make the height and tilt of the device relative to the screen a much more sensitive adjustment, with the added wrinkle that you’re always having to step back from the projector to viewing distance to assess the effect. Even so, I found I could only get the alignment approximately right and had to rely on electronic keystoning to arrive at what was still only an approximate rectangle.
It’s at this point that another similarity with TV is liable to strike anyone used to conventional projectors. Even the cheapest standard throw projectors will be equipped with a zoom lens, allowing you to modify the size of your picture without having to change the throw distance. Like most UST projectors, the GT5000 has no zoom. The size of the picture is in a fixed ratio to the lens-to-screen distance.
Although long throw front projection has been the commercial standard since the earliest days, veteran cinema-goers I’ve talked to remember that as well as the “penny seats” in front of the screen, theatres would often offer “ha’penny seats”, which were rows of chairs arranged in the space behind the screen. This cheap seat audience would be watching a mirror version of the film, and those of them that could read (this is the early 1900s) would have to struggle with backward subtitles.
One truly nutty aspect of the firmware (sadly not confined to Optoma) is that although there’s a menu feature to throw up a useful grid pattern on the screen for the purposes of alignment, this disappears once you try to set the keystoning.
This criticism, of course, only relates to an ad hoc setup, where you’re taking the device out of a cupboard for the occasional movie night. I get the impression that UST is much more appropriate to a permanent installation, perhaps ceiling mounted, when you can spend some time getting the angles exactly right before leaving everything in place.
To my mind, though, if you want to connect your computer into a decent surround sound system (and you will) this still doesn’t solve the wiring problem (see Box). Over the years I’ve got used to the idea of keeping all the related A/V equipment—the projector and whatever is handling the sound system—out of sight behind the audience. After all, this is the way traditional cinemas have operated for a century.
One solution perhaps might be to use a wireless connection into the projector. Optoma seems to have anticipated this with their HDCast Pro, which I’m hoping to review here at a later date.
I’ve seen reviewers blessing ultra short throw because it “minimises wiring requirements”, avoiding “the need to run wires from a power source and video sources to the projector. Nobody wants to see the cables, and snaking them through walls, floors, and ceilings is a hassle. An ultra-short throw eliminates that issue by letting you position the projector in essentially the same spot you would put a TV.” This review, from PC Magazine (about a different ultra short throw projector) makes no sense to me at all. Apart from the (necessary) wiring to my 5.1 speakers, the standard throw arrangement keeps all the wiring—mains to the projector and AVR, video into the AVR from various set top boxes, and video from the AVR into the projector—as short runs, all in one place, and nicely out of sight behind me.
The Ins and Outs of the GT5000
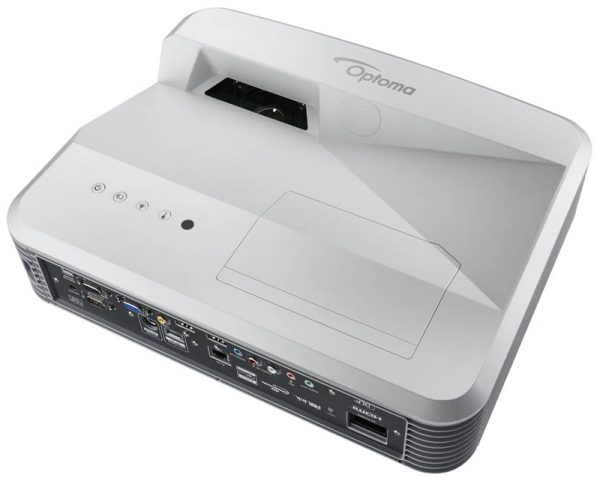
This is a projector that shoots backwards, the output light beam being bent back on itself by way of a convex spherical mirror. The front end, facing the audience, is comprised entirely of a grille, broken only by the infra-red controller sensor.
At the rear, facing into the screen are the various inputs and outputs, notably a pair of HDMI sockets, and an RJ-45 Ethernet connection. This network connection isn’t for video data—no streaming direct from your NAS, unfortunately—but is for remote management of functions like Power On/Off, Brightness and Contrast settings using appropriate PC software from companies like Crestron, Extron and AMX.
Neither of the HDMI sockets is MHL-compatible, which is surprising, as the Optoma HDCast Pro wireless dongle I mentioned above takes advantage of this feature, although it’s not a necessity. MHL-compatible sockets feed power out through the HDMI connector into the attached device (so, for example, if your phone is the signal source it’ll get charged at the same time). The HDCast Pro will still work when plugged into either of the GT5000’s HDMI sockets, but will need external USB power. Happily this is provided by the GT5000’s 5v 2a USB socket.
The video inputs also include two VGA sockets, one of which will accept component video, and there’s also a legacy composite video RCA socket as a fall-back.

You’ll notice that our picture has the GT5000 upside down with the three adjustment feet on top, a clue that the designers really had permanent ceiling mounting in mind. And a further clue that the design focus is chiefly on business is in the provision of a miniUSB socket for a mouse, down there in the right hand corner. The remote control is also equipped with a laser pointer: valuable for presentations, not so much for movie-watching.
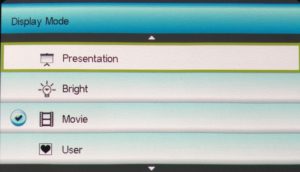
That’s not to say home cinema is ignored. The display modes on offer include one item titled “Movie”. It’s true that most home cinema projectors will provide at least two cinema modes, but the GT5000’s single mode works well enough, and if you’re not happy with it you can extensively adjust it for brightness, contrast and sharpness, as well as (in the Advanced sub-menu) factors like gamma, noise reduction and colour temperature. Any specially tuned display mode can be saved in one of two User Modes, so nomenclature apart, movie fans needn’t feel neglected.
 Speaking of the menus, I can’t resist thrashing Optoma once again for some truly senseless UI design. Different submenu lists will always have different numbers of items. Unless the list includes a lot of these items (and good design dictates it shouldn’t) the sensible design choice is to offer them all at once in a single display box. It’s a persistent feature of Optoma’s UIs that sub-menus appear in boxes of various sizes, but seldom large enough to accommodate all the items. Tiny scroll arrows (easy to miss if you’re just starting out with the projector) are the only hint that there are more items round the corner.
3D
Optoma didn’t supply 3D glasses with the review sample, but luckily I have a number of DLP-Link glasses on hand. DLP-Link is one of two ways the GT5000 achieves 3D; the other is Vesa-3D. DLP-Link is the simple, standard method common to all modern DLP projectors that syncs through bright flashes on the screen (during the blanking period between left and right frames, so you won’t see them).
Vesa-3D on the other hand uses a radio frequency channel between the projector and the glasses to maintain the sync. It’s technically superior (and Vesa-3D glasses tend to be more expensive) but there’s a consensus among users that as far as results are concerned there’s not much between them. If you want to use Vesa-3D with the GT5000 you’ll need the cost-extra “3D Starter Kit”, which includes a pair of glasses and the Vesa-3D emitter, which plugs into the 3D Sync Out socket you can see in the rear panel above. Prices for the Starter Kit seem to vary wildly: the cheapest I’ve seen is on Amazon for around £40, although some vendors are asking twice that amount.
Conclusion
I can’t say I’m entirely sold on UST, although I can certainly see applications where this is the superior solution. My feeling is that if you’re not looking for a permanent installation and you’re not space-inhibited, standard throw is the configuration to go for.
The GT5000 is available on Amazon and through all the usual AV suppliers for around £1000. The best price I’ve come across so far (but prices fluctuate daily, of course) is from CostCo, who currently offer it for £949.99 inc. VAT.
| Display Technology | Single 0.65” DarkChip 3 1080p DLP® Technology by Texas Instruments |
| Native Resolution | 1080p 1920 x 1080 |
| Brightness (Bright Mode) | 3000 ANSI Lumens |
| Contrast | 23,000:1 |
| Lamp Life Eco+/Dynamic/Eco/Bright | 6500/5000/5000/3000 (hrs) |
| Throw Ratio 3 | 0.25:1 |
| Zoom Type | Fixed |
| I/O Connectors | 2 x HDMI (1.4a 3D support), 2 x VGA (YPbPr/RGB), Composite, 2 x Audio In 3.5mm, Audio Out 3.5mm, VGA Out (Shared with VGA2), RJ45, RS232, USB remote mouse/service, 12V trigger, Mic In, USB-A Power, 3D-Sync |
| Power Consumption | 310W Bright mode / 260W Eco mode (< 0.5W Standby) |
| Lamp Type | 260W |
| Warranty | 1 Year |
Chris Bidmead