
I can’t say it’s high on my list of life-essentials, but projection mapping is certainly a lot of fun. And done right, can be stunning.
You may have seen it at exhibitions or concerts. Instead of projecting a coherent picture onto a flat surface, as you do when watching a movie or giving a slide show, the output is directed at a target of three-dimensional shapes, painting each shape individually.
The shapes can be a collection of everyday objects, or specially constructed forms with (usually) white or light-coloured surfaces. The projected scene can be tailored so that each surface receives its own individual image. Each surface can be given a flat colour, a texture, a pattern or even a moving image.
Of course, you’ll need a projector, but you have one already, right? (If not, why not? They’re cheap enough, and where else can you get a 120″ screen for around £600 or less?) Also required are a phone or tablet and Optoma’s Projection Mapper app.
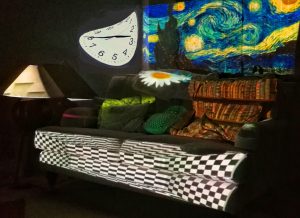 I WAS STARTING FROM SCRATCH, so my efforts are distinctly amateur league. But on day one I was able to come up with the colourful domestic scene (my living room sofa) in the picture.
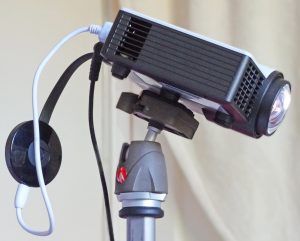
The tools: an Optoma ML750ST, a Googlecast HDMI dongle and an Android phone running Optoma’s Projection Mapper app. The ML750ST is a pocket-sized short-throw LED projector with a very wide angle lens. It produces a 100″ (diagonal) image from just 3ft away.
The phone is the Wileyfox Spark 2 X from the Spark 2 range we recently reviewed here.
Getting Started
Link the phone’s screen display to the projector and point the projector onto the set of surfaces you want to map to. Pull up the Projection Mapper app and use it to delineate the individual areas for your map. As the phone’s screen is mirroring everything to the projector, the areas will show up on the target as you edit them on the phone.
The areas are marked out on the phone screen and on the target by bright white lines, with control points indicated by small circles with crosses in the middle. You start by choosing a roughly suitable shape from the Projection Mapper menu, positioning it over your selected target area, and pulling at the control points until it fits the real life object.
The basic shapes are a rectangle you can reshape into any kind of trapezium using its four corner control points; a similarly mouldable triangle and circle and—most flexible of all—a rectangle with bezier-curvable sides.
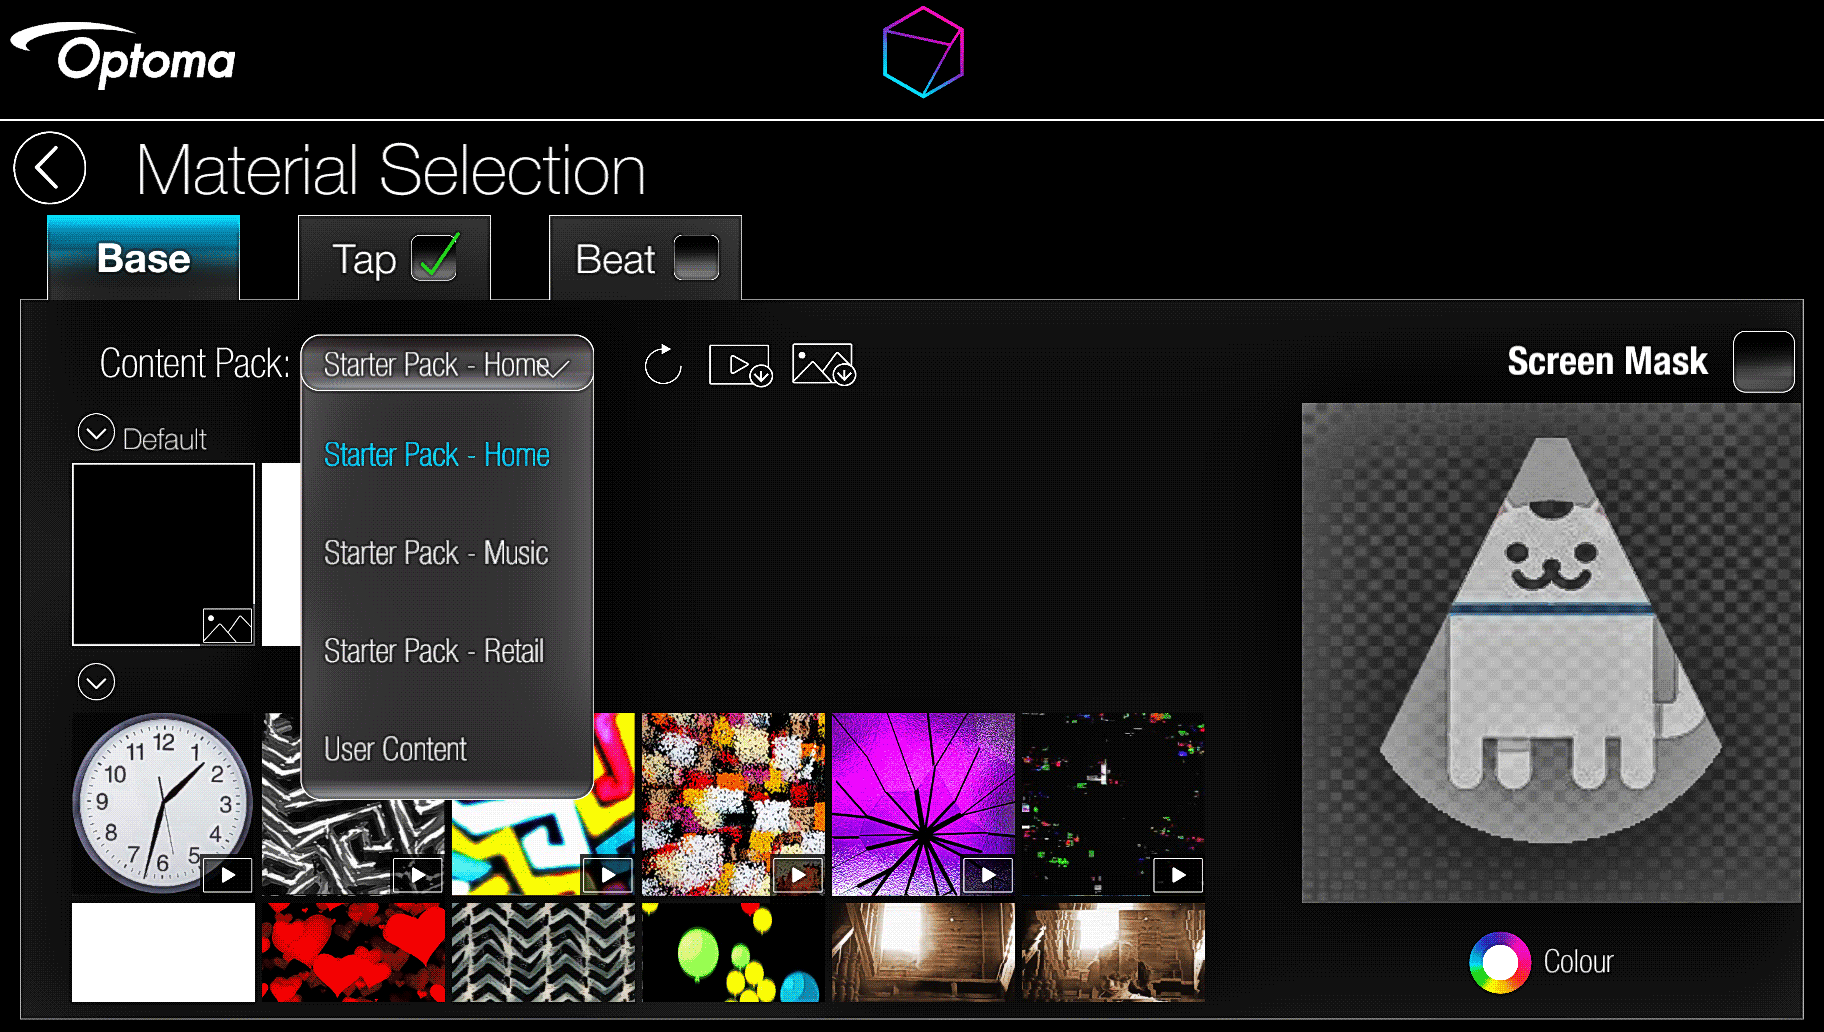
 Once you’ve tailored the shape on your map to fit the real world target, you can fill it with patterns and colour them by picking from a colour wheel. You can apply the shapes in layers, sending them to the background, the foreground and relative positions in between.
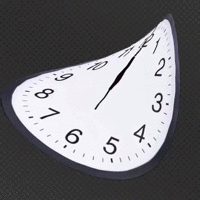
You can’t see from the static picture above, but some of the available patterns are animated. For example, this fast-moving clock. It’s a component in the freely downloadable Content Pack called Home. It’s supplied as a regular circle—the Daliesque distortions are my own manipulation of the clock’s control points.
There are two other free Content Packs to download: Music and Retail. Five additional Content Packs can be bought as in-app purchases at £2.99 each.
The App-Projector Connection
Optoma offers a tiny USB wireless dongle for the ML750ST. It turns the projector into an HD Cast Pro device, able to connect in various ways with Android and iOS devices running Optoma’s HD Cast Pro app. The app is comprehensive—and correspondingly complicated. I found it tough to master.
In theory HD Cast Pro offers a direct casting mode, reflecting everything happening on the screen of the phone or tablet across to the projector. A mirroring connection like this is fundamental to the requirements of the Projection Mapper app, but in the time allocated for testing I wasn’t able to get this to work.
The connection to the projector can be wired, of course, using an MHL connector from the phone. But having previously tripped over the mains cable to the projector and brought it crashing to the ground (Sorry, Optoma—but the robust little thing survived intact), minimising the wireage seemed a good plan.
I chose the £120 Spark 2 X from our selection of possible devices (including Amazon Fire Tablets and the much more expensive Huawei Mate 9) because many of these can only screencast to Miracast devices. Experimentation suggested that Google Cast is a faster and easier way of wirelessly connecting a phone to a projector. The Spark 2 X, newly updated to Android Nougat 7.7.1, handles Google Cast flawlessly.
What’s it for?
 To give you some idea of the scope, here’s what that same sofa looks like in daylight.
I picked the sofa because it happens to be whiteish and sitting there waiting. Of course, you can also experiment with your own home-made target constructions
Very pretty, friends and family have remarked. But what’s it for? There’s a degree to which I share people’s puzzlement. Yes, projector mapping is delightful to experiment with, and I’m continuing to do so. But where are we going with this?
By putting in many more hours I’ll be able to explore the app’s ability to incorporate my own photographs, and perhaps even my own animated patterns and textures…
Some Time Later
…which is what I’ve now done.
http://i.imgur.com/KwqVUde.gifv
This is the same scene with some modification and the addition of a few creations of my own. The lampshade on the far left is now decorated with one of my Android 7 “Easter Egg” cats. The animated feline face in the centre of the sofa is supposed to be Lewis Carroll’s Cheshire Cat, which I’ve somewhat crudely adapted from a GIF I borrowed from The Cheshire Cat blog. I’ve also smuggled my own face into the scene, sandwiched between the Dali clock and Van Gogh’s Starry Night.
The animated picture you’re seeing here is a GIF (or, strictly speaking, a GIFV), embedded from a copy I uploaded to the picture sharing site, Imagur. It was originally created as an MP4 video by filming the scene live. You might think that animated GIFs would be useful elements in building a projection map. Yes, I thought so too. But…
The Cheshire cat, for example, is a picture I downloaded as an animated GIF. But I quickly discovered I couldn’t just drop it into the scene I was building in the Optoma app. With the Android operating system, Optoma’s instructions in the YouTube video are that you transfer your data by USB cable from your Mac or PC and bury it into a directory called Android/data/com.reotek.projectionmappergoogle/data/files (Reo-tek is the Turkish company that developed the app for Optoma). Do this and the upload will turn up inside the Optoma app in the Material Section categorised as User Data in the Content Pack dropdown.
 As an Android semi-geek, I’m reasonably comfortable with obscure directories like this, but they’re really only intended for developers. Optoma shouldn’t be asking punters to fish about in the entrails of Android like this.
In any case, the Optoma app has a feature for importing pictures and animations directly from the Android Gallery. So it makes more sense and is much easier to transfer material from your Mac or PC into the Android Gallery as a first step. Once that’s done, the two symbols on the far right of the Content Pack line will import Gallery videos and pictures respectively into the Projection Mapper app.
But, sadly, GIFs are not a file type the app knows how to import. I had to turn this Cheshire cat into an MP4 before I could incorporate it into the scene. Plain JPGs are straightforward. As long as you stick to MP4s and JPGs, imported through the Android Gallery, you’ll be able to decorate your scene with any textures, patterns or moving images you can photograph or find on the Web.
Tap, Beat, Particles and Screen Masking.
You’ll have noticed a pair of tick boxes labelled Tap and Beat. These are attributes you can optionally apply to any of the individual surfaces you’re painting in the projection mapper.
With the Tap attribute set, physically tapping on a particular surface inside the Optoma app momentarily switches between the main colour or image you’ve applied to that surface and a secondary image you’ve optionally preset. Your tapping sequences can be recorded by the app for subsequent unattended playback.
Applying the Beat attribute to individual surfaces works similarly, but in this mode the surfaces flash in response to music being played.
Particles are a different sort of overlay across the whole screen. Choose from preset particle types (snow, confetti and so forth) and a cascade of them will appear across the scene wherever you drag your finger. It would be useful if this feature could also be recorded like taps, but unfortunately the app doesn’t stretch to this.
Screen Masking opens up the possibility of some very sophisticated effects. Irrespective of the way you’ve surfaced your scene, screen masking carves out an area of the two-dimensional projected scene that you can apply Tap and Beat attributes to. It’s equivalent to holding up stencilled shapes between the projector and its target and then getting the cut-outs allowed through to shake and shimmer.
Optoma’s useful YouTube instruction video provides an example:

The Wider Context
There’s much more to professional projection mapping than this, of course. It will probably use multiple projectors, and there’ll be complex and sometimes costly software to go with that. Optoma has staged or supported a number light shows that demonstrate the capabilities of its extensive range of projectors, but it’s not clear that this particular £3.99 app had much to do with these events.
I said “sometimes costly”. There are at least two comprehensive and professionally developed free/open source projector mapping applications, MapMap and Splash. Others, like HeavyM start with a no-cost entry-level offering (the output is watermarked) with a tariff that rises through various subscription levies to a lifetime subscription for the full version of around £350.
These apps run on desktops and laptops. There’s an Android app from Crest called CPMap that you can download free of charge from the Play Store, but its menus are entirely in Japanese. If you’re familiar with the language (I’m not) you might be able to get started with it (I couldn’t).
Shortcomings
It’s not fair to call these “alternatives” to Optoma’s app, which is, after all, not intended as anything more that a toe-dipping exercise into the projection mapping game. But putting the app in this context raises some questions.
The ML750ST can play AVI and MP4 files directly.
Although the Projection Mapper app will work with any manufacturer’s projector, it’s clearly part of a marketing exercise to open up the possibilities of home cinema and widen the market. So why is Optoma trying to make money out of it? Four quid for the Android version and another fifteen quid odd if you want all five cost-option addon packs. And yet another four quid if you need to go to the Amazon store to run it on a Fire Tablet. Loading the app onto an iOS device will cost you five quid.
These prices would make more sense if the app didn’t leave me with the feeling it was beta software, work-in-progress. Here’s what lead me to this thought:
- The ML750ST, like many other projectors of its class, can play AVI and MP4 videos direct from a USB memory stick. So it would, of course, be very useful if a recorded scene could be transferred to a USB memory stick as a video file. Once the editing was finished, the phone or tablet could then be taken out of the loop. Of course this would preclude the performance mode Tap and Beat features. But in many contexts (like a shop window display) this might not be required. The app has no provision for making recordings like this, although it might be possible to kluge something up with a third party screen recording app.
- A more serious snag. After spending several hours developing scenes on the Wileyfox Swift 2X, I wanted to transfer the work I’d done across to a larger tablet. It turns out you can’t do this. There’s no indication of where the data is stored (you might expect to find it in the app-related Android data directory I mentioned above, but it’s not there), and my contacts at Optoma weren’t able to locate it. So, like Las Vegas, what happens on the device stays on the device. You can’t transfer your work. And you can’t even back it up. Which is the key reason I decided not to sink more hours into polishing the sofa project.
Conclusion
Optoma makes fine projectors, and the company’s more recent foray into audio equipment is a story Tested Technology is following with interest. But this Projection Mapper app leaves me with the distinct feeling it’s a development project farmed out to a third party with inadequate in-house testing, supervision and feedback.
Four or five quid isn’t a lot to invest if you’re interested in exploring the learning slopes of projector mapping. But for that money you’d be entitled to expect at least the ability to back up your hard work.
Chris Bidmead
Good review. I myself wonder if I can do a window display mapping with this app. so i’d have to invest in a new ipad since running it on my android phone would be dicey. Overall the app provides a good mapping experience that you do want to take further.
Not sure why you think an Android phone would be any more “dicey” than an iPad, Ben. But whichever way you go, do let us know here in the comments.