
Part one of my Huawei P9 review is here, but I’ve postponed my review of the P9’s cameras in order to gain as full an understanding as I can of the principles behind them. And, of course, to work my way through all their myriad functions.
I was intending also to cover here other features I’d omitted from part one. But it turns out there’s so much to be said about the cameras that I’m going to have to run that missing coverage in a third part.
 MUCH HAS BEEN WRITTEN ALREADY about the P9’s dual rear-facing cameras. Both employ 12MP Sony IMX286 sensors behind Leica Summarit H 1:2.2/27 lenses, each with a virtual f/2.2 aperture and 27mm focal length.
Commendably, the cameras are housed entirely within the body, and present no ugly “camera bump”. Keeping these mechanisms small comes at a price, though: there’s no optical image stabilisation. This shortcoming will show up mostly in videos. But videos aren’t the P9’s main suite; unlike most rivals in this price range the Huawei/Leica video capabilities don’t extend to 4K resolution.
Why Two Cameras?
(Or three, of course, counting the front-facing camera). The sensors in digital cameras aren’t inherently colour-conscious. They’re made up of individual light-monitoring elements, pixel receptors (I’ll just call them “pixels”), each of which can only read the luminance—the degree of lightness or darkness— of the light falling on them. In physics terms they can count the number of photons falling on them, but not the wavelength of the photons.
In the mid-70s a Kodak boffin called Bruce Bayer came up with an ingenious way to turn a digital black-and-white camera into a colour camera: impose an array of colour filters over the sensor, each filter matching the size of the individual pixels. His original filters were green, red and blue, fully fifty per cent of the filters being green.
The double helping of green was key to the trick, because Beyer was mimicking the behaviour of the human eye, which in effect uses green sensitivity to judge luminance as well as contributing to colour sensing.
Of course each individual pixel could only record the light intensity of the colour allocated to it by its associated filter, which would be blocking all other wavelengths. But the colour filter array (CFA) was arranged in such a way that by combining the information from adjacent pixels, software could guess with good accuracy the exact shade and intensity of colours across the whole picture. And the more pixels the sensor contained, the more accurate the reconstructed colour representation could be.
The downside was that the filters were necessarily throwing away valuable information by blocking photons whose wavelength didn’t match their colour. Strip the CFA off a convention digital camera’s sensor (some photo enthusiasts actually do this!) and you get greatly improved contrast and texture detail, albeit in monochrome.
You can probably see where this is going by now. The two camera mechanisms in the P9 are identical, with one key exception—one of them (the lower camera in our main picture above) has no CFA.
So providing you have software able to correlate the pixel information from the two cameras, compensating for the parallax error arising from their slight spatial separation, you should be able to get vibrant colours and better contrast and texture.
So Does the P9 Achieve This?
Yes.
I’ve been very impressed with the detail and low-light capabilities of the rear-facing camera-combo. I won’t pile on the examples here, but take a look at just one picture.
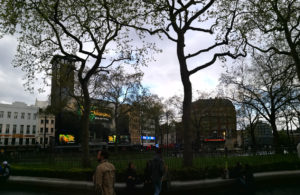 It’s a panorama (more of this later), but I want to emphasise that it’s a snap-shot, grabbed as I was walking through Leicester Sq on the way to a movie showing (“Florence Foster Jenkins”—excellent!). Not a specially set up “demo” photo.
I was struck by the dark lacing of the branches against the sky, and the picture tells this story quite well, I think. But that’s not why I’m including it here. When I got back to base I examined the photo and was astonished to discover the detail it had managed to capture. You won’t see it all in the full picture I’m showing here, because I’ve dropped it down from 5MB to a mere 600K.
But take a look at these sectional blow-ups. The first is part the left-hand foreground; the second is taken from the dark mid-ground just to the right of the large tree right of centre. In both blow-ups I’ve used Photoshop brightening to bring up the details.

I was astonished that the P9’s tiny cameras had managed to capture enough detail to be able to recognise the individuals. (If any of these are you and you’d like to be removed, of course just let me know…)
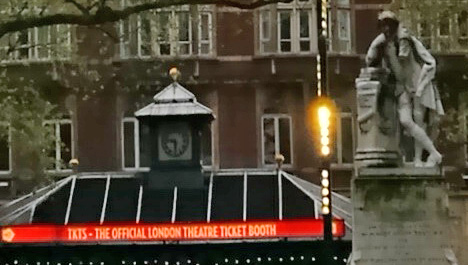 In the second blow-up you can clearly read the illuminated banner across the awning to the left of the statue of Shakespeare.
It’s worth repeating: this was not a special test shot. For that I would have used the P9’s RAW mode rather than leave the processing to in-camera JPEG compression. I wasn’t even using HDR (high dynamic range) mode. I did want a wide shot to embrace the scope of those trees reaching into the evening sky, so I put the camera into Panorama mode.
It’s very easy to do this. Drag the list of modes out of the left side of the camera screen, pick Panorama, and the viewfinder provides you with a right-facing arrow that you steer as steadily as you can, once you’ve pressed the shutter button, along a horizontal guideline as you pan the phone from left to right. A second press on the shutter button will stop the shot when you’ve captured as much as you want, and the phone then stitches the shots seamlessly together. And the stitching really is seamless.
The only time I’ve gone wrong with this is when panning across a moving figure in the foreground. The background panorama melded together flawlessly, but the foreground pedestrian was captured for posterity as a Francis Bacon portrait.

I’m tempted to include a plethora of other pretty photos here, because the P9 has provided me with galleries of them, but you’ll have to make do with this standard cat picture. Again, it’s not posed or set up in any special way—just a snap of an animal I ran into on one of my walks.
More on Modes
The Modes screen has some useful features like Night Mode and HDR, and can be used to switch on Video (there’s also a button to do this on the camera viewfinder screen). There are also less useful modes, like—a particular favourite of Huawei—Light Painting Mode, which provides you with very long exposure while you wave torches or candles around. And of course Beauty Mode, which seems to be an indispensable feature of Chinese phones.
Beauty mode will smooth your skin, enlarge your eyes and narrow your face, all parameters tuneable to your taste. Huawei’s version has its own wicked twist: you can teach the phone what your face looks like from various angles, and then, if you take a group selfie, Beauty mode will seek you out and enhance your face selectively, leaving your chums as their ugly selves. Mwahahaha!

I’m ambiguous about Watermark Mode, which can add various kinds of stamps to your photos, including information on time and date, location and even weather. I don’t think I’ll be using it much, but here’s a small sample. Incidentally, I shot this selfie not by pressing a physical or virtual shutter button but by switching on the built-in option to trigger the camera by saying “Cheese”. It seemed appropriate for this cheesy shot.
The Camera in Depth
Much was made at the P9 launch in Battersea of the rear-facing camera’s ability to mimic a large-lens “proper” camera, particularly the way it can establish a narrow depth of field (DOF). This very important principle of modern photography and cinematography enables the focus to be set within a specific range of distances, blurring out everything nearer and further than that range. It provides crisp portraiture without background distraction, and in cinema story-telling keeps the attention of the audience on the action while presenting a general sense of the surrounding space.
Controlling the DOF (to oversimplify somewhat) is a function of the lens aperture. A lens with a tiny aperture—or the classic lensless “pinhole camera”—lets in a minimal amount of light, but will have a DOF stretching from a few feet to the infinite horizon. The more you open up the aperture the more light you get, and the narrower the DOF becomes. Small lenses can only open up so far, which is why professional photographers pay big bucks for huge, light-grabbing lenses. It’s not just the size of the lenses that makes them expensive: the wider a lens’ aperture the more accurate its contours need to be to avoid distortion.
Mobile phone cameras are tiny, and so are their lenses. Which is why DOF effects aren’t an option. Unless you fake it.
The P9 fakes it. Rather cunningly.
 The P9’s “Wide Aperture Feature”
An icon representing a variable aperture appears at the top of the viewing screen when in straight Photo mode. Touching it turns it orange and switches the DOF magic on.
Now, when you’re setting up your picture, touching any point on the screen will set the focus at that point. A slider allows you to change the virtual aperture: close it down and everything is in focus; open it up and everything outside the focus field you’ve set becomes progressively defocussed. Once you’ve chosen your point of focus and your aperture, hit the shutter button.
 That’s not the end of the story, though. When you view the picture in the Android Gallery app it will appear with the blurred and focussed areas just as you shot it. But that variable aperture icon is still visible at the bottom of the frame. Touch it to activate it and once again—just as you did with the live shot—you can pick any other point of focus and adjust the aperture to tune the DOF around it.
To understand how this works, let’s first consider how you’d fake DOF using an app like Photoshop. At its simplest you’d draw an outline around the section you want to keep in focus, copy that into a separate layer of your picture, revert to the background layer and apply a blurring algorithm to it. Your focus section remains sharp; everything else is blurred; the job’s done.
For something like this to happen automatically inside the camera without your assistance the camera needs to know the relative distance of everything in your shot. If the width and height of your frame are the x and y dimensions, the camera also needs to capture (and store, if it’s to be reused once the photo’s been taken) information about the z dimension.
How does it get this information? One standard focussing technique is “contrast detection”. As tiny motors adjust the lens seeking to focus on an object, the edges of the object will blur or sharpen accordingly. The sharpest image will present the highest edge contrast, which is the same as saying the difference between the amount of photons received by adjacent pixel receptors will be at its highest. As the pixel receptors are there for the sole purpose of counting photons, contrast detection is a job they are designed for.
The P9 is better equipped than most for this, because its monochrome camera, devoid of a photon-rejecting Bayer filter, is dealing with nothing but luminance and contrast. And this leads us to a second technique for judging distance. With two cameras, separated from one another, distance can be assessed much as we do with our own two eyes: by triangulation. Distant objects will appear on the same spot on each of the two cameras’ sensors, but the nearer an object is, the greater the “parallax error”, the shift between the two images of the same object.
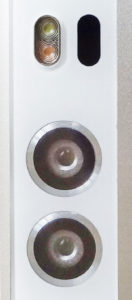
For the greatest focussing accuracy at close distances the P9 uses what Huawei describes as a “laser focussing module”. This is the dark oval aperture at the top of our main picture above, to the right of the pair of warm and cool LED flash lamps. Exactly how this laser focussing works no-one seems entirely clear. If the P9 were an attack drone aiming at a ground target, its ranging system would include a laser to fire a coherent beam and a sensor calculating the distance with deadly accuracy by measuring the exact time of the reflected light’s return.
I’m guessing the P9 doesn’t quite run to that. Instead the laser beam probably passes through a scattering lens, producing a field of light that simply ups the efficiency of the two other focus functions. Whatever the actual mechanism, Huawei’s combination of contrast, parallax and laser focussing seems to work very well, and fast.


This z-dimension information can be used to separate the photo into virtual layers, and the DOF effect is achieved by selectively sharpening or blurring these layers individually. The z-dimension information is stored within the JPEG format using a technique Google released in 2014 with its Android camera app.
Google’s app allows for a degree of refocussing using a standard single lens camera. You take a shot and then slowly move the camera in a short upward arc, keeping the central subject in the same position. The parallax information this process collects is then stored as additional data in the resulting JPEG, and this enables you to refocus the shot subsequently in much the same way as with the P9.
Two key differences are that the P9’s initial refocussing shot happens instantly, and any further refocussing you do is very quick. Google’s single camera method requires some ponderous calculation. The P9 also seems to be able to apply the technique to a much wider variety of shot.
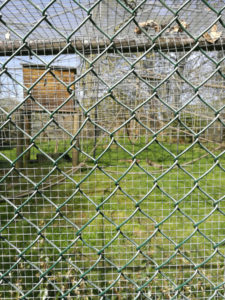
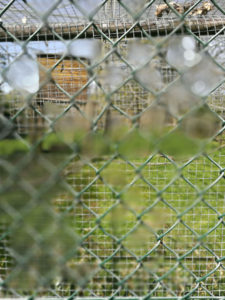
There are some serious limitations, though. It seems that the P9’s depth data is rather coarse-grained—accurate enough to discern the difference between a central figure and a distant background. But the algorithm collapses in local areas if, for example, you’re shooting through a chickenwire fence.
This shot would be a cinch with a true wide-aperture lens. But with the P9, the distance information doesn’t seem to be precise enough to distinguish the fence from the background.
But to be fair, photography is full of anomalies like this, and it’s the job of photographers to know their tools and work around the shortcomings, and even learn to take advantage of them.
After kicking around the P9’s rear-facing camera combo for three weeks I’m coming round to thinking of it as a very valuable tool, and one that has already helped me take some of my very best pictures (and I’ve been using cameras since the mid-60s). In part 3 I’m planning to wind up the camera discussion and say a little about some of the other P9 features not so far covered.
Chris Bidmead