
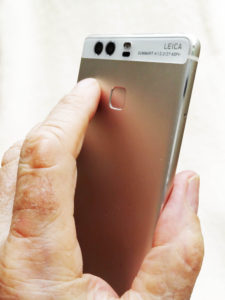
When I started this review I never intended it to run to three parts. But living with the P9 day-to-day has uncovered such a bunch of interesting features I haven’t been able to restrain myself from passing all the news on to you.
In part 2 of this review I covered the fascinating rear-facing Leica cameras in some depth, but there remain some other important features of this combo-camera I haven’t covered so far. I also barely gave space to the front-facing “selfie” camera.
I’m going to make up for that here, and also mention the P9’s sound features. Normally I wouldn’t make much of this: a phone loudspeaker is tiny, nearly always punches surprisingly above its weight, but except for speech you’ll probably want to plug in your favourite headphones instead, having binned the terrible earbuds that come in the box. However, the P9 has some surprises here, as we shall see.
EARLIER I MENTIONED IN PASSING that the P9 rear-facing camera is capable of capturing in RAW mode. Well, that’s not putting it very precisely—all digital cameras capture in RAW mode, the question is: can you get the RAW data out of the camera. Normally the captured RAW picture (the totality of the data gathered by the sensor) is immediately compressed on the fly into a JPEG, and that’s what gets stored to the Flash memory.
Rather like MP3 audio compression, the JPEG process discards information to reduce the picture size from, say, 20MB to around 5MB. You get a decent enough picture, but with compromises. Small details can get lost; luminosity dynamics will be sacrificed; colour graduations may be simplified.
Professionals like to shoot in RAW because with the whole set of original data collected from the sensor there’s much more opportunity for refining it afterward to get the picture exactly right. In the same way that shooting wide allows you to crop in post-production, shooting RAW lets you select exactly what you want from the total smörgåsbord of parameters.
It’s rare for tiny phone cameras to acknowledge RAW, but in recent years picture quality has improved to the point where this can become useful, and higher internal Flash memory capacities and write speeds have made it feasible. Nokia was the first to implement RAW in a smartphone towards the end of 2013, and other companies following this example include Samsung and HTC.
The DNG format all these camera phones use is a variant of RAW introduced by Adobe. The problem with raw RAW, if I may put it like that, is—because it stores the pure uncooked data that comes direct from the sensor—the output from one manufacturer’s sensor will be quite different in structure and content from that of another manufacturer. RAW formats began to proliferate with each new camera arriving on the market, and photo editing apps found it harder and harder to keep up. Adobe’s DNG—it stands for “digital negative graphics”—lightly compresses the RAW data into a universally compatible format without throwing anything away (except possibly additional proprietary metadata unique to a particular manufacturer).
This mode, accessible by dragging up a small, white, oblong button immediately above the shutter button, eschews the automated fancy features and lets you manually set factors like ISO (the effective film speed), shutter speed, exposure, focus and white balance. That’s not to say you need to be a camera pro to use Pro mode: if you just activate it without messing with any of the parameters it puts at your fingertips it will still guess the settings for the best results.
The P9 has some restrictions on the use of DNG: it’s only applicable to the rear-facing camera, and only when using the Leica Pro mode. When you elect to shoot raw, each shot creates a pair of files, a DNG and JPEG. Only the JPEG will appear in Google’s Gallery app. If you want to export the DNG for manipulation in a desktop app like Photoshop you’ll have to track it down with a file manager (ES File Manager is the one I use most) and copy or move it manually.
 One more limitation of the P9’s RAW mode: you don’t have the option of saving the DNG-JPEG pair of files to the external microSD card. The idea is that large DNGs will need fast storage if the process of saving them isn’t going to hold up your shoot. It’s true that some of today’s external SD cards are very fast. Toshiba sells a range called Exceria Pro, the fastest of which which has a write speed of 240MB/s, which theoretically should enable you to shoot around 10 RAW files per second.
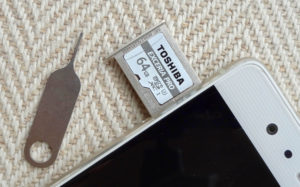 Toshiba also sells a Micro SD Exceria Pro. These come in two speeds, a black version, model M501 and a white version, model M401. The M501s match the top speed of the full-sized Exceria Pros, but the white M401, one of which I have installed in the P9, has a write speed of only a quarter of this. M401s are likely to be the affordable choice for most smartphone users, so restricting saving to internal memory may not be such a bad idea.
Adoptable Storage (or not…)
I’m not sure, though, how this chimes with the idea of “adoptable storage” that Android introduced with Marshmallow. When you install a microSD card into a standard Marshmallow device you’re asked if you want to format it as “Portable” for data transfer to other devices, or as “Internal”. In this second case the card is formatted as an encrypted EXT4 drive. The EXT4 format is compatible with all modern Linux devices, but the encryption ensures its data can’t be read outside the device that created the format. If you elect to use adoptable storage, this “Internal” microSD card effectively becomes an integral part of the built-in memory.
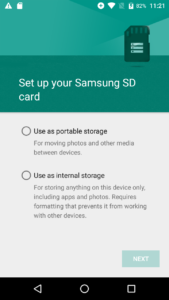
This is how my Wileyfox Swift handles the addition of a Samsung SD card.
This sounds good: your 32GB P9 has suddenly become a 96GB P9, and now you can save all your RAW files to that integrated internal memory. There’s one problem, though. I said adoptable storage works with “standard Marshmallow”. But this is Huawei’s Emotion UI. And Emotion UI won’t let you do adoptable storage.
This isn’t really a show-stopper, though. For one thing you can kluge adoptive storage on the P9 with a simple low-level hack. But adoptive storage introduces some problems which could mean it isn’t a great idea, and you may not need it anyway. It was introduced to fill out the rather low memory of Google’s entry-level Android One devices. Phones like the P9 don’t need it. If you need to know more, there’s a very full discussion here at AndroidCentral.
Document Scanning
While we’re still on the rear-facing camera(s) there’s a mode I haven’t mentioned yet. Dragging your finger left to right across the camera screen gives you access to “Document Scan” mode. I’m a devotee of the Camscanner app, and phones have pretty much replaced dedicated scanning devices in my day-to-day work. But this is the first time I’ve come across this feature built in to an Android phone.
Every time you take a picture in this mode, the camera will attempt to identify the most prominent rectangular shape, crop the picture to it, correct the perspective, and clean up the contents to improve legibility. The process works very well with documents, but also with projected slide presentations. I’ve also tried it experimentally when shooting a regular picture through a doorway, or photographing a picture hanging on a wall.
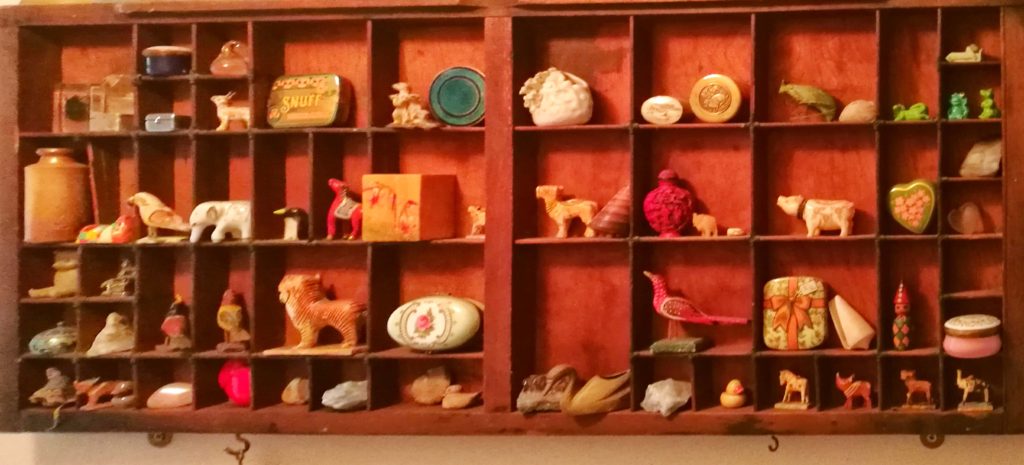
A quick snap of a wall-mounted printer’s tray, deliberately shot well off-axis, relying on Document Scan mode’s auto-crop and perspective correction.
If you’re using Document Scan mode to capture multiple printed pages, perhaps using both hands to hold a book flat and turn the pages, the vocal “Cheese” shutter firing feature will do the job. A further sophistication is this mode’s “Auto” feature you can switch on so that any newly presented printed page gets snapped the moment the camera recognises it.
Facing Up to the Selfie Camera
 I slipped a jovial selfie into part 2 of this review for fun. Here’s another one, if you’ll indulge me. The format is landscape, but it’s actually three portrait shots auto-stitched together in the front-facing camera’s Panorama mode (the curve of the background rooftops is something of a giveaway).
The P9’s selfie Panoramas are each limited to three frames, shot in the order of centre, right, left (relative to the finished picture). This is a distinct limitation compared to the main camera’s equivalent, which can do a full 360 degrees if you’re so inclined. But it’s useful for a group selfie, or “Here I Am At The Edge of the Grand Canyon”, and the good news is that Beauty Mode can still be used to make you look your very best. I haven’t applied it here for obvious reasons. No point in gilding the lily.
The P9 Stands Apart from the Heard
Before I close down this discussion there’s one more trick up the P9’s sleeve I can’t resist unveiling here. Particularly as no other review seems to have covered it, and I haven’t been able to find a mention of it in any of Huawei’s documentation.
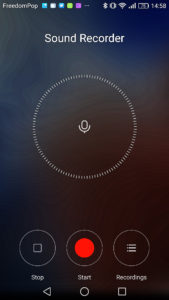
The Huawei P9 records audio in stereo.
A few days after the P9 launch I’d made my way through the rain to the high end audio vendor, KJ West One, in London’s Cavendish Street. I left my soaking jacket on a hanger upstairs and descended into the basement to audition a pair of loudspeakers. The technical discussion about the Martin Logan Neoliths (RRP: £79,500 for the pair—I did mention that KJ West One is “high end”) was so interesting and intricate that I reached for my faithful old Edirol R-09.
My “steady Eddie” has been in my service for about a decade now, recording crisp broadcast-quality stereo that preserves conversations even in very noisy surroundings. But I’d left it in my jacket upstairs.
 Rather than interrupt the proceedings to get it, I pulled out the P9. All smartphones have audio recording built it, and although I hadn’t tried the P9’s I thought in the hushed atmosphere of KJ West One a phone-quality mono recording should be able to do the job.
I mentioned “junk earbuds” in the intro, but the sound quality of the ones supplied with the P9 are a cut above the average. Their unusual design, a flattened egg shape with two ports each, can be twisted into the ear canal for secure attachment. They’re not sound-isolating, but the advantage is that when you’re walking or running you won’t get your footfalls thundering up into your ears.
I returned the P9 to my shirt pocket and left it recording all through the remainder of the proceeding. When I got home I Bluetoothed the P9 into my Skullcandy Grind Wireless headphones. What I heard next was astonishing.
I was listening again to technician Pablo’s erudite exposition of the Neoliths as if I were back in the KJ West One demo room. Other than the occasional rustle of my shirt, the recording was as clear as anything the Steady Eddie had ever delivered. And in stereo.
I played the feed into my Yamaha RX-V679 to listen on my room speakers. Only when the mighty electrostatic Neoliths opened up did I notice a difference, an absence of the very low bass tones you pay the big money for when you buy speakers from meticulous audiophile manufacturers like Martin Logan.
The native Huawei Recorder app makes use of the P9’s two microphones set into the top and bottom edges of the phone. The recordings are 128 kb/s AAC stereo with a sample rate of 48KHz. The term “broadcast quality” used to mean something, but in these days of monstrously dynamically compressed transmissions with measly bandwidth allocation on the digital channels I should probably just say that the P9’s recording quality, though technically below the Edirol’s best efforts, is more than adequate for the day-to-day work I do.

Tested Technology’s nobody’s “ambassador”. We aim to talk straight to our readers.
That’s probably enough about the Huawei P9 for now, although I’ll certainly be using it as a touchstone for future phone reviews. One last thought: I mentioned in part one that the phone had been kindly “gifted” to me (along with hundreds of others at the launch). I’ve discovered since that Huawei’s internal jargon describes such allocations as “ambassador units”.
Please note that it’s the device that’s the ambassador here. I don’t feel myself to be an ambassador for any manufacturer in these reviews. I’m here for my readers. If you get even a whiff of Ferrero Rochers in these Tested Technology pieces, please shout out. That’s what the comments section’s for.
Chris Bidmead
Very enjoyable and informative Mr B , thank you.
Thanks for your appreciation, Mr Q.
Most detailed and geeky review of the P9 on the planet for now.
And I expect there’s a lot more to be said about this interesting phone. I’m very grateful for your comments, Mike.
Your review has reached the eyes of a Singapore reader, great article!
Your review has reached the eyes of a fellow reader here in Singapore… Great article!
Thanks, Tan.
Great article, thanks. Still trying to figure out why hundreds of ‘audio 0’ etc files are annoyingly listed in my ‘ringtones’ (and various other places you can choose to set sounds, eg alarms) when I just don’t want to see them. I had 750 of them in my ‘local songs’ and had to ‘hide’ them one by one! Arrghh!
I haven’t encountered this, Caroline. My guess is either that some third-party app (like Spotify) is responsible, or that you may have inserted an SD card from another phone that has accumulated all these files. Either way, I don’t think it’s an inherent “feature” of the P9.
A file manager app like X-plore or ES File Explorer would be an easy way to clean these up.
—
Chris