
RATHER THAN JUMPING RIGHT IN I used episode 1 of this Yamaha RX-V679 review/adventure to set the scene. Now let’s get physical.
Any neophyte unboxing the machine might at this point be forgiven to taking a long pause. A coffee break at the minimum. Because the moment you turn these AVRs around to look at the back you’re presented with something of a challenge.
Speakers and the Back Panel
It seems logical to start at the back, because until you’ve sorted out the connections here the RX-V679 is just an impressive-looking doorstop. Here’s what you’re confronted with:
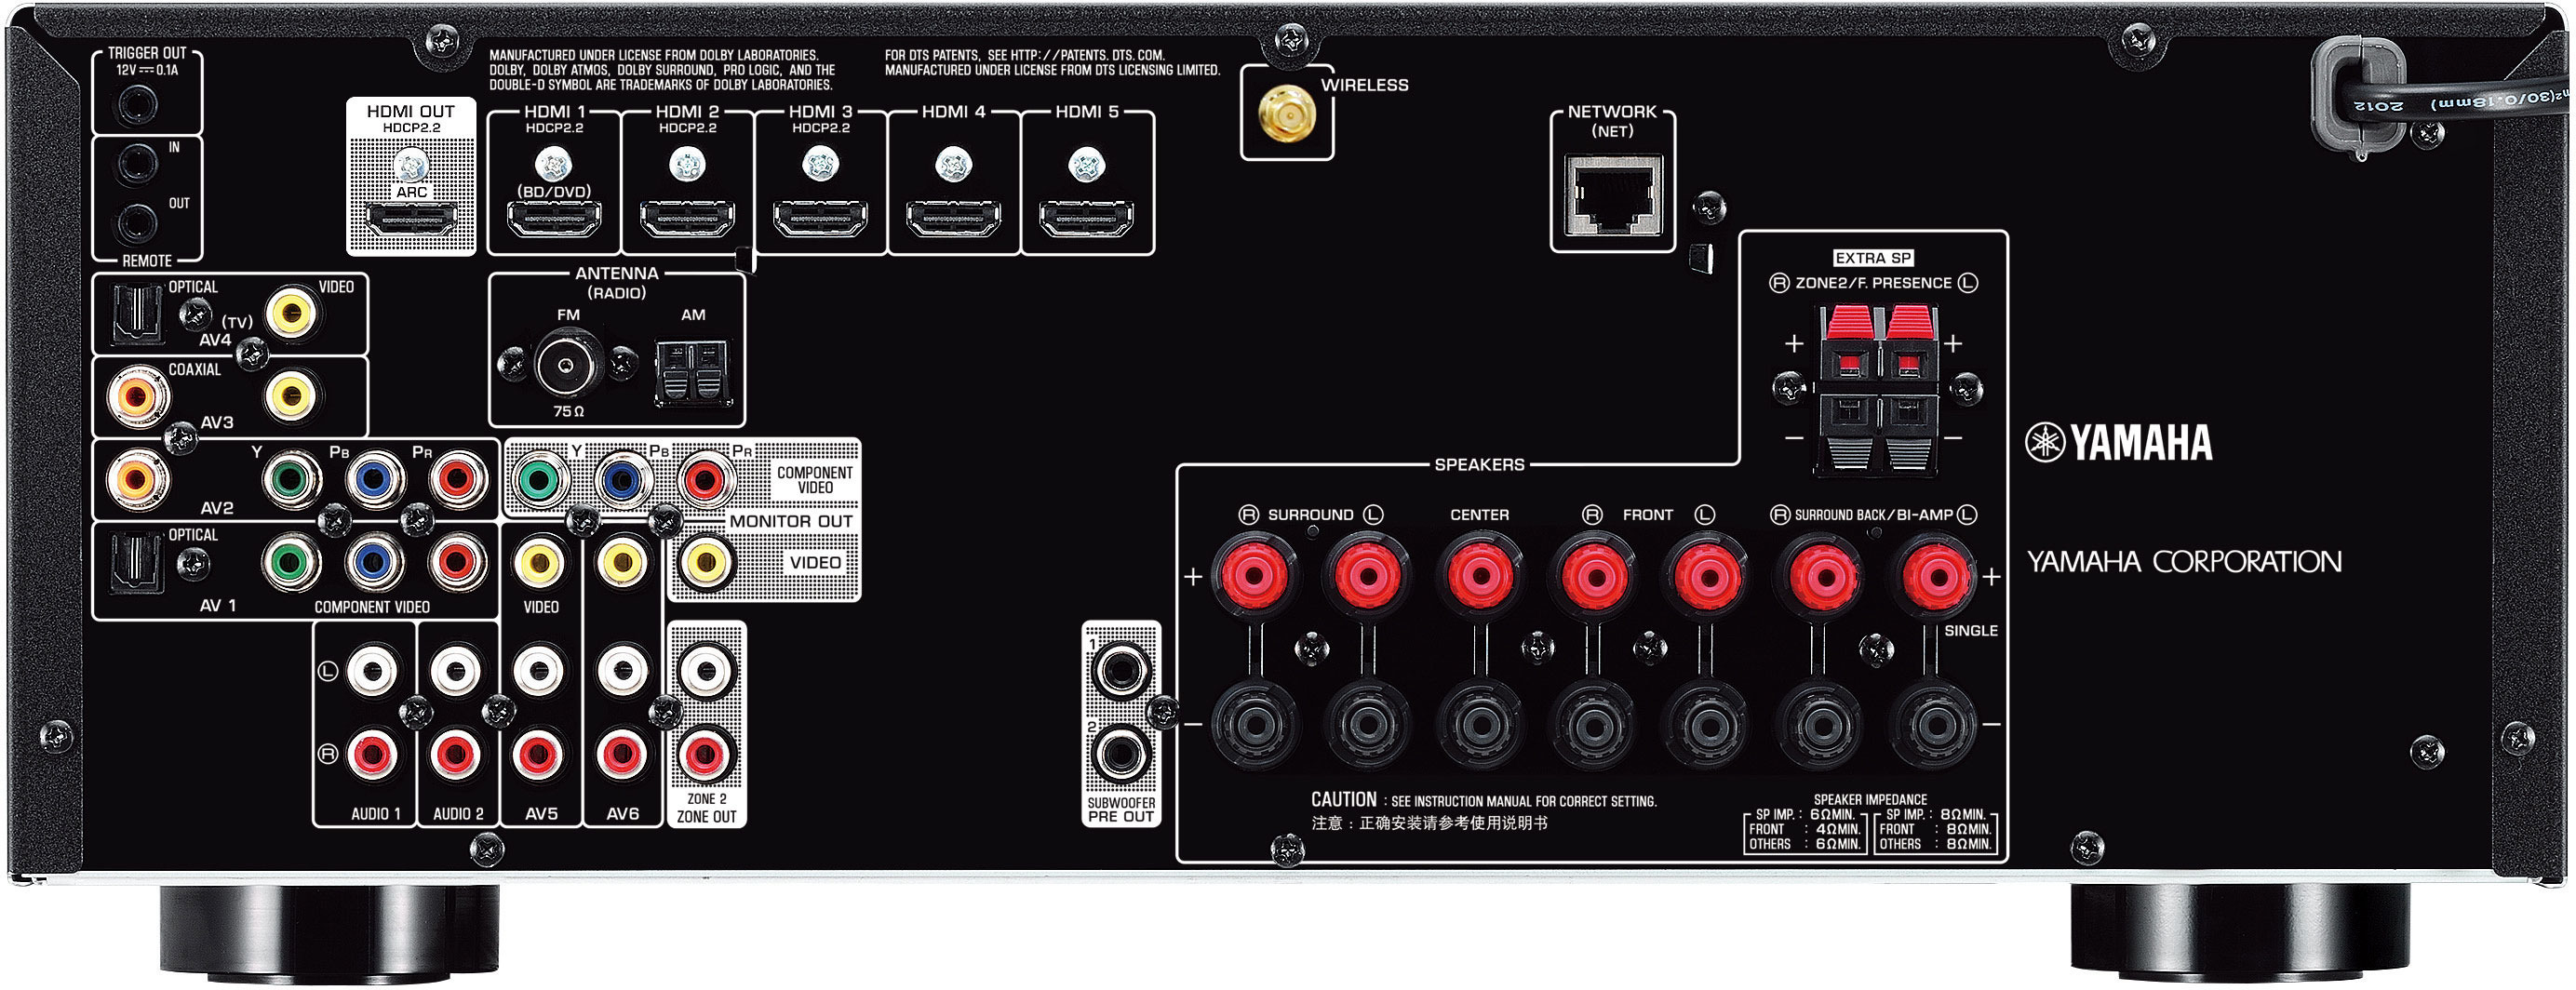
We’ll leave the inputs out of it for now, and concentrate on getting something out of this machine.
The L-shaped section marked “Speakers” is mostly self-explanatory. The two connections on the left, just outside the Speaker section, are where you wire in one or two subwoofers.
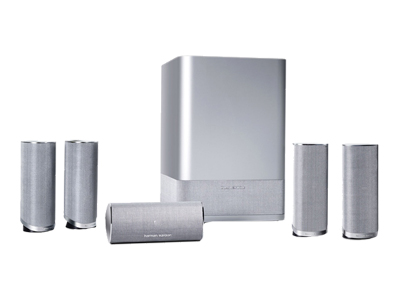
My Harman Kardon TS-11 surround speakers. Ten years old and still going strong.
The subwoofers need to be active – that is to say, have their own built-in amplification – and each will receive an identical signal. As the premise of the subwoofer is that it provides a non-directional output for low frequencies that in any case (unlike high frequencies) carry little or no directional information you might wonder why you’d ever need two of them. The reason is that low frequencies bouncing around your living room can set up “standing waves”. These manifest themselves as unpleasant booming sounds that peak at particular frequencies when they hit the resonance of your room. This can be minimised by careful positioning of a single subwoofer, but having a pair of them each emitting the same signal can provide much more effective standing wave elimination. In my own set up I’m using a single Harman Kardon sub-woofer and a set of five bookcase Harman Kardon front, centre and surround speakers.
Checking the labels on the RX-V679’s connectors (you can click on the picture to enlarge it) you’ll see there’s some ambiguity in the description of the output pairs labelled “Surround” and “Surround Back/Bi-amp”. If you’re just setting up a straight-forward 5.1 speaker system like mine, simply connect the Surround terminals to the rear speakers and ignore the second pair on the far right.
This 5.1 wiring arrangement feeds all the surround information into my two rear speakers. Actually this Surround channel that I’m using to feed the 5.1 rear speakers is a compromise combination of two channel pairs. If I were to use the Surround Back/Bi-amp connection for a full 7.1 set up this would split these two channels out, moving the Surround speakers forward to mid-points left and right of the viewer/listener, with the Surround/Back channel now playing into the rear speakers.
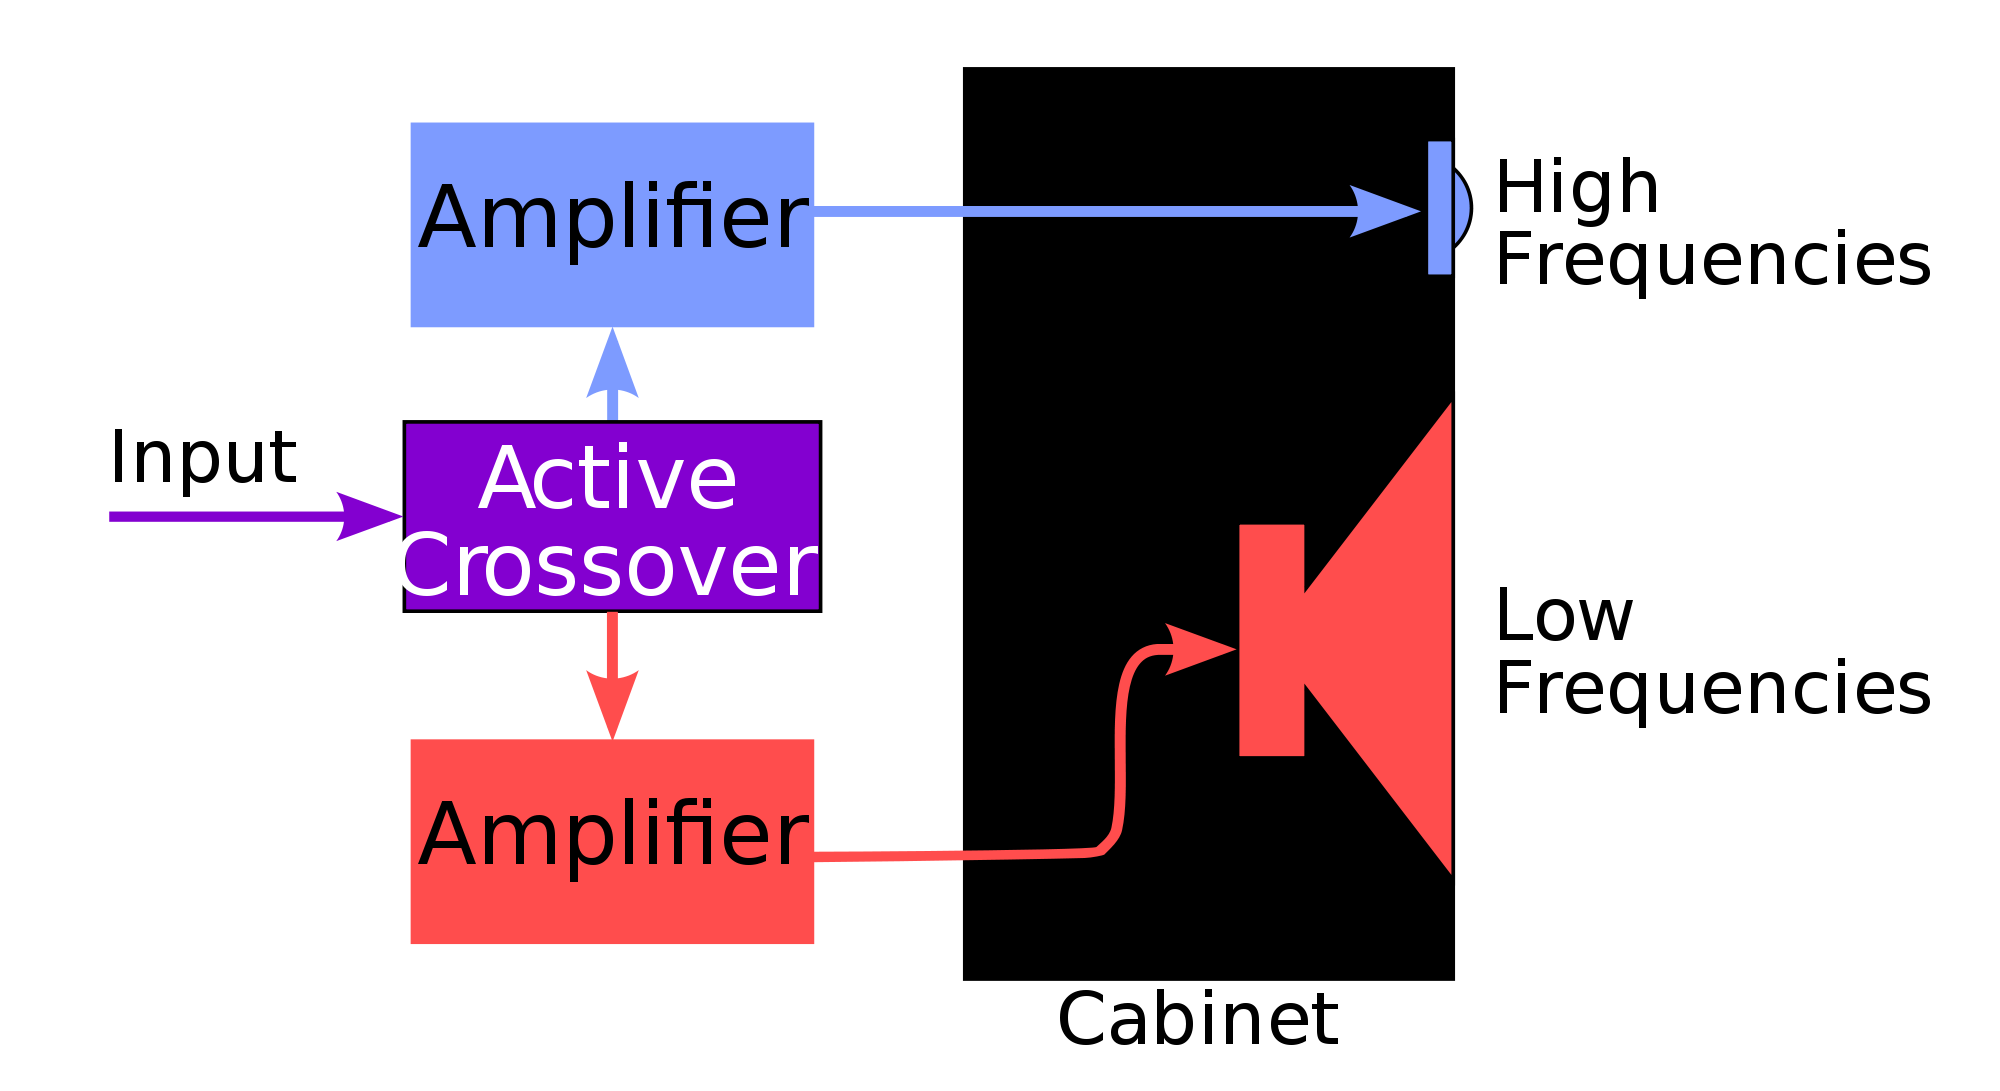
Bi-amping splits the signal into treble and bass at the pre-amp stage, each component being fed separately to the speaker through its own amplifier.
So what’s this “/Bi-amp” business then? The idea is that your two left and right front speakers may be large handsome costly beasts with separate treble and bass units. (Yes, even small speakers these days tend to have separate bass and treble transducers, and perhaps even tweeters, but they’re unlikely to be bi-ampable). If you’re driving each of these wonders of the acoustican’s art with a single pair of wires, the bi-amp lobby tells us, you’re not doing them justice. The bass and treble of each of these left and right speakers should be driven separately, with two wire pairs going to each speaker, each of the wire pairs connected to its own amplifier.
The RX-V679 can provide for this. It will confine you to a 5.1 system (because the two amps are no longer available for the extra speakers), and – if you lash out for, say, a pair of Dynaudio Excite X34 speakers which you’d be lucky to pick up for a grand each bi-amping might produce a discernible audio advantage. But we’re now invading the territory of the strict stereophonic audiophile, who would probably shoot you on the spot for daring to meddle with DSP-driven surround sound. So, in conclusion, it’s my feeling that at this mid-range level Bi-ampery is probably more like marketing finesse than something it’s worthwhile venturing into.
There’s one other speaker output to deal with, the “Zone 2/Presence” pair. Zone 2 means you can optionally send stereo audio output to a separate pair of speakers in another room – the kitchen, say. Alternatively the output can be used to add a second pair of front speakers to your 5.1 system, typically near ceiling height, to enhance the 3D effect.
So to summarise, the RX-V679 is essentially a 5.1 or 5.2 system with two spare pairs of amplifier channels that you can either ignore, use for wiring stereo to another room, adding presence speakers, bi-amping your two front speakers (fergeddaboudit), or, of course, going for the full 7.1/7.2 surround sound experience. This kind of flexibility is really valuable.
Hook up the supplied FM aerial into the section marked “Antenna”, use the tiny tuning buttons on the front panel (more about those later) to find a station, and confirm that the RX-V679 is alive.
Speaker Setup
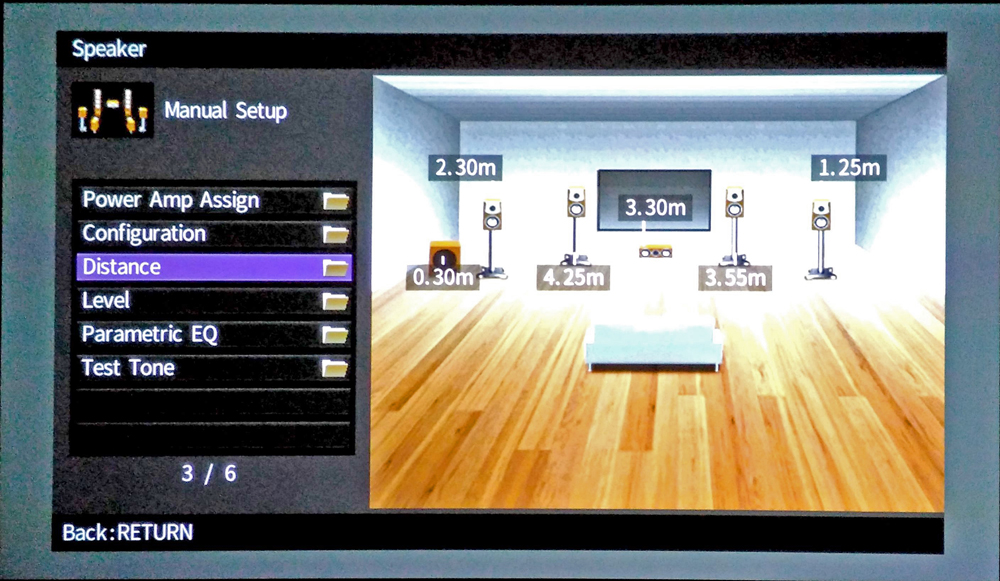
The on-screen speaker set-up lets you tell the RX-V679 exactly how far away each individual speaker is.
Balancing the various speaker outputs can be a delicate work of art. Or you can just leave it to Yamaha’s automated set-up system. It uses a mono microphone placed in the primary listening position while a series of test sounds are run one by one through the various speakers. The process, called YPAO (Yamaha Parametric Audio Optimisation), is designed to measure the acoustics of your listening room and adjust for speaker positioning and factors like over-bright reflections. It judges the distances of the speakers, balancing out the volumes and other acoustic properties in an attempt to optimise your listening experience.
Or, in Yamaha’s own slightly quaint phasing: “The YPAO function of the unit adopts the YPAO-R.S.C. (Reflected Sound Control) technology that enables to create natural sound fields like a room specifically designed for acoustic perfection.”
There’s a 3.5mm mono jack socket on the front panel provided for the sole purpose of plugging in this tuning microphone. With this microphone connected, the moment the unit is switched on it goes into the set-up mode. This is the point where my favourite line in the manual warns: “Test tones are output at high volume and may surprise or frighten small children.”
There are three starting points for the test depending on how you’ve wired your speakers. “Basic” assumes 7 channels with no bi-amping, with the spare channels used for a pair of presence speakers. These are maximum figures: if – as in my case – you’re only using 5.1 with no presence speakers the subsequent test will detect this.
The two other optional starting points allow for incorporating a second zone, or alternatively, bi-amping.
While the test is running an on-screen display shows the various speakers diagrammatically, highlighting each one in turn as the various test tones are emitted. Speakers the test finds not to be present (in my case the presence pair and the rear surrounds) vanish from the diagram. At the end of the run a report shows on the screen pointing out any problems encountered.
The report, frankly, could be rather more helpful. My screen showed “W-1:Out of Phase” and “W-3:Level Error”. As the test was examining feedback from each speaker in turn presumably it had learned which speaker was out of phase, and which one was responsible for the “Level Error”. But it wasn’t going to tell me.
According to the manual the “W” indicates that these are warning rather than error messages, even though the second was a warning about an error! The manual says of the first warning: “Depending on the type of speakers or room environment this message may appear even if the speakers are connected correctly.” Which rather leaves one in limbo.
It’s tough for an automated calibration tool to distinguish between the primary and reflected wavefronts if a speaker is too close to a wall. The recommendation if you get an “out of phase” warning like this is to try again with the speakers moved away from the wall, but in my case the speakers are actually mounted on the wall. So instead I carefully checked my wiring – it was fine.
I googled the “W-3:Level Error” message and found that users regard this as rather unreliable too, so I switched to manual set up. This gives the diagram of your existing speakers as discovered through the automatic test and shows the distance each one is from the listening point, along with its volume setting expressed in negative or positive dB, with a granularity of .5dB. These distances and loudness settings can be adjusted manually, and then, from the same menu, you can send a white noise test tone to each speaker in turn.
 Warnings apart, to my ears YPAO does a reasonable job of aligning the speakers. It’ll certainly get you started. But once you settle down to some real listening you’ll probably want (as I did) to get out your steel tape measure and tune the results by going into the on-screen setup to adjust each speaker manually.
Inputs
The RX-V679 has more inputs than you can shake a stick at – enlarge the back panel picture by tapping on it and count them all on the left hand side: five HDMIs along the top together with two component video and four composite video, two optical audio, two coaxial audio and four analogue audio. Oh, and there’s that extra HDMI socket on the front panel.
It seems to me you’re covered for pretty well anything you might want to pour into the device, but for now we’ll just concentrate on the HDMIs. I hooked my Viewsonic projector to the HDMI out and fed a Roku 3 and Amazon Fire TV into HDMIs 1 and 2.
I’m also connecting the device to my LAN. There are two ways to do this: wirelessly or via the Ethernet port that’s sitting up there above the L-shaped speaker section. As I have a nearby router with a spare port I’m inclined to go wired. But in the spirit of experiment I’m currently testing wirelessly connecting to the LAN. For this you need to screw the short “rubber duck” aerial supplied in the box onto the fitting marked “Wireless” you can see top centre in the rear view illustration above. Sadly there’s no provision for the new ultrafast 802.11ac, and Yamaha’s WiFi is only single band, but 802.11n at 2.4GHz is so far working flawlessly.
The LAN, using DLNA (more of that later) is going to be my primary way of sucking in music tracks. There are plenty of other ways of getting music tracks into the device which we’ll explore in the next episodes.
(to be continued)
Revised 13/04/2016, 10:08:25 to reflect the fact that unlike the previous model, the RX-V677, the front HDMI connector is not MHL compliant.
Brilliant work!! Thank you so much!!!
Hello,
I have this above receiver! I can’t get video through from cable to receiver to TV! Although I get sound through all speakers!!
Could someone have pressed a button to remove video?
We also have the hdmi connected to a hdmi booster! Which pushes the signal over the 50ft wire! I did not work without it!!
U think I would need another one of these? Some did splice the hdmi, cause we broke it!!
Apologies for not getting back to you sooner, Ken. I don’t really have enough information to respond usefully to your problem. Do I gather you’re connecting a cable TV set-top box to the RX-V679, and then trying to send the signal on to a TV?
What happens when you connect the set-top box directly to the TV?
—
Chris
I’m at the end of the rope. My set-up is: PC, TV (as a monitor), this 679 and a deck.
I want to be able to listen the 679 from my deck input while i’m using the PC (ergo the TV-monitor), but to switch sometimes to PC/TV sound. So, the HDMI’s should go from PC to TV-monitor then to 679 (otherwise when i’m listen to deck my TV-monitor will have no signal from PC).
For few days i was unable to have sound from deck when the PC was on. I discovered two things on 679: HDMI Control (off or on with options) and at HMDI inputs were you can set manage the sound source.
At first HDMI Control was overwriting my choice to hear the sound from Audio1 – the deck. The TV and Yamaha were talking to each other and TV was “winning”. Yamaha was either playing the TV sound or nothing.
Now i’m on the other extreme. I cannot hear The PC-TV sound through 679.
In the HMDI Control options, at TV Audio Input are NOT listed the HDMI inputs, you can choose only AV(x) and Audio(x)…
In any HMDI i’m connecting the signal from TV(monitor) the 679 won’t play it. And there are some curious things only when i choose the TV input(!): a. on the receiver screen the lights for speakers are down; b. using the remote button “info” – “audio decoder” the result is “Decoder Off”. I incline to understand that the DAC is shut off. And the TV is not seeing receiver as viable sound output more than few seconds.
I have no more ideas. Tried with ARC on/off, HDMI control / on/off… nothing.
I know that “end of my rope” feeling only too well, Liviu. I’ve learnt to tell myself, Come on, Bidmead—it’s only hardware. Sometimes (often?) the hardware simply won’t behave the way you think it should. It’s not necessarily a bug; it may just be that you’re trying to put the kit to a use the designer never intended or never thought of.
If you feel it’s a bug, I’m sure Yamaha would like to hear about it. Talk to the company that supplied the AV receiver, or your Yamaha representative. If you’re in the UK you could drop a line to simon.harknett@music.yamaha.com.
—
Chris
Chris, wondering if you still have this receiver now in Feb. 2019? Did you experience the low subwoofer output discussed across web? Ypao seems to attenuate the output, however, even with manual setup override or front panel base enhance dB settings, the output is quite low. Jamo 7.1 setup for speakers, powered 8″ jamo sub in use.
I can’t say I have noticed any difference in the subwoofer. But this may be because (as you’ll have seen from the posts here) I’ve been switching between different hearing aids. If you’re finding this a problem, you might want to rerun the Yamaha loudspeaker set-up to rebalance the output.
Chris Wray, the Yamaha exec who helped me with the RX-V679 in the early days has now left the company. If you’re in the UK you could drop a line to his replacement, simon.harknett@music.yamaha.com. If Simon can’t sort you out I’m sure he’ll be able to connect you with someone who can.
Let me know how that works out.
—
Chris
I appreciate the work you put into this.
I want to use 7.2 PLUS the zone 2 as height/presence. The settings for that are very confusing. It seems that config only works in certain DSP modes, with 3D enabled? And Neo:Music doesn’t seem to support it.
I never explored that aspect of the RX-V679 AV, probably because this was always something of a kluge with this level of technology. If you want real height it might be worth exploring Dolby Atmos.
—
Chris