
It’s time for some drive expansion.
We left the Terramaster F4-223 in part one with just two of the bays populated with a pair of 1 TB drives. But we’re using the BTRFS file system and have chosen Terramaster’s TRAID asymmetric RAID configuration.
If we’d chosen to use any of the conventional RAID configurations, to increase the size of our storage pool we would have had to fill the remaining two empty drives bays with matching sized 1TB drives. Larger drives would be an option, but their excess capacity over 1TB would simply be ignored.
Because of the way conventional RAID works, reserving drive space for redundancy (duplicating data across the drives) and parity (additional error checking), the maximum working capacity of the resulting 4-drive array would be just 2TB.
TRAID ignores the requirement for matching drive sizes and endeavours to make the best use of all the available space, while still providing redundancy and appropriate error checking.
Our initial two-drive configuration was no kind of a stress test for TRAID. As we’ve discussed, the optimal configuration it automatically adopted was identical to conventional RAID 1, where drive 2 simply mirrors all the data on drive 1. But now we’ll press on, adding a new drive to bay 3.
 Fishing around among the stock of drives we’ve accumulated over the years, we found a 6TB drive that had served time in our first QNAP NAS. Old drives like this aren’t optimal for a NAS. But you can certainly get started with them and, when the time comes, replace them with something newer. An added advantage with Terramaster’s TRAID* is that you can also replace them with something larger.
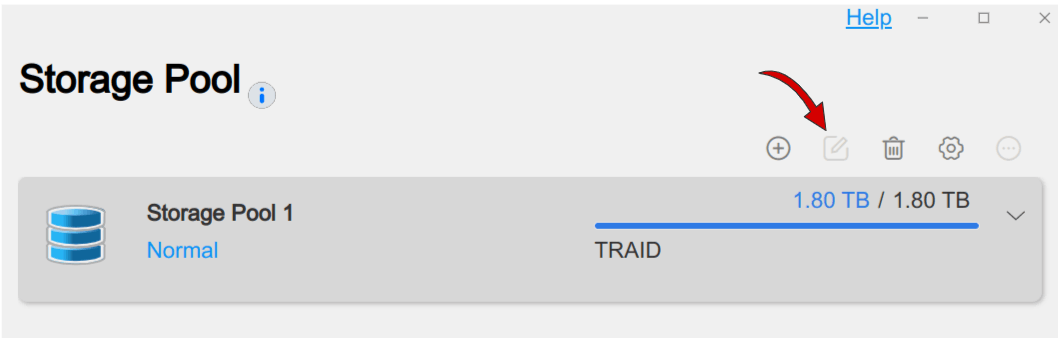
We followed the same procedure as the addition of the second drive, being careful this time not to hit the plus sign for creating a new storage pool, instead editing the existing storage pool to include the new drive.
We’d learned our lesson; but there was another lesson to be learned. Extending the storage pool, (a pop-up told us the process would take 157.2 minutes to complete) turned out not to produce any expansion at all of the existing storage. It was resolutely stuck at the old figure of 931.51GB.
When you’re messing around with unfamiliar technology it’s always a good idea to read the small print. TRAID was brand new to us. But its foundation in Linux drive management wasn’t and we should have known better.
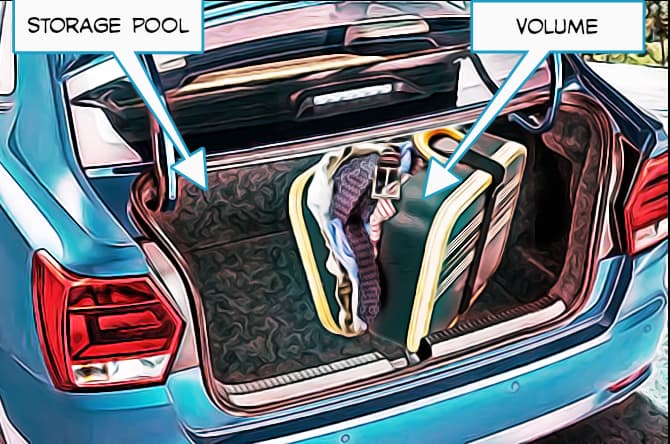
The storage pool isn’t where the data are kept. It’s where the volumes are kept. We were warned…

It’s there in that last sentence of the dialogue box. We’ve expanded the storage pool but the operating system stores its data in the volumes, not in the storage pool. We’ve bought ourselves a bigger car with a bigger boot (“trunk”, for our transatlantic readers). We’ve now got room there for a bigger suitcase, but we’re still stuffing all our possessions into the same old small suitcase.
Expansion
Once we’d grasped this, it was just a matter of switching to the Volume section of the Control Panel to adjust our existing volume to its maximum.
If you were expecting the addition of a 6TB drive to open up 6TB more capacity you would be disappointed. We knew enough about RAID systems to understand that a portion of the new drive space would have to be allocated to redundancy and fault-tolerance. But we still found the expansion to a mere 1.80TB something of a surprise.
Why was this?
Another lesson here. TRAID does its best to make the most of the available space while maintaining the redundancy and fault-tolerance to the extent that any one physical drive can fail without loss of data. It does this, in essence, by dividing up all the available drive space into equal sized chunks. Then it pretends that each of these chunks is an individual drive. Now it can apply one or more of the conventional RAID array strategies to this set of virtual drives.
Here’s what this looks like for a 5-bay NAS in this Terramaster-supplied diagram :
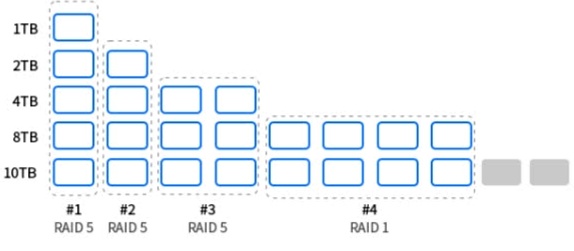
There are five drives in this TRAID configuration, ranging in size from 1TB to 10TB. This provides a total of 25TB of physical storage. The three RAID 5 arrays, #1, #2 and #3 yield, respectively, 3.5TB, 3TB and 4TB. The RAID 1 array, #4, of 8 (virtual) 1TB drives produces 4TB of usable space because the virtual drives are mirrored in pairs. Total, a fraction under 15TB.
A key point to notice here is that 2TB of physical drive space, greyed out on the 10TB row at the bottom, can’t be fitted into the any of the conventional RAID schemes. This space simply gets ignored.
But compare this with the amount of wasted space there would have been if any regular RAID configuration had been applied instead of TRAID. Each of the drives would be limited in capacity to the size of the smallest drive, and the deliverable space would only be what you see represented here as the RAID 5 array #1, 3.5TB.
…to increase the size of our storage pool we would have had to fill the remaining two empty drives bays with matching sized 1TB drives.
The key phrase here is “storage pool”. A perfectly respectable workaround for adding drives of difference capacity would be to create a second storage pool. But, again, running more than one storage pool in a 4-bay NAS is unlikely to optimise reliability and redundancy.
Obviously, this 3.5TB proposition isn’t a likely real-life scenario. A typical enterprise IT manager would throw out the drives and refill the bays symmetrically. A smaller business presented with this mismatched selection of drives without TRAID available would probably want to set up multiple storage pools, perhaps avoiding RAID altogether. The point about TRAID is that it can balance out an asymmetrical array of drives without much effort on the part of the punter.
Setting up our own three-drive array has been very easy. But as we’ve seen, TRAID seems to be throwing away a lot of drive space. The miscellany of drives in Terramaster’s TRAID example puts 60% of the physical 25TB to good use and in the process has to write off just 8% of it.
However, of our own total of 8TB only about 23% gets delivered by TRAID for data storage.
We really hadn’t known what to expect. Which is why the revelation that our 6TB drive had only brought 0.8TB of usable storage to the party gets classified under “Education” rather then “Disappointment”. We’re planning to do further drive swaps anyway once we’ve populated all the bays.
And it turned out that this 0.8TB storage increase did the job we were hoping it would. It was enough to get us out of trouble…
The Trouble with Syncthing
 Trouble? Were we in trouble?
Actually, yes…
We mentioned in part 1 that the two mirrored drives, with a total working capacity of just under 1TB, housed a growing collection of multimedia files. The growing collection had quite suddenly grown to the point where there was no more room on the NAS. Not because we’d been adding too many movie files. But because we still hadn’t grasped the true nature of BTRFS. Another lesson was in the offing.
The Films section of the directory structure set up for Plex looked something like this:
/Multimedia
   /Films
      /<Title of Film (Production Date)>
         <Film>
         <subtitle>
         <notes>
We also mentioned that the system was running a third-party synchronisation tool called Syncthing.
Syncthing is a very solid piece of software that synchronises files between two or more devices over the LAN or WAN. You can read all about it on the Syncthing Web site. There’s no official Terramaster version, but you can get a third-party implementation for Terramaster devices here.*
Or, rather, would have been if we’d understood more about how Syncthing works. Hopefully, we do now. But…
We discovered rather late in the day that although the directories for all our movies on the F4-223 remained intact, giving us a full list of movies with their respective production dates, some of the movies inside those directories had completely vanished!
Syncthing is a wonderfully flexible tool when used intelligently. Its default with paired directories is to keep them in sync, so that any change to one is reflected in the other. If you start, as we did, with a full directory on one machine and an empty directory on the other, the outcome will be pair of matching full directories. If you then delete a file from either directory it will be automatically removed from the other.
We concluded that what happened must have gone something like this:
- The initial synchronisation is started, creating empty “Title of Film (Production Date)” directories on the target QNAP.
- Syncthing then begins filling all those directories…
- …but the sync is interrupted for some reason.
So now we have a pair of directories, synced two ways, with identical sets of Title of Film subdirectories. Some of which are empty on one of the devices.. What do you think the next two-way sync is going to do?
Yes, it evens out the playing field by deleting all the unmatched film files in the other directory, leaving their directories in place.
So several of our films that failed to be synced during the aborted initial pass were gone forever?
The Trouble with BTRFS
Actually, no.
 Thanks to BTRFS the files were all still there. The filesystem’s copy-on-write strategy had left all the data intact. Syncthing had only deleted the directory signposts to the location of the data. And because we’d set up daily snapshotting of the entire Multimedia directory, Terramaster’s @snapshot directory still held all the data we needed to recover these files.
The question was, though, how best to go about making that recovery.
Terramaster’s official method is built into its Snapshot application. You pick the Restore tab from inside the app and hit the + button to create a new Restore Task. This offers you a list of all your (in our case, daily) snapshots and when you’ve picked one (in our case, dated the day before we started messing with Syncthing) you then choose where that snapshot is to be restored to. This has to be an existing empty directory.
Two key points here:
- You are restoring a whole directory. The Snapshot app doesn’t offer a way to restore single files or single subdirectories.
- No matter how large the directory you’re restoring, the process takes up very little extra disk space. It’s just restoring the metadata about where to find data that’s already on the disk.
We didn’t need the entire directory. So once the restoration was finished we picked the movie files we needed out of the target directory and copied them back into their rightful place inside Multimedia.
Which, as our volume was already pretty full, turned out to be another mistake.
Why? Because this is the point at which our limited remaining single terabyte of drive space* started rapidly disappearing. The film files that had turned up in the recovery directory were taking up no extra space (see point 2 above). But now we were making copies of some of those files. Each copy was a duplication, and certainly taking up new space.
Terramaster’s support crew tells me that the Snapshot app may be able to restore single files in a future version. That would certainly be very welcome. Meanwhile we’ve been experimenting with a variant of the process described above, using the Snapshot app to restore the snapshotted directory and then moving rather than copying the file from the restored directory to the desired new site.
Using the TOS 5 File Manager to make this move would normally either delete the source file or—if permissions didn’t allow deletion—abort the move. In this particular case of files in a snapshot-restored directory, neither of these things happens. The File Manager completes the move and the source within the restored directory remains undeleted.
Is there a catch? We haven’t found one yet and we’re waiting for Terramaster to confirm whether this is just another space consuming copy or a clean restore of the file, surfacing the original file data in the custody of the @snapshot directory.
Syncthing and BTRFS Redeemed
The trouble with Syncthing outlined above turned out to be just plain old user error. We plunged in without knowing what we were doing—which actually isn’t a bad strategy, as long as you’re not experimenting with critical data. You assume that an app is going to work in a particular way, only to discover it doesn’t. The big mistake is then to assume that there’s something wrong with the app.
A much more fruitful assumption is that the developer of the app is way ahead of you and you need to align yourself with their thinking. This certainly turns out to be the case with Syncthing.
There are three main ways that Syncthing can co-ordinate a pair (or more) of directories. We’ve described the default, which Syncthing describes as Send and Receive. But you can also set a Syncthing directory to be Send Only or Receive Only.
Clearly, in our use case, the Forbay Multimedia directory should have been set to Send Only and the copy on the QNAP to Receive Only. All changes on the Forbay would be then reflected on the QNAP. But if files mysteriously vanished from the QNAP they’d automatically be replaced.
Our problem with BTRFS wasn’t so much a misunderstanding as a general fog of not understanding very much at all. A WebUI like TOS 5—or, indeed, any modern graphical user interface—is a vast simplification of what’s really going on under the surface. A welcome simplification, in most cases, that saves us getting tangled up in technicalities. But BTRFS requires special consideration when it comes to apparently simple processes like copying and moving files and directories. We’ll have more to say about this later.
Filling that Empty Bay
If you’re keeping count you’ll know there’s one more achingly empty bay at the end of the row, wondering if and when… With some generous help from Seagate, we have a plan for it.
The catch is—A catch? Who knew?—that TOS 5 is preventing us from adding the new drive to the current storage pool. Here’s our bug report on this:
 Our F4-223 running the current version of TOS 5.1 has a successfully working storage pool of three drives (1TB+1TB+6TB) formatted as BTRFS in a TRAID array. We are trying to add a fourth drive to this storage pool, which contains a live volume but is not currently rebuilding.
Expected Behaviour: Editing the current storage pool (Control Panel/Storage Pool, select storage pool, using the Edit button) should allow us to add the fourth drive.
Actual Behaviour: Selecting the current storage pool leaves the Edit button greyed out. We are unable to edit the storage pool. Tested with two different drives in bay 4. Each drive individually accepted by TOS 5 and marked “Good”.
This is the bug report we lodged with Terramaster support. We expect tell you about a successful (and educational) resolution in part 3.
Chris Bidmead